
Share this page


What’s New in AccuRev 7.0.1
Highlights of the new developments in AccuRev 7.0.1 are presented here.
Version Browser: Highlighted Version Relationships and Show Promotion Path
The Version Browser has been enhanced with two new features to help the user visualize the flow of changes in the system: (1) highlighting of version relationship lines, and (2) the new Show Promotion Path operation.
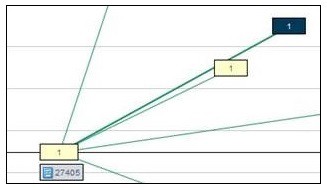
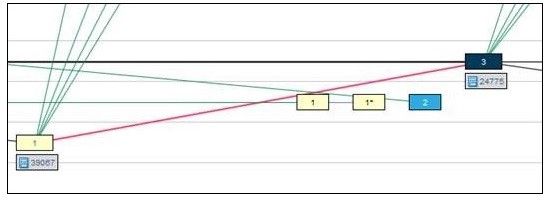
When the user clicks on a version to select it, the Version Browser now highlights the box representing that version and all lines leading directly from earlier versions to the selected version. The highlighted lines are drawn with a heavier weight line, but still in the appropriate color to identify the type of relationship. Two examples showing highlighted relationship lines follow:
Show Promotion Path is a new operation available in the context menu of versions that were created by a Promote or Demote operation. Show Promotion Path uses a solid orange line to display the sequence of promotions and demotions leading from a real (kept) version all the way to the selected virtual version. For example:
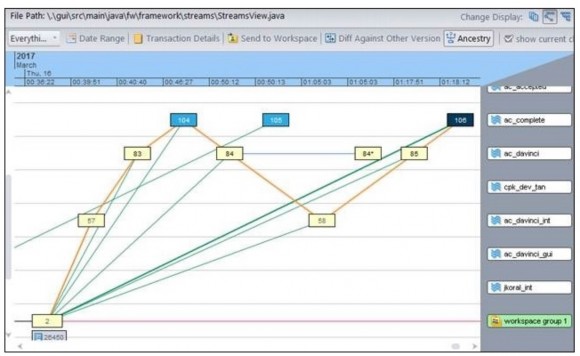
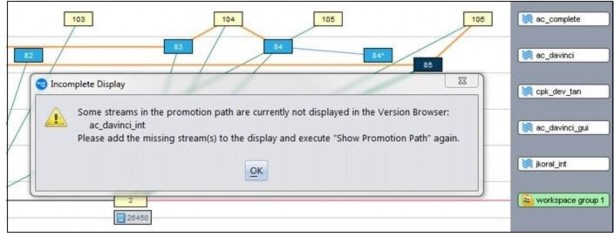
AccuRev will draw a horizontal line going off the left edge of the window if the left endpoint version is not displayed (due to the current transaction range or swim lane choices). If streams in the promotion path have been filtered out of the version browser display (causing the promotion path line to be discontinuous),
AccuRev will display a dialog telling the user which streams to add to the display in order to see the full promotion path:
The user can clear the promotion path from the display by doing one of the following:
- clicking Refresh View
- changing the transaction range
- executing Show Ancestry
- clicking on a different stream in the bottom panel of the version browser
Scrolling around the panel or dragging versions around the display will not make the promotion path disappear. This allows the user to move versions around to clarify the display.

Sync Stream Wizard in the GUI
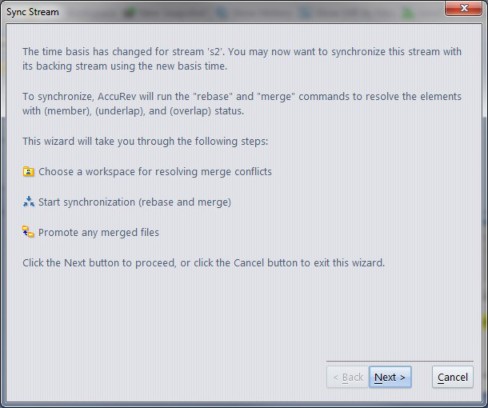
When a stream’s time basis is modified, there may be newly visible changes in the backing stream that need to be merged with the changes in the time-based stream. The new “Sync Stream wizard” in the GUI takes care of this situation by running rebase and merge operations to sync the stream with its backing stream. This wizard is invoked automatically when the user changes a stream’s time basis in the Stream Browser. It can also be invoked manually on any stream by clicking the Sync button in the File Browser view.
The Sync Stream wizard first runs the rebase command to resolve elements with (member) and (underlap) status. If the stream contains any files with (overlap) status, the wizard then executes the merge command, resolving any merge conflicts in a workspace that is selected by the user. Autokeep is automatically enabled, so trivial conflicts are resolved and kept without requiring user input. As its final step, the wizard prompts the user to promote all the resolved conflicts from the workspace up to the stream.
The initial screen of the Sync Screen wizard looks like this:
Styling Individual Issue Fields in the Schema Editor
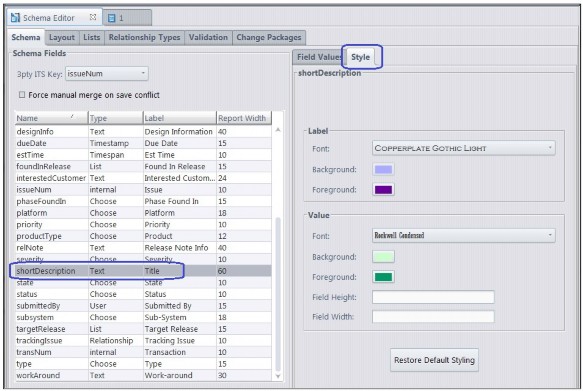
Previous releases of AccuRev provided limited abilities to style AccuWork issues – the administrator could only specify the colors to be used for all field labels, required field labels, and the issue background. Release 7.0.1 enables more extensive styling of individual issue fields. Depending on the type of the issue field, it may be possible to specify the font style and foreground color for the field label and the field value, as well as the background color for the field value. For certain types of fields, the width and height of the value can be specified too.
Styling of an issue field is done in the new Style subtab of the Schema Editor’s Schema tab. The Restore Default Styling button gives the user the option of returning to the default styling parameters for the current issue field.
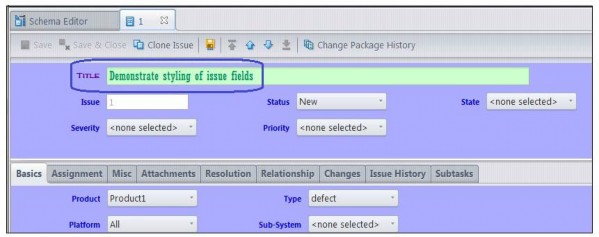
The following screenshots depict how one might style the “Title” issue field and the resulting appearance of the field:
Crucible Connection in the GUI
The AccuRev GUI now supports integration with Atlassian Crucible servers via a new AccuRev feature called Crucible Connection. This integration improves developer productivity and alleviates performance issues native to the Atlassian Crucible server related to creating and modifying code reviews using the Crucible web browser and accessing the web application. By using the REST API provided by the
Crucible application and the AccuRev Plugin for Crucible, the AccuRev GUI can now integrate with Crucible by using HTTP and secure HTTPS connections (i.e., TLS v1.2).
Note: Crucible Connection works with Crucible 4.1.2 using AccuRev Plugin for Crucible version 2017.1. The AccuRev Plugin for Crucible must be installed as a managed add-on for the Crucible server in order for Crucible Connection to work properly; the plugin allows Crucible to interact with the AccuRev server.
To enable the Crucible Connection feature, enter Crucible server and user information in the Code Review panel of the AccuRev GUI’s Preferences dialog. If the “Enable code review integration” checkbox is selected, the GUI displays new menu items in various views to send active file changes, transactions, and/ or issues to “New Reviews” and “Existing Reviews." Crucible project and review information is retrieved from the Crucible server and is filtered in the GUI based on the depot that is active in each AccuRev view.
Archive Enhancements
Release 7.0.1 introduces two new convenient ways of dealing with files that either need to be archived or have already been archived. The first helps to identify which files the user would benefit most from archiving, and the second provides a mechanism by which the AccuRev server can access an archived file without actually unarchiving it.
Identifying Which Files to Archive
An administrator who wants to free up disk space can execute the maintain verinfo command on the server to identify which files to archive. Each time a file is modified and kept, a new version of that file is created and stored on the server in a “storage container file.” The verinfo command indicates, for each element on the system, how many different, unarchived versions of the element are currently in storage and the total amount of space occupied by all of those storage container files. The results are sorted in descending order of amount of space occupied; therefore, the best candidates for archiving (i.e., those whose storage containers use the most disk space on the server) are returned first.
The verinfo command is also available on the client side via accurev verinfo. This enables administrators to issue the verinfo command from any client machine instead of having to login to the AccuRev server machine.
Accessing an Archived File
Sometimes a storage container file that has already been archived is required again. A user might want to patch an old issue that requires that container file, or perhaps he just wants to see how that file changed over time using annotate or diff. Whatever the reason, he needs a way to gain visibility to the content that was in the archived file.
The unarchive CLI command could be used to restore the archived storage container file to its original location in the depot’s file storage area. However, the container file’s status would change from archived to normal, and the user might then need to re-archive the file if he no longer needed it.
Release 7.0.1 offers a simpler alternative – a new trigger called server_archFiles_trig, which provides a way to access an archived file on an as needed basis, without unarchiving the file. When installed, the trigger gets called whenever a container file is missing from the depot’s storage location. The trigger is passed the name of the depot and the file being accessed, along with the file’s original storage path. The trigger can be written to access the data directly from the archive location and copy that data into a
temporary file that the server can access. That temporary file only exists for the duration of the command that required access to the file content. A sample script is included in the examples folder.
License Management Enhancements
License management has been enhanced in several ways in 7.0.1. The following sections describe how.
Master License Server
If you have multiple AccuRev master servers, one of those servers can be configured to be the master license server, which serves licenses to all of the other master servers.
During a fresh 7.0.1 install or an upgrade to 7.0.1, the installer asks whether license information should be obtained from a local license file or a remote license server. On the machine that is to be the master license server, select the local license file option.
On the other master server machines, select the remote license server option. You will then be prompted to enter the following values for the remote license server:
- Host: The host name of the AccuRev master license server (which will serve licenses to the other master servers)
- Port: The port that the master license server is configured to listen on (typically port 5050)
- Username: The name of a user configured on the master license server. This username is used to ver- ify that the local master server is authenticated and authorized to request licenses from the master license server.
- Password: The password for the Remote License User account on the master license server
Note: When one of the master servers is configured as the master license server, then all of the master servers must be configured such that either:
- SSL is enabled on the master license server and all the AccuRev master servers that obtain licenses from it
or:
- SSL is disabled on the master license server and all the AccuRev master servers that obtain licenses from it.
Sharing Licenses Across Clients
Each master server uses its own pool of licenses, but within a single master server, licenses are shared by user name. This means that if a single user logs into the same master server from many different clients, he still consumes only a single license. However, if that same user logs into a different master server, a second license is consumed for that second master server login.
Replica Server Installation
The installation process for a replica server no longer prompts for license information. Replica servers do not need to be configured with licenses because they get their license information from the master server they are replicating.
User Account Credentials on Master License Server
If the user account credentials on the master license server are modified, the other master servers can be updated via the maintain utility:
- maintain setcnf REMOTE_LICENSE_USER <user_name>
- maintain setcnf REMOTE_LICENSE_PASS <user_password>
These settings are stored in the acserver.cnf file on the local master server. The password is encrypted in the same way as the DB_PASS password for accessing the PostgreSQL database.
“accurev licenses –fxv” Output
The output of the accurev licenses –fxv command has been enhanced in the following ways:
- The last_renewed_time attribute in the user tag has been renamed to last_accessed_time for clarity.
- A new host attribute in the user tag identifies the master server that the license was checked out for.
- A new port attribute in the user tag identifies the port that the master server is listening on.
- A new type attribute in the license tag distinguishes between “floating” and “named” licenses. (Currently only floating licenses are sold.)
Here is an example of the enhanced output:
<acResponse>
<licenseCounts>
<license
name="AccuRev"count="250"
usage_count="1"
type="floating"
min_checkout="1440"/>
<user
name="testuser1"
host="myhost"
port="5050"
checkout_time="2017/05/08 11:11:03"
last_accessed_time="2017/05/08 11:18:17"/>
</license>
</licenseCounts>
</acResponse>


