
Share this page


What’s New in AccuRev 7.4
Highlights of new developments in AccuRev 7.4 are captured here. The following sections describe the new AccuRev Git Server, hosting of client-side triggers on the AccuRev server, how to define read-only Log entries in a schema, changes in overlap resolution, and several enhancements to the AccuRev GUI and CLI.
Help Center
We've updated our Help Center Home page with a new fresh look.
Let us know what you think: Send Help Center Feedback
AccuRev Git Server
AccuRev 7.4 introduces the AccuRev Git Server, a new web application that enables developers to clone, push, and pull source code to and from AccuRev depots and streams using Git or any Git-compatible IDE or desktop application. Using the Git Server’s web interface, developers can browse for project repos, select stories to work on, and perform peer code reviews. Team leads and administrators can configure the Git Server, create new repos, view user access permissions, and read and download repo access logs.
The AccuRev Git Server offers the following benefits over the AccuRev Git Client, which was introduced in release 7.2:
- Requires no client-side software other than Git version 2.18 (or higher)
- Supports branches and tags
- Provides Git users with a full transaction history from AccuRev from the time that the AccuRev Git Server was instantiated
- Performs better than the AccuRev Git Client
Overview
The AccuRev Git Server is included in the AccuRev 7.4 full server and web server installs. No installation is required on client machines. The Git Server sits between Git users and the AccuRev server, and it interacts with AccuRev through the AccuRev Git Client. The Git Server is configurable via a web interface, and it has no dependency on triggers.
AccuRev streams are accessed using Git HTTP/S URLs. The system administrator creates a Git repo for an AccuRev stream, and then users can clone that repo. The Git Server supports task-based development using AccuRev change packages -- in both the web interface and the CLI, users can select issues to associate with push operations.
The commit history is shared between AccuRev and Git users. Commits on the master branch are pushed to the AccuRev stream corresponding to the Git repo and are visible in stream and element histories.
Conversely, a fully materialized transaction history from AccuRev is visible to Git users -- the Git Server creates commits to reflect the changes inherited from upstream changes or from crosslinks. (This requires that the NOTIFICATION_LEVEL in acserver.cnf be set to 15.) The “git log” command shows the full history since the Git repo was created.
Access control over Git repos is based on AccuRev stream ACLs. Access logs, visible to Administrators in the web interface, provide an audit trail of clone, push, and pull operations.
Pulse Code Review, initially introduced in release 7.3, is also included with 7.4 full and web-only installs. It enables users to easily conduct code reviews on AccuRev issues (change packages). Code reviews are accessible through Pulse’s web interface, and also through the AccuRev GUI (AccuWork) and the AccuRev Git Server web interface. The Git Server displays the latest status of code reviews for issues in a repo’s change package.
Developers
To work with the AccuRev Git Server, a Git user must have an AccuRev account. Users can clone AccuRev streams using Git HTTP/S URLs. Using the web interface, they can set up change packages so that subsequent “git push” commands are associated with the configured issue(s).
Logging In
Log in to the AccuRev Git Server’s web interface at <host>:<port>/git-server using your AccuRev user credentials:
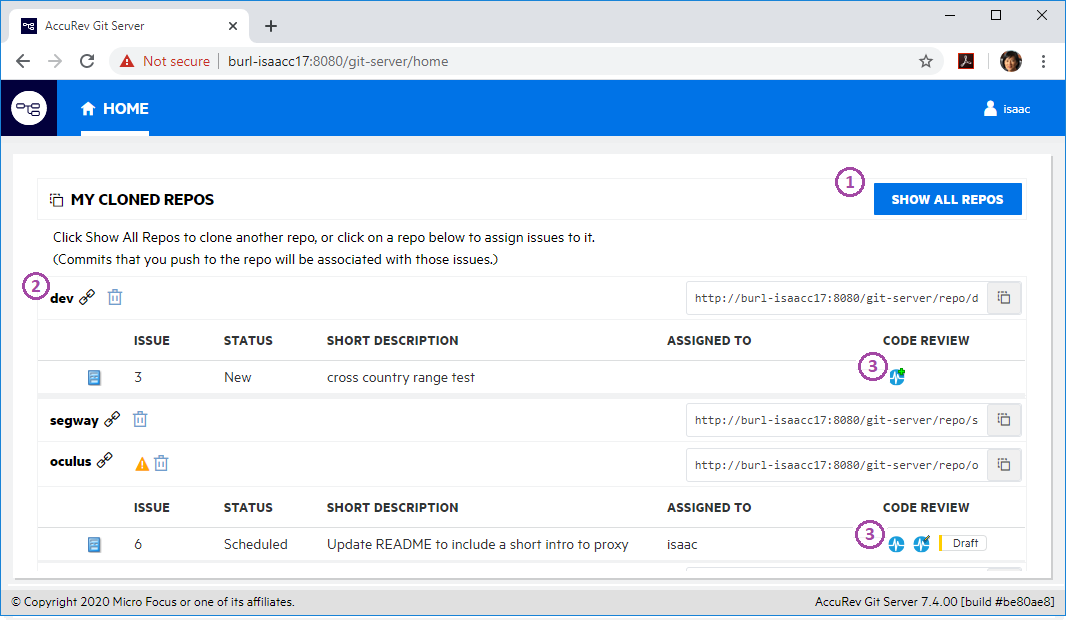
Home Page
The Git Server’s home page displays the Git repos that you have cloned on your local system, along with the issues that you have selected to associate with commits pushed to those repos.
You can do the following on the Home page:
- Click the SHOW ALL REPOS button to go to a page where you can clone another repo.
- Click on a repo name to manage what issues are associated with commits pushed to that repo.
- Click one of the Pulse code review icons to create a new code review, update an existing code review, or open a code review in the Pulse web interface.
All Repos Page
The All Repos page displays all the repos created from AccuRev streams that are ready to be cloned by Git users. On this page, take this action to clone a repo:
- Click the Copy URL button and then execute “git clone <paste URL here>” in your Git work- space.
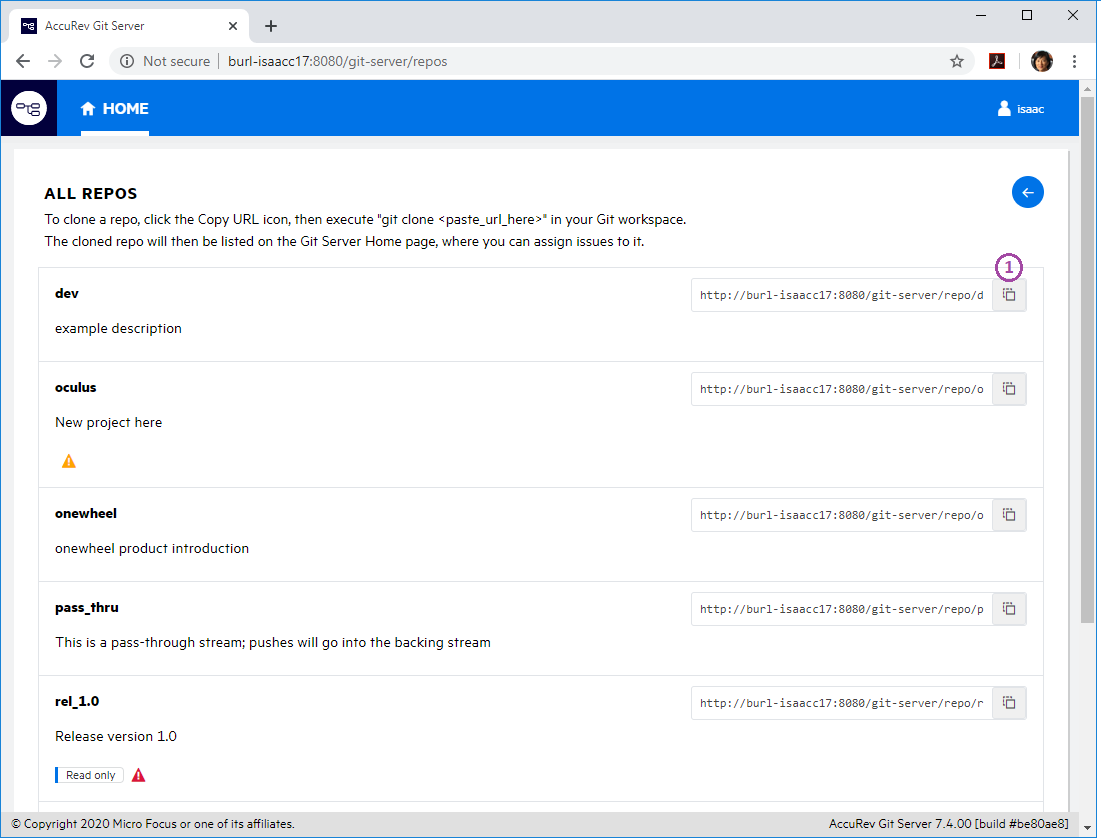
The cloned repo will then be listed on the Home page.
Issues Page
Clicking on a repo name on the Home page brings you to the Issues page, where you see issues that are, or can be, associated with commits that you push to the repo. The selected issues are used for subsequent pushes to the repo until they are de-selected on this page.
You can do the following on the Issues page:
- Click a checkbox to select or de-select an issue.
- Click the issue icon to view the issue in the AccuRev WebUI.
-
Click the ‘X’ next to an issue number to remove that issue from the list of selected issues.
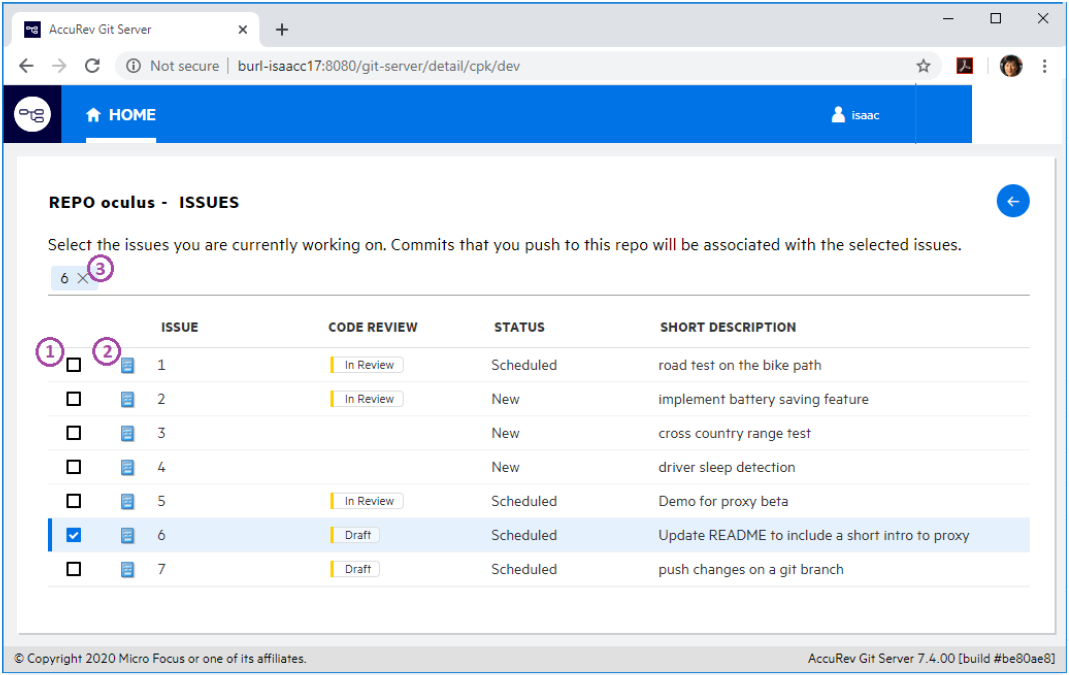
Note: Admin: The columns in the table are configured in the Change Package Triggers part of the schema for the AccuRev stream from which the repo was created.
Pulse Code Review Page
From the Home page, you can open a Pulse Code Review for an issue associated with your cloned repo. The files under review are listed on the left side of the page. On the right side, you can click on different tabs to see code diffs and comments from reviewers.
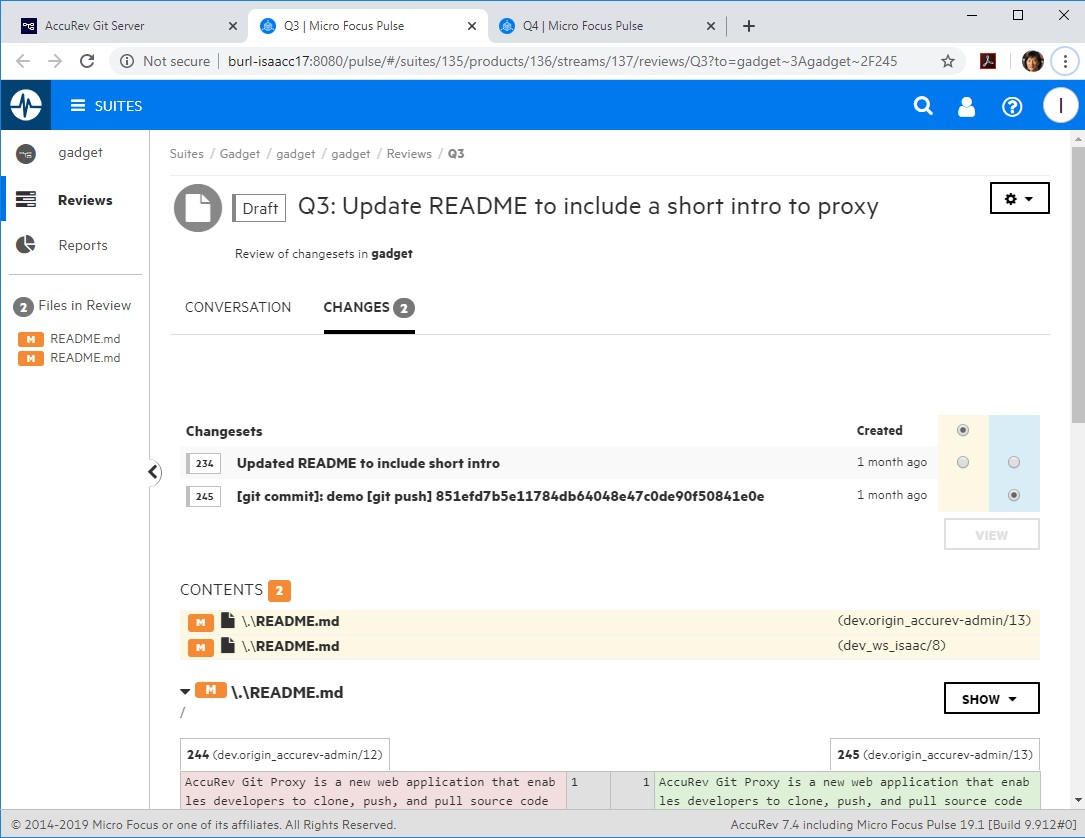
For more details on Pulse Code Review, see PulseUno Code Review and Configure AccuRev with PulseUno Code Review
Administrators
Administration of the AccuRev Git Server is simple and fast. No changes to AccuRev triggers or security (users, ACL, EACL) are required.
Important Notes:
- Initial configuration of the Git Server must be done by the accurev-admin user, which must first be created in AccuRev. After the initial configuration, any member of specified admin groups can create repos from streams, view ACLs, and review diagnostics and repo access logs in order to debug problems.
- Git version 2.18 or higher must be installed on the system by the normal OS means. None of the AccuRev installers installs the native Git software.
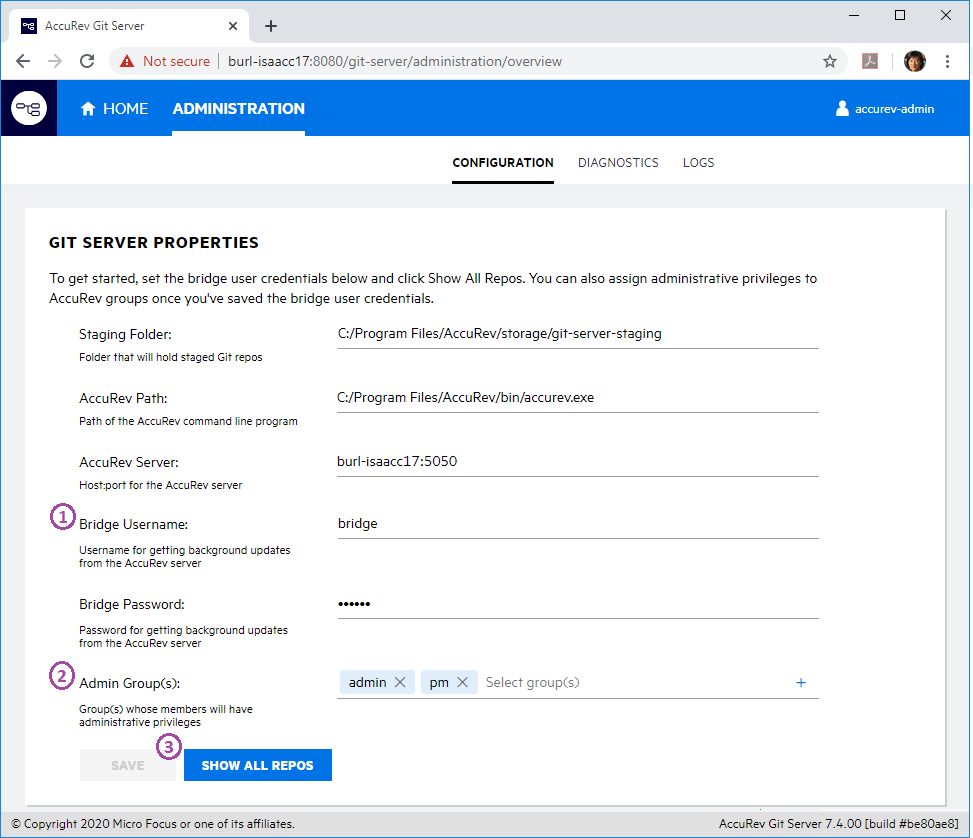
Configuration Page
The accurev-admin user must login at <host>:<port>/git-server and perform these tasks on the Administration Configuration page to get the Git Server ready for use by developers:
- Set up an AccuRev user in whose name the Git Server will get background updates from the AccuRev server. This AccuRev user is known as the bridge user.
- (optional) After saving the bridge user credentials, specify AccuRev groups whose members will have administrative privileges in the Git Server.
- Click Show All Repos to create repos that developers can clone.
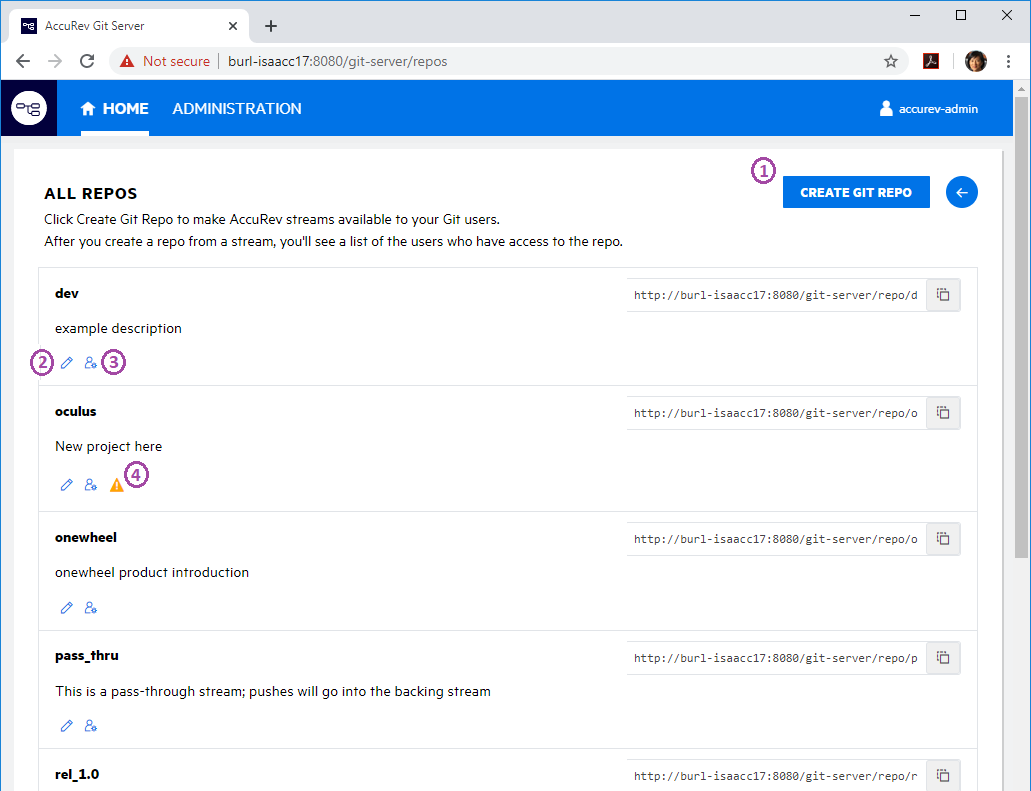
All Repos Page
The All Repos page displays all the repos created from AccuRev streams that are ready to be cloned by Git users. On this page, an administrator can:
- Click the Create Git Repo button to create a repo for users to clone.
- Click the Edit Description button to modify a repo’s description.
- Click the Show ACL button to see what groups and users can access a repo.
-
Click a warning or error icon to find out about overlap in a stream or a failed push to the repo.

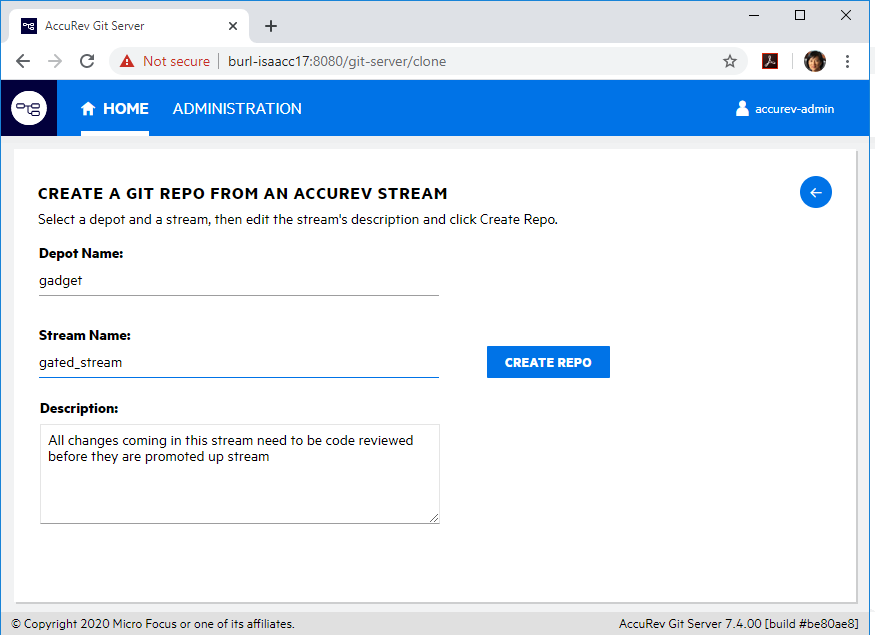
Create Git Repo Page
On the Create Git Repo page, an administrator can create a repo from an AccuRev stream in a selected depot. They can also write a description for the repo, which will help developers find the repo that they want to clone. After clicking the Create Repo button, the administrator sees a list of all the AccuRev groups and users who have access to the new repo. (Access is dictated by stream ACL settings in AccuRev.)
Diagnostics Page
The Administration Diagnostics page facilitates finding and fixing problems when the Git Server is not working as expected. It displays installed system software versions, along with the minimum versions required. Any value that does not meet the required minimum is flagged with a clickable error icon. The page also shows connectivity status for receiving background updates from AccuRev.

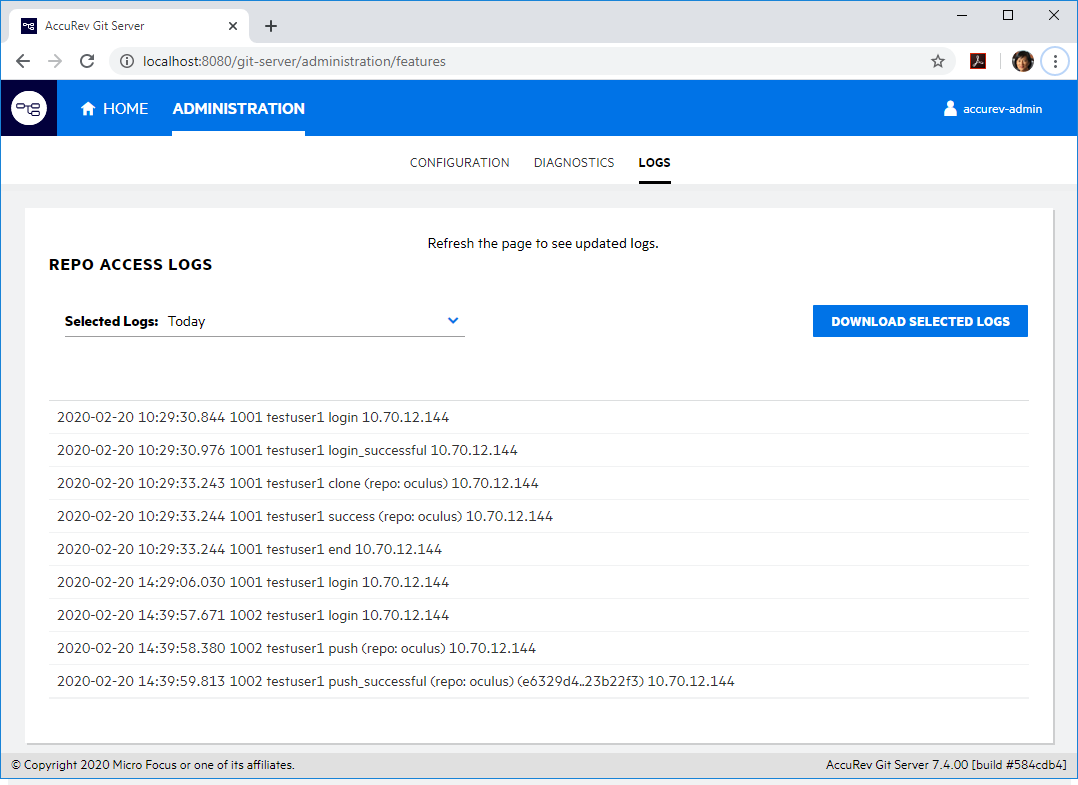
Logs Page
The Administration Logs page displays repo access logs for clone, pull, and push operations. Logs can be downloaded to the local file system.
Known Issues: Git Server
This section describes known issues in the AccuRev Git Server.
Cannot create a Git repo for a stream whose name contains spaces
In AccuRev 7.4, it is not possible to create a Git repo for a stream whose name contains spaces. This issue will be fixed in the next AccuRev release.
AccuRev Git Server is not supported on CentOS 6
The AccuRev Git Server is not supported on CentOS 6 because the underlying AccuRev Git Client requires glibc v2.14, and CentOS 6 only supports glibc v2.12. If your AccuRev server is installed on CentOS 6, you can provide support for Git users by doing a separate AccuRev Web Server install on a different platform and having it connect to the CentOS 6 AccuRev server.
In Chrome browser, cannot stay logged in to Git Server web interface
Due to a recent update in the Chrome browser, you might find that after you login to the Git Server, you are quickly bounced back to the Login page. To work around this Chrome issue, take the following steps:
- Uninstall Chrome.
- Remove the Chrome folder, e.g., C:\Program Files (x86)\Google\Chrome on Windows.
- Download and re-install Chrome.
-
Set these two Chrome flags to Disabled, then relaunch the browser:
chrome://flags/#same-site-by-default-cookies
chrome://flags/#cookies-without-same-site-must-be-secure
Note: This problem has been fixed in AccuRev 7.5, so the workaround can be removed once you have upgraded to 7.5.

Hosting Client-Side Triggers on the AccuRev Server
AccuRev 7.4 supports hosting of client-side triggers on the AccuRev server; the triggers are downloaded to client machines at execution time. This allows administrators to manage client-side triggers at a central location on the server. Triggers can be an executable or interpreted files (Perl, Ruby, Python, BASH, bat...).
If a client-side trigger returns with an exit code of zero (0), indicating success, the AccuRev command finishes executing. If, however, the trigger fails to execute (e.g., because a required Perl module is not on the AccuRev client machine), a message stating why the trigger failed is displayed in a dialog box. A non- zero exit code causes the AccuRev command to fail.
How to Configure Client-Side Triggers to Be Hosted on the Server
-
In the depot triggers folder on the server, create an OS platform context folder for every client plat- form that you want configured to use client-side triggers. There are currently six supported plat- forms. The staging folders representing these platforms are:
<ac-install>/storage/depots/mydepot/triggers/x64_win<ac-install>/storage/depots/mydepot/triggers/i386_nt<ac-install>/storage/depots/mydepot/triggers/x86_64_linux<ac-install>/storage/depots/mydepot/triggers/i386_linux<ac-install>/storage/depots/mydepot/triggers/x86_64_solaris<ac-install>/storage/depots/mydepot/triggers/ub_macosx (only for 64-bit binaries)
-
Trigger Files
There are five types of client pre-action triggers that can be staged. The trigger file must be placed in the OS platform folder on the server that corresponds to the client platform where the trigger will run, and it must have one of the following names:
- pre-create-trig
- pre-keep-trig
- pre-promote-trig
- pre-demote-trig
- pre-promote-change-packages-trig
As an example, if you have a trigger that should execute on macOS clients whenever a promote occurs, you should stage that pre-promote-trig trigger on the server in <ac-install>/storage/ depots/mydepot/triggers/ub_macosx.
-
Trigger File Extensions
For Windows, use one of the following file extensions for the triggers:
- .exe
- .com
- .bat
- .cmd
For all other platforms, use one of the following:
- .pl
- no file extension at all
The search order for trigger file extensions is as listed above. If you stage both an .exe and a .bat trigger on Windows, the .exe trigger will be used, and the .bat trigger will not be used.
Details About Client-Side Trigger Execution
If the pre-action trigger is staged properly on the server, the staged file for the client platform is downloaded to the client the next time the trigger needs to execute. That file is stored in the workspace’s top hidden .accurev folder. It is downloaded only if the existing file on the client is not executable or if it has been updated on the server in any way (new extension, new size, new CRC). For example, the trigger staged on the server in C:\Program Files\accurev\storage\depots\mydepot\triggers\x64_win\ pre-create-trig.bat will be downloaded to the workspace the first time a user executes the accurev add filename command from a 64-bit Windows client.
The downloaded trigger file remains in the .accurev folder until either:
- it is updated by a subsequent download because it’s time to execute the trigger again, but the staged trigger file has been updated on the server, or
- it is deleted by the AccuRev client because it’s time to execute the trigger again and the staged trigger file has been deleted on the server.
Staged trigger files override the "accurev mktrig" configuration. However, if no trigger is staged, the AccuRev server falls back to using the existing trigger that was configured with mktrig, if one exists.
Schema: Read-Only Log Entries in an Issue
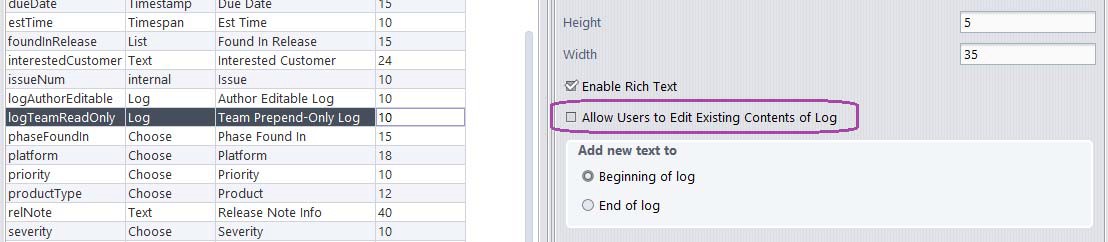
In AccuWork, Log-type schema fields can now be configured to prevent users from editing past log entries in the field. To make a Log field’s old entries read-only, uncheck the Allow Users to Edit Existing Contents of Log checkbox for that field in AccuWork’s Schema Editor.
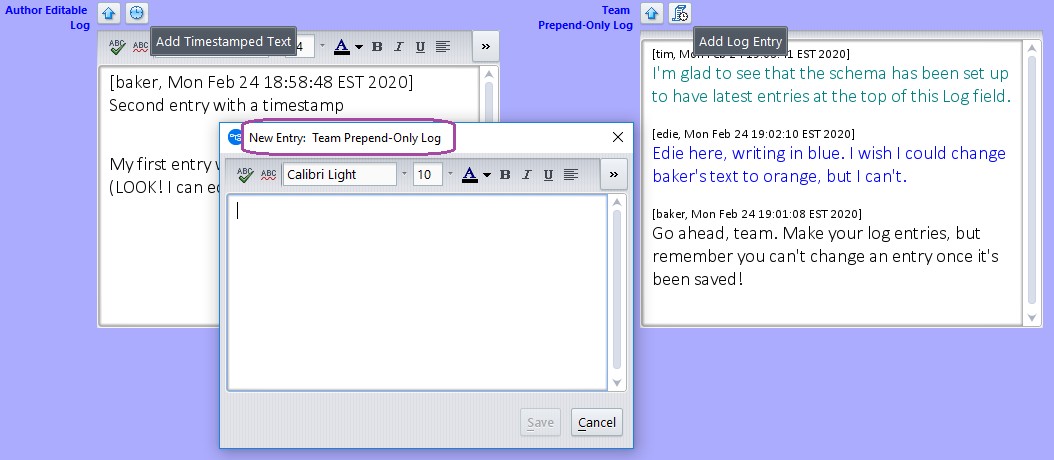
If the checkbox is unchecked, the Log field itself is read-only in AccuWork. You can click the log entry icon and type a new log entry into the modal “New Entry” dialog that is displayed. When you click the Save button in the dialog, your new entry is displayed either prepended or appended (as configured) to the existing log contents in the read-only Log field.
Up until the time you save the issue, you can click the log entry icon again to modify the log entry that you created earlier. The entry’s contents and timestamp are updated when you click Save in the Edit Entry dialog. Once you save the issue, however, it is no longer possible to edit previous log entries.
When a pre-7.4 schema is edited in the 7.4 Schema Editor, existing Log fields are displayed with the checkbox checked. That is, existing entries in those Log fields will continue to be editable unless the administrator manually clears the checkbox and saves the schema.
Eliminating Issue Dependencies and Variants Created By Merges
How the Merge Operation Has Evolved
Suppose you’ve been working on a fix for an issue and you’ve modified and kept multiple files in your workspace. However, before you can promote the files to your issue, your colleagues promote conflicting changes for other issues into the backing stream. Since your workspace files now have Overlap status, you must do a merge, combining each file’s workspace version with the parent stream’s version to create a new, merged version. After the merge, the changes in your workspace are a combination of your original changes for your bug fix and changes made to resolve overlap between the various issues. What issue(s) should you promote your merged files to?
Sometimes users have resorted to promoting against a brand new issue just to document the fact that they needed to resolve overlap. That action, unfortunately, creates new dependencies among the issues involved in the merge. AccuRev 7.3 helped to eliminate those unnecessary issue dependencies by enhancing the merge algorithm to automatically send overlap resolution to the appropriate issues. This algorithm, however, created new variants of the issues being merged. Sometimes it created variants of issues that were in the backing stream, causing issues that had been promoted to appear active again.
Release 7.4 includes a further enhancement to merge that eliminates the creation of issue variants. Whenever it is necessary to resolve overlap in the backing hierarchy, AccuRev performs what is called a rebased merge. The changes in your workspace are merged into the changes in the parent stream, and the results of the merge are kept in a new version. AccuRev keeps track of the overlap resolution details without needing to create variants for issues in the backing stream or in the workspace.
Version Browser: New Rebased Merge Ancestry Line
The Version Browser in the 7.4 GUI and the WebUI displays a rebased merge line in light gray, in contrast to a regular merge line, which is displayed in red.
A rebased merged version, which results from resolving overlap in the backing hierarchy, has:
- a black Ancestor line leading to the real version that was promoted into the parent stream, and
- a light gray Rebased Merge line leading to the workspace version that was merged into the parent stream’s version.
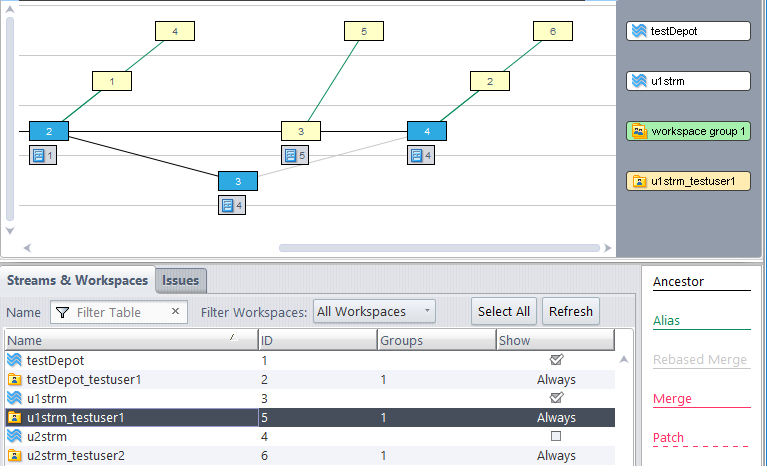
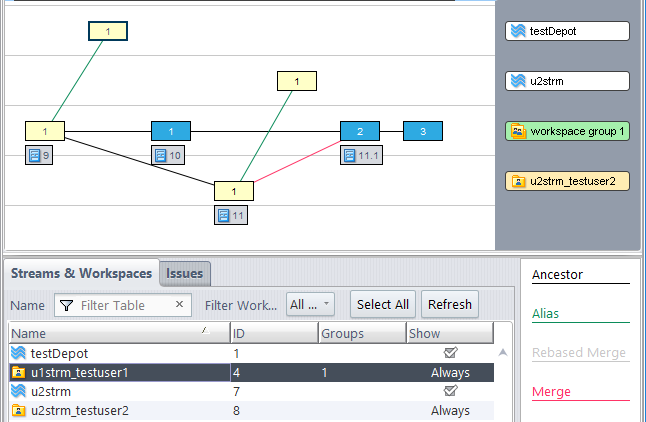
For example, the following Version Browser screenshot shows the version tree of Package.java after this sequence of actions has occurred:
- testuser1 edited Package.java to fix issue 4. She did a Keep of the file in her workspace, followed by Send To Issue for issue 4.
- testuser2, working on issue 5, edited Package.java and promoted his change to issue 5. That Promote caused Package.java to have (overlap) status in testuser1’s workspace.
- testuser1 switched to Conflicts mode in the Workspace Explorer and merged testuser2’s changes with her own changes. This operation was a rebased merge because it resolved overlap in the backing hierarchy. The rebased merge did not create variants of issue 4 or issue 5.
- testuser1 promoted her fix for issue 4 up the stream hierarchy.
Contrast that with a regular merged version that results from a cross-promote in the presence of conflicting changes. That type of merged version has:
- a black ancestor line leading to the most recently kept version in the workspace, and
- a red merge line leading to the real version that was promoted into the source stream of the cross- promote; this version was merged into the workspace version.
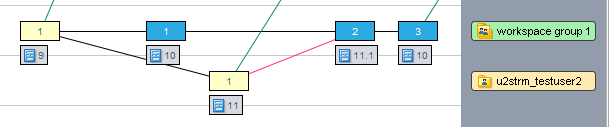
Here is an example of a regular merged version:
- testuser1 edited Contents.java to fix issue 10. She did a Keep of the file in her workspace, followed by Send To Issue for issue 10.
- testuser2, working on issue 11, edited Contents.java and promoted his change to issue 11. u2strm is not in the backing stream hierarchy of u1strm, so this Promote did not cause overlap in testuser1’s workspace.
- testuser1 cross-promoted issue 11 to her workspace to get testuser2’s changes. This operation was a regular merge because it did not resolve overlap in the backing hierarchy. This regular merge created variant 11.1 of issue 11.
- testuser1 made another small change to Contents.java and then did a Keep of the file again.
New Promote Option to Promote Unaffiliated Changes to an Issue
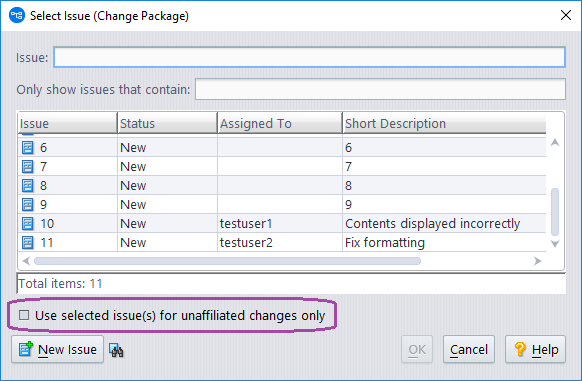
When you do a Promote in the 7.4 AccuRev GUI, you will see that the Select Issue (Change Package) dialog contains a new checkbox labeled "Use selected issue(s) for unaffiliated changes only". If you check that checkbox, then only the versions that have not yet been assigned to an issue will be promoted to the issue(s) you select in the dialog. Using that option helps to keep issue dependencies to a minimum.
Using the checkbox allows you to send only your own workspace changes to an issue, even if you’ve merged other issues into your workspace.
Let’s go back to our regular merge example from the preceding section and consider what happens when testuser1 promotes her fix for issue 10. In workspace u1strm_testuser1, version 2 was created by the cross- promote operation and was assigned to issue variant 11.1. Version 3 contains some of the changes for issue 10, but they haven’t been assigned to an issue yet; therefore, version 3 contains unaffiliated changes.
Suppose testuser1 now promotes Contents.java and selects issue 10 in the Select Issue (Change Package) dialog:
- If she selects the Use selected issue(s) for unaffiliated changes only checkbox and clicks OK, then the Promote operation will assign version 3 to issue 10. Issue 10 will include the fixes for issue 10, but not the merged changes from issue 11.
- If she clears the Use selected issue(s) for unaffiliated changes only checkbox and clicks OK, then the Promote operation will assign versions 1, 2, and 3 to issue 10. Issue 10 will include the fixes for issue 10 and the merged changes from issue 11.

GUI Features and Changes
Please see Version Browser: New Rebased Merge Ancestry Line and New Promote Option to Promote Unaffiliated Changes to an Issue for descriptions of changes in the Version Browser and in the dialog for promoting to an issue, respectively.
Stream Diff (Issues) View Displays Only Real Issue Differences
The GUI’s Stream Diff (Issues) view (displayed by the Show Diff By Issues operation) now hides issue differences that only exist to merge or patch an issue into a new context. A variant that was created by AccuRev in order to merge/patch an issue will not be displayed as an issue difference unless more changes were added to the variant after the merge/patch. A new checkbox labeled “Show all issue variant differences” allows you to see those "merge/patch only" version differences in the Stream Diff (Issues) view if you really want to.
Stream Browser: New Expand/Collapse All Buttons
The Stream Browser in the AccuRev 7.4 GUI supports new Expand All and Collapse All operations on streams. Holding the Ctrl key down while expanding a stream (Ctrl-left-click on the stream’s ‘+’ button) expands that stream and all of its descendant nodes so that the entire stream hierarchy rooted at that stream is visible.
Holding the Ctrl key down while collapsing a stream (Ctrl-left-click on the stream’s ‘-‘ button) collapses that stream and all of its descendant nodes. Note that if you then expand that stream by clicking ‘+’ without holding the Ctrl key down, only the immediate child streams will become visible; each of them will still be collapsed.
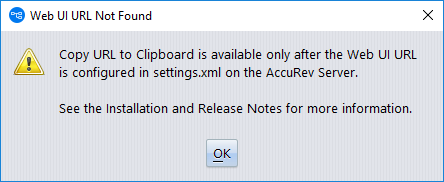
You can now send someone a link to a file by clicking on the GUI’s new Copy URL to Clipboard item in the file’s context menu. This copies the file’s URL to the system clipboard. You can then paste the URL into an email or code review request, etc. The person who clicks on the link will be prompted to login to the AccuRev WebUI; after login, the file will be displayed in whatever way the browser sees fit. The file will not be displayed in a tab of the WebUI.
Note: This feature requires that the webui url be configured in <ac-install>/storage/site_slice/ dispatch/config/settings.xml, e.g.:
<webui url="http://server3:8080/accurev"/>
If it is not, you will see this popup:
GUI Log File
The GUI log file, accurev.log, is now written to the user’s .accurev profile directory so that administrator privileges are not required to write to the file.
CLI Changes
AccuRev 7.4 supports new options for the show streams command and the include/exclude commands, and it also supports four new commands: isallowed, show allowed, show denied, and lsmarks.
show -k [(]<workspace,normal,snapshot,gated,staging,passthrough>[)] streams
To limit what kinds of streams are included in show streams output, use the new -k option with a comma-separated list of the desired stream types, e.g., -k normal,snapshot. You can use spaces or tabs as separators, instead of using commas, if you surround the list of types with double quotes, e.g., -k "normal snapshot". To exclude specific kinds of streams from the output, surround the list with parentheses, e.g., -k (normal,snapshot) or –k ("normal snapshot").
New “-c <comment>” option for clear, incl, incldo, excl commands
With the new –c option, you can now write an explanatory comment when you change include/exclude rules. The AccuRev GUI also provides a dialog for entering a comment with these operations.
isallowed -u <user> -s <stream> [-p <depot>]
Use the new isallowed command to check a user’s stream ACLs. The command returns 1 if the specified user is allowed to access the specified stream, and 0 otherwise.
show -s <stream> [-p <depot>] [-fx] allowed
The new show allowed command identifies the users and groups that are allowed to access the specified stream. The returned list of users and groups is fully expanded – every user that is a member of an allowed group is included in the XML output. If the -fx option is specified, the XML output is formatted like this:
<AcResponse Command=”show allowed” TaskId=”123”>
<Principal name=”mike” id=”1234”></Principal>
<Principal name=”dev” id=”12” isGroup=”true”></Principal>
</AcResponse>
show -s <stream> [-p <depot>] [-fx] denied
The new show denied command identifies the users and groups that are not allowed to access the specified stream. The returned list of users and groups is fully expanded – the XML output includes every user who is (a) a member of a denied group and (b) not a member of any explicitly allowed group. If the -fx option is specified, the XML output is formatted like this:
<AcResponse Command=”show denied” TaskId=”123”>
<Principal name=”mike” id=”1234”></Principal>
<Principal name=”dev” id=”12” isGroup=”true”></Principal>
</AcResponse>
XML Command Changes
Input Request Changes
The issuediff XML input command has a new show_variant_diff attribute. If this attribute is set to ”true”, then the issuediff output includes differences that exist only because two versions were merged together. If it is set to ”false” (the default), the output excludes those differences.
Motivation for the new show_variant_diff attribute:
When a merge happens, the resulting version is technically a variant of all of the issues that were merged into the basis version. If any of those issues were already in the version history, the new version is not actually adding those issues into the stream again. By default (show_variant_diff=”false”), the AccuRev GUI does not display such variants in the issuediff result set. This makes it easier for a user to verify that all of the issues they wanted merged or patched into other streams are not “missing” from those streams.
The cpkdescribe XML input command also supports the new show_variant_diff attribute, but the attribute defaults to ”true” for cpkdescribe.
Output Changes
In the XML output for the hist command, if a merged version was created by AccuRev to resolve overlap, the new rebased attribute is specified, i.e., ‘<version rebased=”yes”>’. This tells the Version Browser to display the new light grey rebased-merge ancestry line for overlap resolution. (See Version Browser: New Rebased Merge Ancestry Line.)

