
Share this page


Including and Excluding Files
By default, workspaces and streams contain a copy of each file in the parent stream when they are created. A stream might contain hundreds or thousands of files, however, of which you might need or want only a subset. If you are a developer working with, say, core libraries, you might not want source files used by your team’s GUI developers and technical writers in your workspace, for example.
This section describes how to use the Explorer mode’s Include/Exclude View to choose the subset of directories and files you want to make available in a given workspace.
Displaying the Include/Exclude View
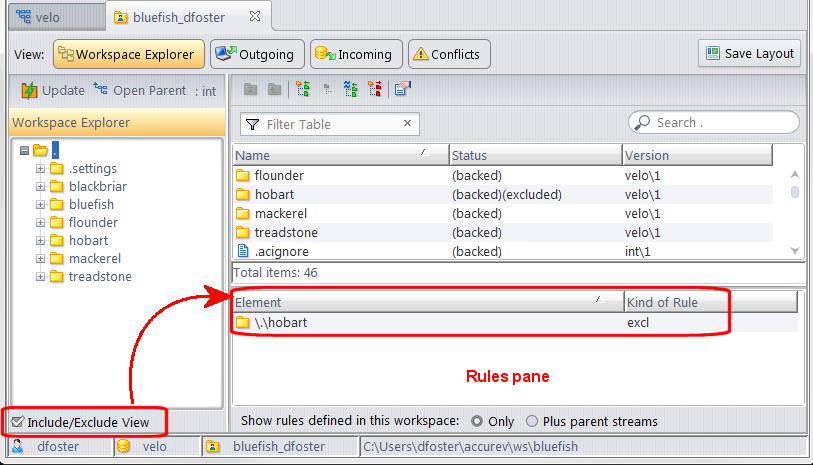
To display the Include/Exclude View, select the Include/Exclude View check box at the bottom of the Explorer pane.
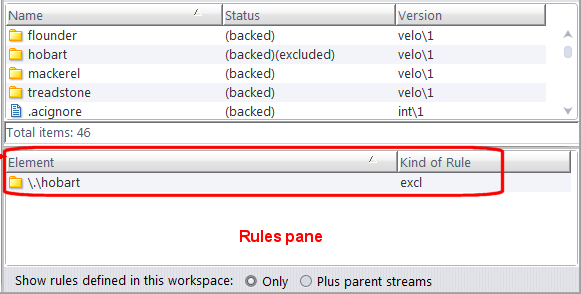
When the Include/Exclude View is active, AccuRev adds another pane to the Details pane. The Rules pane displays any elements for which an include/exclude rule has been defined, as shown in the following illustration. If you are viewing a workspace or stream for which no rules have been defined, the Rules pane is empty.
Tip: The Include/Exclude View check box setting is saved as a user preference in AccuRev’s preferences.xml file. The setting is applied to all workspaces and streams you subsequently open in the File Browser, though you can change it any time you wish.
By default, AccuRev displays all include/exclude rules defined directly in the current workspace or stream. If you want you can also display include/exclude rules:
- Inherited from streams higher up in the stream hierarchy, if any. This option is not applicable to the root stream.
- Defined in child streams, if any. This option is not applicable to workspaces.
When you select one of these display options, AccuRev adds a Set in Stream column to the table in the Rules pane to help you see where a given include/exclude rule was set, as shown in the following illustration.
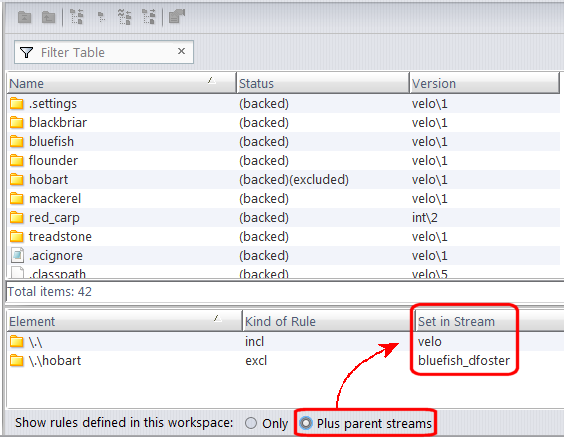
See Including and Excluding Files for more information.

How Include/Exclude View Affects the File Browser Display
In Include/Exclude View, both the Explorer and Details panes show all elements in the workspace or stream. For example, if the top-level directory hobart is excluded, it still appears in both the Explorer and Details panes in Include/Exclude View, as shown in the preceding illustration. You can navigate into an excluded directory as you would any other. Its elements will have a status of (backed)(excluded).
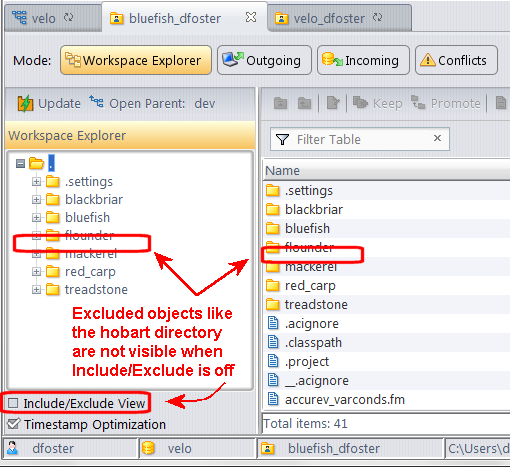
Excluded directories and files are not displayed in the File Browser when Include/Exclude View is turned off, however — notice that the directory hobart does not appear in the following illustration:
Changes to Toolbar and Context Menu
In the Include/Exclude View, the Details pane toolbar and context menu change to support operations associated with this view — setting and removing include/exclude rules. A few of the standard toolbar buttons remain, to aid you in navigating the depot and determining element history. Commands for typical AccuRev operations — Keep, Promote, and Merge, for example — are not applicable in this view, so they are not displayed.
Setting Include/Exclude Rules
This section describes include/exclude rules and how to add and remove them.
Types of Rules
AccuRev supports the following include/exclude rules:
![]() Include
Include
Make the selected elements appear in the workspace or stream. If you specify a directory element, the entire subtree below it will appear in the workspace or stream, too.
As usual, the particular versions that will appear in the workspace or stream are the ones inherited from the backing stream.
![]() Include Directory Only
Include Directory Only
Make the selected directory elements, but not any of the elements within the directory, appear in the workspace or stream. You can set additional Include or Include Directory Only rules to make part of the directory's contents appear.
The Include Directory Only rule enables you to include files and directories that are deep in a depot’s directory hierarchy, without having to include lots of other, unwanted elements. If you include a file or directory that is several levels below an include-only directory, AccuRev automatically creates the necessary Include Directory Only rules required to "dig down" to the level of the desired data.
Example:
A depot contains a tools subdirectory, which contains a src subdirectory, which contain a scripts subdirectory, which contains two subdirectories, perl and python. If you need only the python subdirectory, not the rest of the tools subtree, use these commands:
- Set the Include Directory Only rule on tools
- Set the Include rule on python
In the Rules pane, note that AccuRev automatically creates "incldo" (Include Directory Only) rules for the intermediate directories, src and scripts.
![]() Include from Stream
Include from Stream
Establish a cross-link, making the selected elements appear in the workspace or stream. Instead of inheriting versions of the elements from the backing stream (as with the Include rule), inherit the versions from the stream you specify in the Basis Stream dialog.
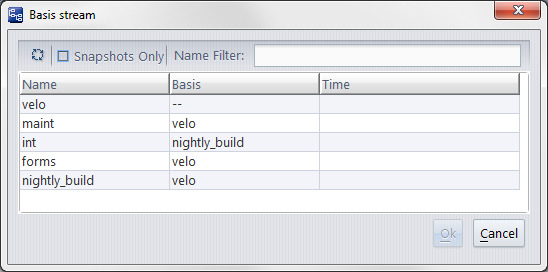
Use the toolbar to filter the streams shown in the dialog.
Note: For cross-linking to succeed, the element must have been present in the selected Basis Stream at the time your workspace was last updated. In a time-based stream, you cannot create a cross-link to another time-based stream (or to a snapshot) whose basis time is 'in the future' with respect to your stream.
- The Refresh button contacts the AccuRev Server to refresh the list of streams displayed in the Basis Stream dialog box.
- The Snapshots Only checkbox restricts the streams shown to snapshot streams only. This setting (as well as the sort order of the columns in the dialog) is stored as a preference.
- The Name Filter field filters the streams shown using the text you enter in the field. If the stream name contains the text entered in this field, the stream appears. Otherwise, it is filtered out and does not appear.
- If you specify a directory element, the entire subtree below it will appear in the workspace or stream, too.
Note: In a stream, you cannot promote to cross-linked elements; in a workspace, you cannot keep (or anchor, or defunct, and so on) cross-linked elements.
![]() Exclude
Exclude
Remove the selected elements from the workspace or stream. For a workspace, the elements are deleted from the workspace tree. If you specify a directory element, the entire subtree below it will be removed.
Default Include Rule
AccuRev hard-codes a single include rule in each depot’s base stream that specifies the depot's top-level (root) directory. This rule makes the depot's entire directory hierarchy visible in the depot's base stream.
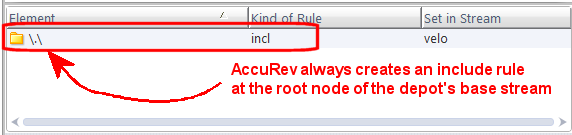
You cannot remove this rule.
Adding Rules
You can add any number of rules throughout the workspace or stream. Each rule that you add applies to a particular pathname within the depot's directory hierarchy (as shown in the "Element" column), and applies at a particular level in the depot's stream hierarchy (as shown in the "Set in Stream" column). A rule set in a dynamic stream gets inherited by lower-level streams; but a rule for the same element in a lower-level stream or workspace overrides a rule in a higher-level stream.
To add a rule:
- In the workspace or stream Explorer, select the Include/Exclude View checkbox.
-
In the Explorer pane, select the parent directory to expose in the Details pane the directory or files for which you wish to specify an include/exclude rule. For example, if you want to set a rule for the hobart directory, select the root node in the Explorer pane to display all children of the root node in the Details pane, as shown in the following illustration.
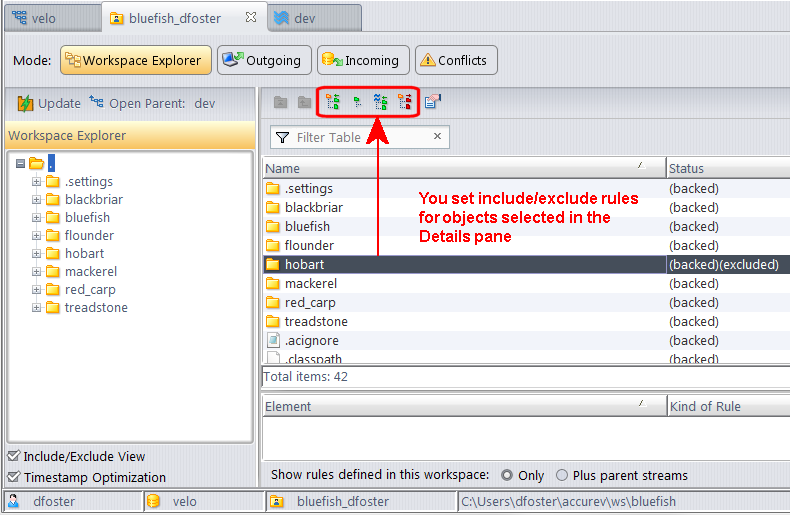
- In the Details pane, select the directory or file for which you want to specify the rule. You can select multiple rows to set rules for more than one object at a time.
-
Select the rule you want to apply from the toolbar. See Types of Rules above for detailed information on the implication and effect of setting include/exclude rules.
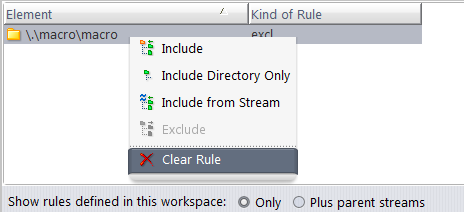
Alternative: Right-click the selected objects and choose the rule from the context menu.
AccuRev displays a dialog box asking you to confirm setting the rule.
-
Click Yes to create the rule.
The new rule appears in the rules pane:
Note: If you set the rule in a dynamic stream, remember that elements are not removed from workspaces below that stream until they are updated. Element exclusion, however, is instantly inherited by streams below that stream.
Removing Rules
When you remove a rule from a stream, the effect is immediate on the stream itself and on streams below it. The effect does not take place on workspaces below the stream until they are updated.
When you remove a rule from a workspace, the effect is immediate on the workspace itself: files are copied into the workspace tree if you remove an exclude rule; files are deleted from the workspace tree if you remove an include rule.
To remove an existing rule:
- In the workspace or stream Explorer, select the Include/Exclude View checkbox.
- Display the workspace or stream in which the rule was explicitly set (as shown in the Set In Stream column).
-
Right-click the rule, and select Clear Rule from the context menu.
Leaving Include/Exclude View
To leave Include/Exclude View in a workspace or stream, clear the checkbox at the bottom of the Explorer pane. The Rules pane disappears, and the Details pane reverts to displaying data for the current workspace or stream. Note that any elements that have been excluded are not displayed. See How Include/Exclude View Affects the File Browser Display above for more information.

