
Share this page


Work in the Change Palette
The following sections describe the tasks you perform in the Change Palette. The order of the sections follows the typical order of tasks. But the Change Palette is a long-lived "work environment", not a simple dialog box or sequential wizard. So you might perform just some of the tasks or perform them in a different order.
Also, using the Change Palette with issues has some special considerations that are covered in Working with the Issue Change Palette, below.
Specify the destination stream
If you've loaded versions into the Change Palette using Send to Change Palette, you've already indicated the source stream, but need to specify the destination stream or workspace. (The drag-and-drop operation indicates both the source and destination.)
Click the arrow control next to the Destination Stream field.
![]()
A dialog appears, listing all of the depot's streams and workspaces. Select one to be the destination for subsequent commands (Send to Workspace, Promote, Merge, and/or Patch) on the versions in the Specified Versions pane.
Example
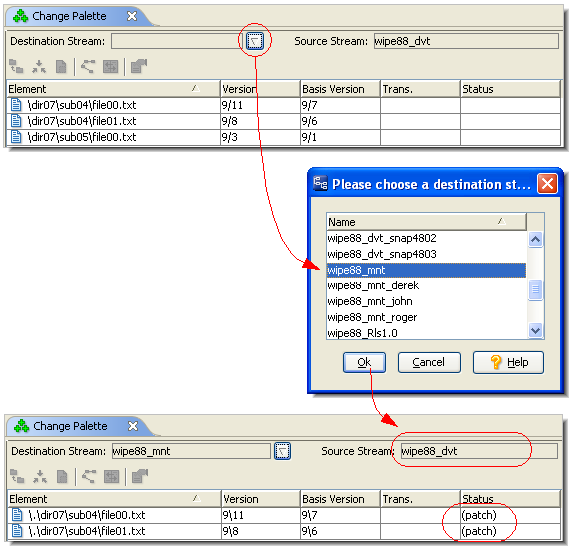
As the example shows, AccuRev determines a status for each element, describing the relationship between the source-stream version and the destination-stream version. Entries with (overlap) status are highlighted in yellow.
Note: If the destination is a workspace, AccuRev evaluates the version currently in the workspace stream, which is not necessarily the same as the file currently in the workspace tree.
You can change the destination stream at any time, using the arrow control next to the Destination Stream field.

Send versions to the destination stream
In the Specified Versions pane:
- If the destination is a stream, you can immediately Promote the versions that do not have (overlap) status.
- If the destination is a workspace, you can immediately Send to Workspace any or all versions, whether or not they have (overlap) status.
Select one or more eligible versions, then click the ![]() button in the pane's toolbar or choose Promote (or Send to Workspace) from the selection's context menu. When the command completes, the entry(s) for the version(s) are cleared from the Change Palette.
button in the pane's toolbar or choose Promote (or Send to Workspace) from the selection's context menu. When the command completes, the entry(s) for the version(s) are cleared from the Change Palette.
In the Merged Versions pane, you can Promote versions at any time. The versions are active in the workspace listed in the Merged in Workspace column; Promote sends them to this workspace's backing stream.
Notes:
-
If you've used multiple workspaces for merging...
In each Promote invocation, the set of versions must all be in the same workspace.
-
If you've merged using a workspace based on the source stream...
Promoting sends the merged version to the workspace's backing stream, which is not the destination stream you originally specified. You can now promote this version from the workspace's backing stream to the original destination stream (no additional merge is required). But you'll need to use another instance of the Change Palette to invoke Promote.
Merge the source and destination versions
If an entry in the Specified Versions pane has (overlap) status, you cannot immediately promote the version to the destination stream. First, you must create a new version by merging the source and destination versions.
The merge operation must take place in a workspace that belongs to you and is based on either the source or destination stream. If you have not already selected a merge workspace, you must do so before performing any merges. (See Merge the source and destination versions.)
Select one or more versions with (overlap) status, and click the ![]() button in the pane's toolbar or choose Merge from the selection's context menu.
button in the pane's toolbar or choose Merge from the selection's context menu.
The merge operation(s) proceed for the selected element(s), as described in Merge.
Select a workspace for performing merges
A merged version cannot be created directly in either the source or destination stream, because these are dynamic streams — all new versions of AccuRev elements must be originally created in workspaces.
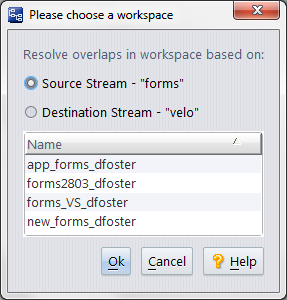
The first time you invoke Merge in the Specified Versions pane, AccuRev prompts you to establish a merge workspace, suggesting one that is based on the destination stream. You can also choose a workspace based on the source stream.
Notes
-
Which is preferable — source or destination?
A workspace based on the destination stream is preferable. After you perform the merge, you can then accomplish the original task — propagating a version's changes to the destination stream — with a single Promote. If you use a workspace based on the source stream, you'll need to Promote twice: (1) from the merge workspace to the source stream; (2) from the source stream to the destination stream. The second one requires you to use another instance of the Change Palette.
-
What if no candidate workspace exists?
Click Cancel in the choose-workspace dialog, and do either of the following:
- Create a workspace based on one of the streams.
- Reparent one of your existing workspaces to the source or destination stream. Be sure to Update the re-parented workspace before using it to perform merges in the Change Palette.
-
Dialog box used for patching changes and resolving twin status, too.
The Please Choose a Workspace dialog box is also used when patching changes and resolving an element’s twin status. See Patch changes from the source version into the destination version and Resolving Twins from the Change Palette for more information.
After you select a merge workspace, its name is displayed at the bottom of the Specified Versions pane. You can change this setting at any time; this enables you to use different workspaces to merge different versions.

Patch changes from the source version into the destination version
If an entry in the Specified Versions pane has (patch) status, you can invoke Patch to incorporate the patch defined by the Version and Basis Version settings into the destination-stream version. Select one or more of these versions, and click the ![]() button in the pane's toolbar or choose Patch from the selection's context menu. AccuRev prompts you to select a workspace that belongs to you and is based on the destination stream. The patch operation is performed in this workspace, as described in Patch and Patch From.
button in the pane's toolbar or choose Patch from the selection's context menu. AccuRev prompts you to select a workspace that belongs to you and is based on the destination stream. The patch operation is performed in this workspace, as described in Patch and Patch From.
When the patch operation is complete, the entry disappears from the Specified Versions pane.
Resolving Twins from the Change Palette
Using the Change Palette to promote elements across streams can reveal the presence of elements with a (twin) status, which are highlighted in yellow in the Specified Versions pane. Twin elements (or so called twins) can be created when a file with the same name is created in workspaces off both the source and destination streams and then promoted to their respective streams. Elements that have a (twin) status cannot be promoted across streams until their (twin) status is resolved.
AccuRev provides a twin status resolution wizard and one-step defunct operations designed to help resolve twins quickly and easily. See Resolving (twin) Status for more information. Note that there are considerations when using the twin resolution wizard to resolve twins from the Change Palette.
Multiple Entries for the Same Element
In some cases, the Specified Versions pane of the Change Palette can get populated with multiple entries for the same element. Here is a simple scenario:
-
Successive changes to an element,
buffer.c, get assigned to different AccuWork issue records. For example, this illustration shows a one-version change assigned to issue #41, then a two-version change assigned to issue #42, then a two-version change assigned to issue #43.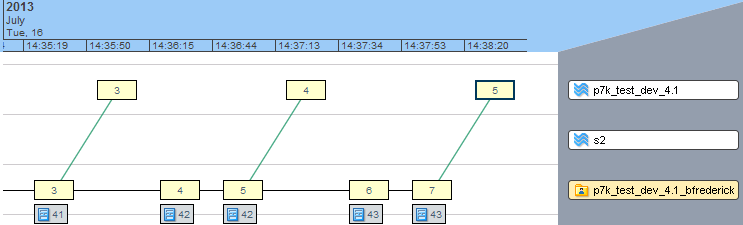
- At this point, all three issues (#41, #42, and #43) are "in" the stream to which the versions were promoted.
-
Open an Active Issues window for the stream to which the versions were promoted, then select issues #41 and #43 and invoke Send to Change Palette. Since there is a "change package gap", consisting of versions 4 and 5, between the two change package entries for
buffer.c, AccuRev cannot combine them into a single patch entry. Accordingly, the two entries are entered into the Change Palette separately and, in this case, a Patch operation is required for one entry before the changes can be propagated to the destination stream.
Work with the Issue Change Palette
If you are working with issues rather than files, the Change Palette GUI and the procedures you use with it are somewhat different than what is described for files in the previous sections.
First of all, remember that you might not need the Change Palette at all if you are cross-promoting a single issue, or multiple issues that do not have any elements in common. Just cross-promote in the StreamBrowser by dragging and dropping the issue(s) from the Active Issue mode of the source stream, to the destination stream. The Change Palette appears if AccuRev analyzes your drag & drop and discovers that some or all of your issues require patching or merging. (See Invoking the Patch by Drag & Drop for a description of the situations where the Change Palette will be automatically displayed.)
In the following example, three issues are drag & dropped from stream p7k_test_dev_4.1 to stream pk7_test_dev5.0_timebox:
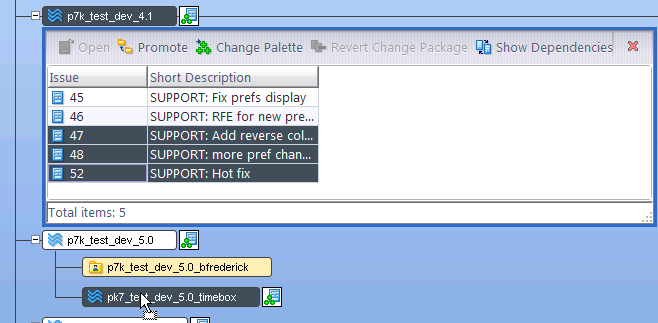
However, two of the issues (47 and 48) will require a merge to complete the operation, so AccuRev displays the Change Palette for you:
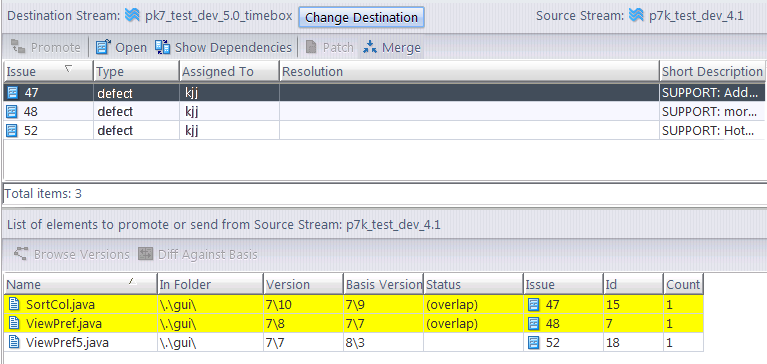
You will need to address these overlaps that need to be merged before you will be able to promote the issue that is ready to go. The files requiring intervention are highlighted in yellow. Once you have addressed the problems, the Promote button is enabled. Click the Promote button to process the issue which requires no intervention (in this case, 52).
This leaves the issues that require merging. Select them and click the Merge button. If you are merging to a dynamic stream, AccuRev prompts you to specify a workspace in which to complete the patch operation:
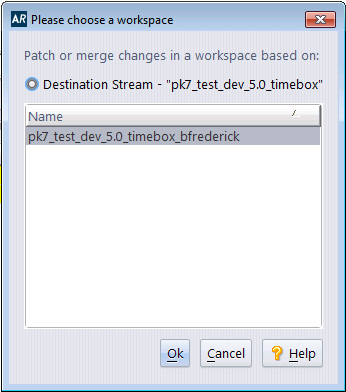
When you click Ok, will be presented with one or more Merge screens in which to complete your changes. When done merging your changes, AccuRev prompts you to promote your issues. Click the Promote button, and you are done.


