
Share this page


Working with Tables
The AccuRev GUI often presents information in the form of a table, with multiple rows and multiple columns.
Tables Overview
In many contexts, the AccuRev GUI displays data in the form of a rows-and-columns table.
You can adjust all such tables, to maximize their usefulness, as described in the following sections.

Filtering Tables
Generally speaking, the details panel displays the contents of whatever node has been selected in the explorer tree. You can use the Filter Table entry field to limit the display to only those files of interest to you — for example, you might want to see only those files that contain the letter "s"in the file extension, as shown in the following illustration:
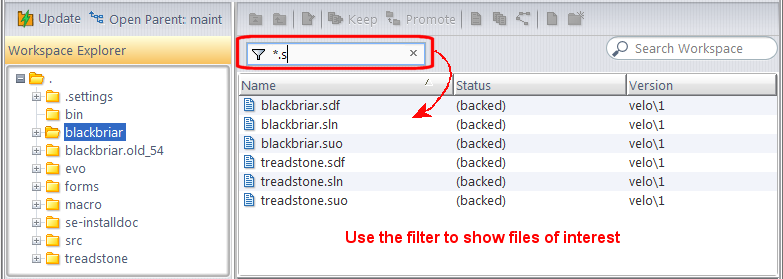
As you type in the Filter Table field, the files displayed in the details pane are narrowed down to only those containing the characters you enter. The Filter Table field takes wildcards like ? and *.
To clear the filter, click the X button in the Filter Results field.
Tip: The results of the Filter Table field are temporary — AccuRev lets you filter tables independently, from view to view. If you prefer, you can prevent AccuRev from displaying files based on an ignore patterns that you specify. You might want to exclude from view all backup and temporary files, for example. See Controlling the Display of External Objects for more information.
Selecting Files in a Table
- The file-selection gestures are the same ones used by Windows Explorer:
- To select a file, click it with mouse button 1.
- To select a contiguous range of files, click-and-drag with mouse button 1.
- To select all the files in a directory, select any one of them, then press Ctrl-A.
- To add or subtract a file from an existing selection, hold down the Ctrl key and click that file with mouse button 1.
- To extend an existing selection to a particular file, hold down the Shift key and click that file with mouse button 1.
- Typing a character selects the next file or directory whose name begins with that character (if the Details pane listing is sorted on the Name or Element column).
Adjusting the Column Width
You can adjust columns widths in one of two ways:
-
Drag the column separators.

- Double-click the column separator to a column's right to resize that column to exactly fit its longest value.
Adding and Removing Columns
The columns AccuRev displays in tables vary across views. If you want, you can change the columns that are displayed using the Columns dialog box. To change the columns that are displayed in a table:
-
Right-click the column heading and choose Format Columns
The Columns dialog box appears.:
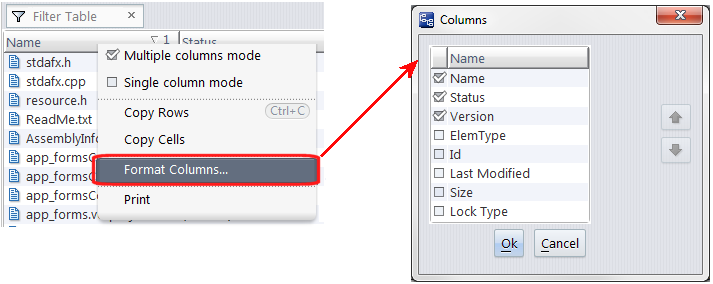
- Select the columns you want to display in the details pane and click Ok.
Changing Column Order
You can change the order in which columns appear in two ways:
- In the details pane, drag and drop the column to the place you want it.
-
In the Columns dialog box:
- Select the column you want to move in the Columns dialog box.
- In the Columns dialog box, Use the up and down arrows to move the column.
- Click Ok.
Sorting the Rows of a Table
Initially, the rows of a table are sorted on one column (single-column mode). A direction icon in the header for that column indicates whether the sort is lowest-to-highest or highest-to-lowest.
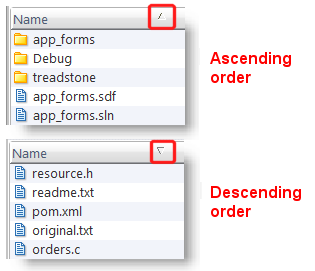
Note: In the Details pane of the File Browser (and any other table that lists file names and directory names in the same column), a lowest-to-highest sort places all directories before all files; a highest-to-lowest sort places all files before all directories.
Left-click on any column header to continue in this mode:
- Click on the current sort column to reverse the sort order.
- Click on another column to make it the sort column.
You can switch at any time to multiple-columns mode, in which you define a primary sort column, a secondary sort column, and so on. Right-click any column header to switch sort modes.
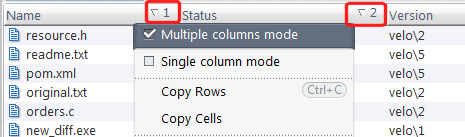
A "1" appears next to the direction icon in the current sort column, indicating that this is now the primary sort column.
Click another column to make it the secondary sort column. A direction icon annotated with "2" appears in this column, and the rows are reordered according to the two-level sort. Continue in this way to define additional sort levels.
In multiple columns mode, you can:
- Left-click on any column header without a direction icon: this defines an additional sort level, using that column.
- Left-click on any column header that already has a direction icon: this reverses the sort order at that sort level.
- Left-click on any sort column's level number (1, 2, etc.) to change the sort level of that column.
The table's rows are resorted automatically each time you perform any of these actions.
Using the Keyboard to Navigate through a Table
The keyboard's navigation keys — up-arrow, down-arrow, PgUp, PgDn, Ctrl-PgUp, Ctrl-PgDn --move a table's selection highlight in the expected way. In addition, you can navigate by typing any alphanumeric character; this moves the selection highlight to the next row whose entry in the (primary) sort column begins with that character.
Printing Tables
You can print tables in views throughout the AccuRev GUI by choosing File > Print from the AccuRev menu or by typing Ctrl+P. You cannot print tables that appear in dialog boxes.
What Gets Printed
When you print a table, AccuRev prints the table headings and table contents for every column and row in the table. Column widths and sort order are preserved; you might want to adjust the width of a table’s columns or change the sort order before you print. Printed pages include a footer that displays the date the table was printed and a page number. If you are printing a table of query results, the query name is printed at the top of each page.
Note that AccuRev prints a table’s entire contents, even if only a portion of it is visible online. For example, if a query returns 65 records, the printed table includes all 65 records, even if only 30 are visible at a time. Similarly, some tables in AccuRev and AccuWork use a single line per row and display ellipses (...) for columns that are not wide enough to display their full contents. Printed tables are not limited to one line per row, and AccuRev wraps column contents, if necessary, when printing the table.
Previewing What You Print
When you print a table, AccuRev displays a preview window that lets you see what the printed page will look like.
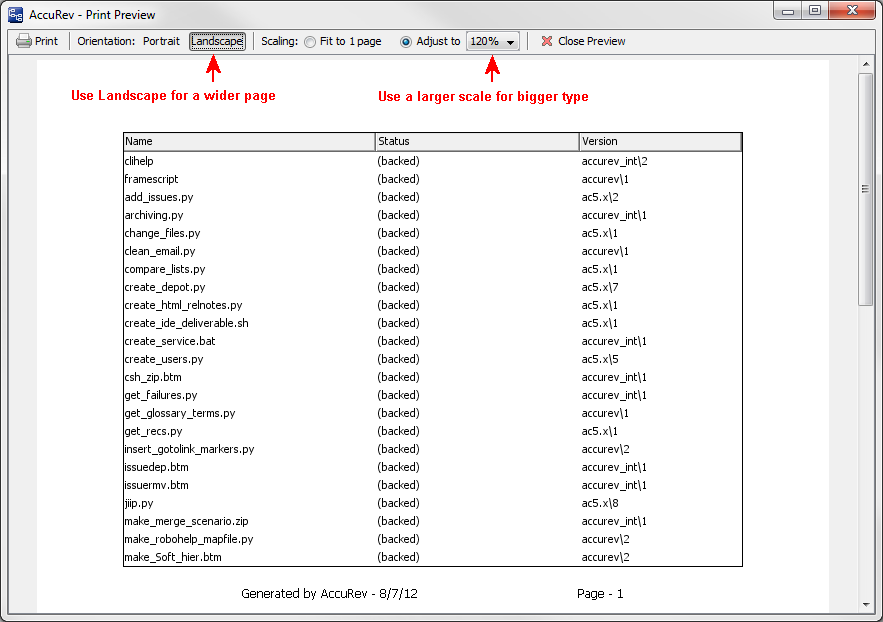
The preview window provides several settings that give you additional control over the output, as summarized in the following table.
| Setting | Description |
|---|---|
|
Orientation. |
Lets you choose between Portrait and Landscape layout. Portrait is the default Tip: Try changing the orientation to Landscape to fit more columns on a single page. |
|
Scaling |
Lets you specify whether you want:
By default, the Scaling setting is set to 100%, which provides good readability. Tip: Use a larger scale for bigger type. |
How to Print a Table
To print a table:
- Display the table you want to print.
-
Choose File > Print from the AccuRev menu, or type Ctrl+P.
AccuRev displays the Print Preview window.
-
Optionally, use the preview settings to adjust the output. See Previewing What You Print if you need help with this step.
Tip: If using the preview settings does not provide the output you expect, click the Close Preview button and make adjustments on the source table (resizing or adding/dropping columns, for example).
-
When you are satisfied with the output displayed in the Print Preview window, click the Print button (
 ).
).AccuRev displays the familiar Print dialog box, an example of which is shown here.
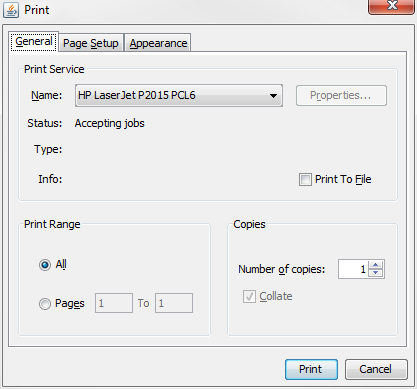
You use the fields on the Print dialog box to specify characteristics of the print job (specifying a printer, the number of pages you want to print, and so on).
- Change any print job settings as needed and click Print to print the table


