
Share this page


Synchronize View
Describes the synchronize view.
In this topic:
- Overview
- Eclipse Annotations
- Performing operations in the Synchronize view
- Committing outgoing changes
- Updating incoming changes
Overview
The AccuRev perspective includes the standard Eclipse Team Synchronize view. Most of the controls and commands available in this view work the same way with AccuRev as they do with the CVS version control system. This means you can use the Eclipse online help facility to learn about synchronization in general and about the specific facilities of this view. This section describes the AccuRev-specific aspects of using the Synchronize view.
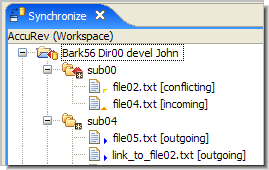
An Eclipse synchronization is a file-by-file listing that answers the question, “What are the current differences between my projects and the repository?”.
With AccuRev, a synchronization actually takes into account three locations:
- The AccuRev “project” or workspace tree. The AccuRev workspace is typically located on your machine’s hard drive.
- The
AccuRev “repository” or depot. The
AccuRev depot contains two locations corresponding to a given project:
- Your AccuRev workspace stream, which tracks your private versions, for example, those created by Keep.
- Your AccuRev workspace’s backing stream, which tracks versions that you have made public with Promote.
Since AccuRev also version-controls directories and links, a synchronization can list these objects, as well.

Eclipse Annotations
Eclipse annotates each object in a synchronization, to indicate the type of difference:
| [incoming] |
The object changed in the repository, but not in the project. |
| [outgoing] |
The object changed in the project, but not in the repository. |
| [conflicting] |
The object changed in both the project and the repository. |
The following table summarizes how Eclipse annotations correspond to AccuRev statuses:
| Eclipse Annotation | AccuRev Status |
|---|---|
| [incoming] | (stale) |
| [outgoing] |
(modified) (kept) (member) (external) |
| [conflicting] | (overlap) |
You can view an object’s AccuRev status by invoking the Show Properties command from its context menu or from the AccuRev toolbar.
Note:
- The AccuRev command Anchor changes a file’s AccuRev status to (member), but does not affect the file’s contents. Such a file is classified as [outgoing] in a synchronization, even though there might be no difference between the file’s contents in the project and in the repository.
- AccuRev icon label decorations are included for each object in the synchronization. These decorations can help you identify the various kinds of outgoing objects, for example, to distinguish the (overlap) files from the (modified) files. For more information, see Setting Label Decorations .
- Icons for files with a status of (external) are displayed without any decoration.
Performing operations in the Synchronize view
You can work in the Synchronize view by running commands from its toolbar or from the context menu of an object (or a selected set of objects). Many of these commands work with AccuRev in exactly the same way as they do with CVS. For example, the context menu commands Open in Compare Editor and Remove from View, and the toolbar commands Pin Current Synchronization, Mode, and Presentation.
The following provide a visual quick-reference for the standard Synchronize view commands. For detailed help, use the Eclipse Help menu.
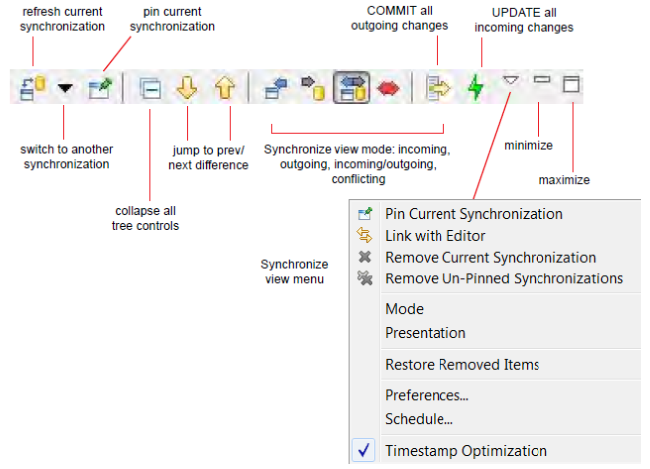
The same AccuRev commands that are available in the Navigator view (Keep, Promote, Defunct, etc.) also appear on object context menus in the Synchronize view. These commands are described in Team Menu Commands.
A common operation in the Synchronize view is comparing the project’s version of a file with the repository’s version. You can do this using Eclipse or AccuRev tools:
- To invoke the Eclipse Compare Editor, double-click the file or select Open in Compare Editor from its context menu.
- To invoke the Diff Tool, select Diff Against Backed Version from its context menu. (You can also access Diff Against from within the Commit All dialog box . You can configure this command to invoke the Eclipse Compare Editor, third party, and custom Diff tools. See Using Alternative Diff and Merge Tools .
The following sections describe the most important Synchronize view operations: increasing the level of synchronization between your project and the repository, either by “committing” (transferring data from the project to the repository) or by “updating” (transferring data from the repository to the project).
Committing outgoing changes
Eclipse uses the CVS term “commit” to mean the transferring of changes from your project to the repository. You initiate a commit operation by clicking the Commit All Outgoing Changes button in the Synchronize view toolbar.

This launches a multiple-page wizard, which leads you through the invocation of some or all of these AccuRev operations:
| Add to Depot | Creates new versions of objects with (external) status. |
| Keep | Creates new versions of elements with (modified) status. |
| Merge | Creates new versions of elements with (overlap) status. |
| Promote | Sends the project’s (kept) or (modified) versions -- including versions created during this wizard session--to the backing stream. |
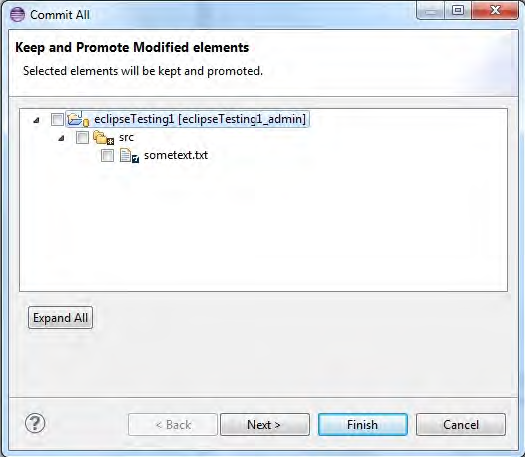
These operations are organized into a series of pages. On each page, you can select none, some, or all of the eligible [outgoing] elements to be processed. The AccuRev operations take place when you click Finish on the wizard’s final page. The following example shows the wizard screen to keep and promote (modified) elements.
You can right-click individual elements in the Commit All Outgoing Changes dialog box to access a Diff Against context menu.
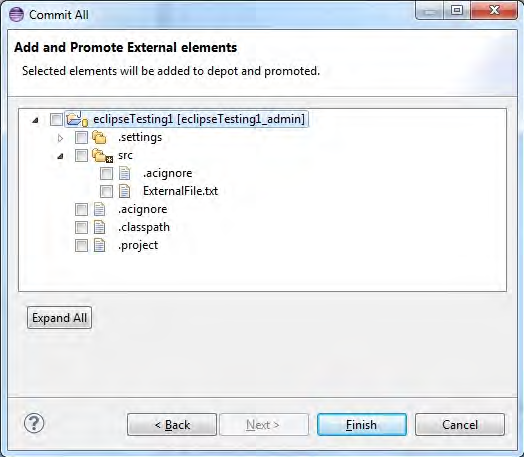
To add and promote external files, click Next.
One invocation of Commit All Outgoing Changes can result in many AccuRev commands being performed. If your synchronization spans multiple projects in multiple AccuRev workspaces, separate AccuRev transactions are performed for each workspace. The wizard prompts you just once for a comment string, and attaches it to each AccuRev transaction that accepts comments.
Updating incoming changes
Eclipse uses the CVS term update to mean the transferring of changes from the repository to your project. AccuRev also uses the term “update”. Sometimes, clicking the Update All Incoming Changes button in the Synchronize view toolbar simply performs an AccuRev Update command. But it sometimes launches a multiple-page wizard, which leads you through some operations to be performed before the AccuRev Update command proceeds.
The wizard’s first page handles the following “AccuRev Update restriction”:
- An AccuRev Update cannot proceed if any element has (modified) status but does not also have (member) status.
That is, the offending elements have not been made “active” in the workspace with the Anchor or Keep commands. You can locate such elements in the Navigator view with the command .
(This page does not appear if the synchronization contains no such “non-member” elements.)
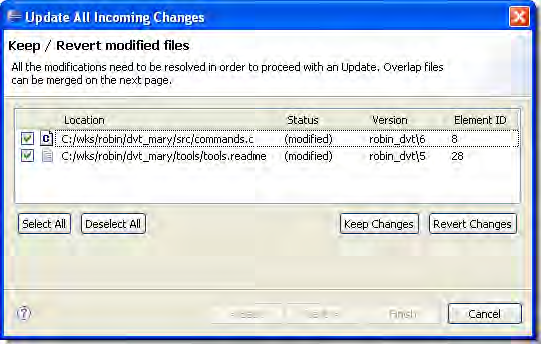
On this page, you must process all elements whose status is (modified). You can process (overlap)(modified) elements here too, or, you can wait to process some or all of them on the next page.
You can resolve the (modified) status of elements in either of these ways:
- Keep Changes performs a Keep command on all the selected elements. These elements will not be overwritten in the coming Update operation.
- Revert Changes performs a Revert to Backed command on all the selected elements, causing them to have (backed) status. In the coming Update operation, these elements will be overwritten by the current version in the backing stream.
When the list has no more elements whose status is (modified) only, you can:
- Click Next to proceed to the second wizard page on which you specify Merge operations to be performed before the Update.
- Click Finish to proceed directly to the Update, without doing any merge work.
- Click Cancel to exit the wizard without performing the Update at all. (This does not cancel your Keep Changes and Revert Changes work, which has already taken place.)
The wizard’s second page handles files with (overlap) status. If you chose not to handle one more files with (overlap)(modified) status on the preceding page, they appear here.
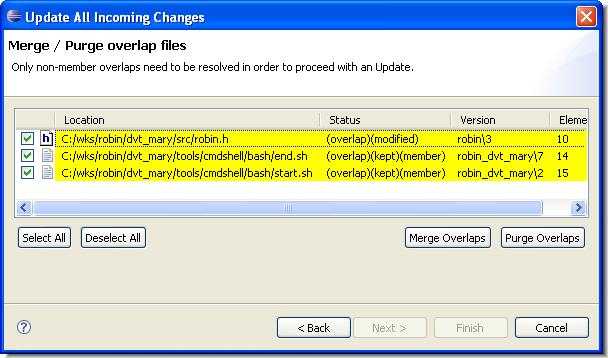
You must resolve files with (overlap)(modified) status, because of the AccuRev Update restriction discussed at the beginning of this section. Resolving files with (overlap)(kept)(member) status is optional, because the Update operation will not try to overwrite them.
You can resolve the (overlap) status of elements in either of these ways:
- Merge Overlaps performs a Merge command on all the selected elements, combining the changes in the repository (backing stream) with your project’s changes. This Keeps a new version of each element. These elements will not be overwritten in the coming Update operation -- but that is OK, since you have already incorporated the changes from the repository (backing stream).
- Purge Overlaps performs a Revert to Backed command on all the selected elements, causing them to have (backed) status. In the coming Update operation, these elements will be overwritten by the current version in the backing stream.
When the list has no more elements whose status is (overlap)(modified), you can:
- Click Finish to proceed to the Update.
- Click Cancel to exit the wizard without performing the Update at all. (This does not cancel your Merge Overlaps and Purge Overlaps work, which has already taken place.)

