Using Alternative Diff and Merge Tools
By default, AccuRev uses its own tools to diff and merge files. If you want, you can configure third-party or custom Diff and Merge tools.
Supported Third-Party Diff and Merge Tools
| Vendor | Diff Tool Support | Merge Tool Support |
|---|---|---|
| Araxis | Yes | Yes |
| BeyondCompare | Yes | No |
| Eclipse | Yes | Yes |
| Guiffy | Yes | Yes |
| TkDiff | Yes | Yes |
AccuRev provides pre-formatted command parameters for supported third-party Diff and Merge tools. To use one of these tools, all you need to do is specify the location of the tool’s executable when you configure it. See Configuring a supported third-party Diff or Merge tool .
Command parameters for Diff and Merge
In the case of custom Diff and Merge tools, you need to specify the complete command parameters in addition to the executable’s location.
The following summarizes the command parameters supported by AccuRev Plug-In for Eclipse.
Diff
| {backing stream version} | Quoted pathname of the first version to be compared. |
| {workspace version} | Quoted pathname of the second version to be compared. |
Merge
| {common ancestor version} | Quoted filename of the closest common ancestor version. |
| {backing stream version} | Quoted filename of the version in the backing stream, or other non-workspace version. |
| {workspace version} | Quoted filename of the version in the workspace. |
| {merge results} | Quoted name of the merge-output file, which is a temporary file for storing the results of the merge. |
These command parameters are preformatted for supported third party Diff and Merge tools. If you are configuring a custom Diff or Merge tool, you must ensure that the command parameters you specify are correct for that tool. For example, if you were configuring SourceGear DiffMerge, you might configure the Diff tool as follows:
/c="AccuRev Diff" /ro2 /t1="First" /t2="Second" {backing stream version}
{workspace version}
Similarly, the Merge tool might be configured as follows:
/c="AccuRev Diff" -merge -result={merge results} /t1="First" /t2="Second" /t3="Third"
{backing stream version} {workspace version} {common ancestor version}
The executable for both Diff and Merge tools might be defined as follows:
C:\Program Files\SourceGear\DiffMerge\DiffMerge.exe
Specific command parameters vary from tool to tool. See your tool’s documentation for more information.
Configuring a supported third-party Diff or Merge tool
-
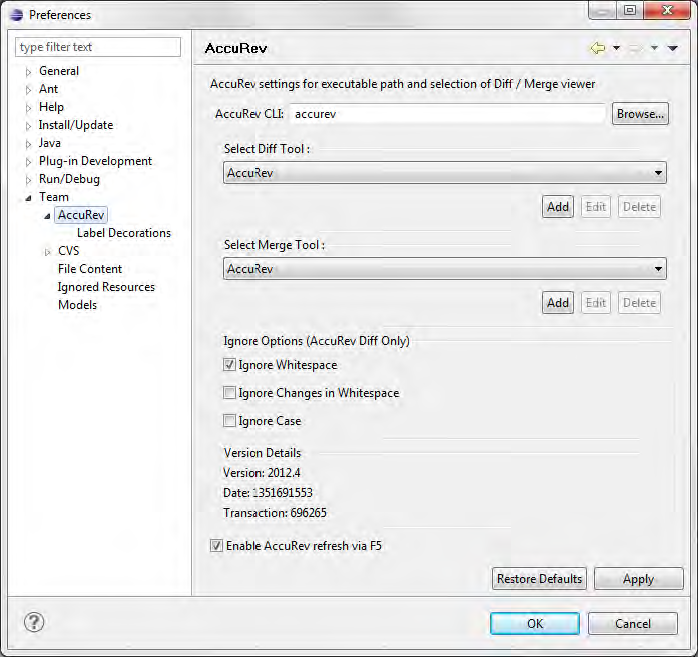
Display the AccuRev page on the Eclipse Preference window by selecting Window > Preferences >Team > AccuRev from the Eclipse menu.

-
Select the supported third-party tool from the Select Diff Tool or Select Merge Tool field.
- Click the Edit button. The Add/Edit Tool dialog box appears. Values in the Tool Name and Path to Tool fields are based on the tool you selected in the previous step.
- If the third party tool executable is not on your system’s search path, specify the complete path in the Path to Tool field.
- Review the command line that will be used to invoke the third party tool.
AccuRev displays the command as it will be executed in the Command used to invoke the Diff tool (or Command used to invoke the Diff tool) field.
- Click OK.
- The Add/Edit Tool dialog box closes.
- Click Apply if you want to change other preferences. Otherwise, click OK.
Configuring a custom Diff or Merge tool
-
Display the AccuRev page on the Eclipse Preference window by selecting Window > Preferences >Team > AccuRev from the Eclipse menu.

-
Click the Add button associated with the custom Diff or Merge tool you want to configure.
- Enter values in the
Tool Name,
Path to Tool, and
Command Parameters fields appropriate for the custom Diff or Merge tool you are configuring. See Command parameters for Diff and Merge
AccuRev displays the command as it will be executed in the Command used to invoke the Diff tool field (or Command used to invoke the Diff tool field).
-
Review the command line that will be used to invoke the custom third party tool.
-
Click OK. The Add/Edit Tool dialog box closes.
-
Click Apply if you want to change other preferences. Otherwise, click OK.


