
Share this page


Start working with GitCentric
This section guides you how to open GitCentric after a successful installation.
Before you log in
Before you log into GitCentric for the first time, ensure that:
- You have an AccuRev login account that belongs to the Admin group. See the table in AccuRev Installation in the GitCentric Installation and Release Notes.
-
You have an SSH public key. If you do not already have an SSH key, generate one now from the operating system command line:
> ssh-keygen -t rsa -C “<your_email>@<your_domain>”
This creates a populated subdirectory at ~/.ssh. You will need the contents of ~/.ssh/id_rsa.pub in upcoming steps. The topic of SSH keys is beyond the scope of this document, but there is a great deal of information on the web that you can locate with your favorite search engine. For more information, see https://docs.github.com/en.
The SSH public key representing the GitCentric bridge account is registered automatically when you install GitCentric the first time. If you have upgraded an existing GitCentric installation, you need to register the SSH public key manually. For more information, see the Public Keys menu item.

Log in
Navigate to the GitCentric web server. If you chose defaults during installation, the address should be similar to:
http://<gitcentric_server_name>:8080/gitcentric
Adjust the 8080 port if necessary.
Since you are the first user to log into GitCentric after installation, you are presented with a one-time bootstrap screen which asks you to specify the AccuRev server and some additional information. No GitCentric menus are visible in the GUI at this point.

Note: After you successfully enter your credentials, you are automatically added to the Administrators group. Make sure that an administrator is the first user to log into a new GitCentric installation.
The following table describes the fields of the login screen.
| AccuRev Server | This is the host of the
AccuRev Server used with
GitCentric. You may add other
AccuRev Servers later, but this is the
AccuRev Server where the
GitCentric database and
Tomcat web server reside, and is typically on the same machine as the
GitCentric installation. The value can be the name of the server, an IP address (not recommended), or
localhost. Note that if you are connecting to
GitCentric from a remote machine via your web browser,
localhost indicates the
AccuRev Server on the host you are connecting to, not your local machine where you started your browser. Examples:
localhost:5050 acserver2:5050 <ip_address>:5050 |
| Port | This is the AccuRev port number, and is typically 5050. |
| CLI Path | This is the path to the
AccuRev Client executable on the
GitCentric server that should be used to communicate with the
AccuRev Server. For example:
<ac_home>/bin/accurev Where
<ac_home> is the actual installation directory, such as
/home/<gc_installer>/accurev. The
GitCentric server requires either a master
AccuRev Server or a compatible
AccuRev Client installed locally. In the case where you are using
AccuRev Servers of different revision levels, you must have a compatible client installed on the
GitCentric server machine for each version of the
AccuRev Server you are using, and each must be configured with
GitCentric using its specific path.
For example, if you need to work with two AccuRev Servers -- one running version 5.7 and one running version 6.2, you would need two AccuRev clients installed on the GitCentric server: one 5.7 client to work with the 5.7 server, and a separate 6.2 client to work with the 6.2 server. Example: /home/gcadmin/accurev/bin/accurev |
| User Name |
The AccuRev user account on this server that you use. If you are an administrator, this would be the account that you use for GitCentric configuration, and might be an account such as acserver if you have legacy AccuRev systems. For example:<gc_installer>.
|
| Password | The password for the specified
AccuRev user. For example:
<gc_installer_password>.
|
Register with GitCentric
This section describes how to register with GitCentric.
When any user logs into GitCentric for the first time, GitCentric prompts guides them through a self-registration process. This way, users with valid AccuRev accounts do not need to involve an administrator to begin working with GitCentric.

Enter your information as follows:
- Full Name: Your real name (unless this is an account for a role such as “Guest User”).
- Preferred Email: Enter the same email address here that you specify for the Git
user.emailconfiguration for your clones. If these do not match, pushes from your clone will fail. If you need to maintain multiple email addresses, you can add them later at My Account > Contact Information. For details, see . -
SSH key: Click Add and copy the contents of your SSH public key file here (see Before you log in) and Save it.
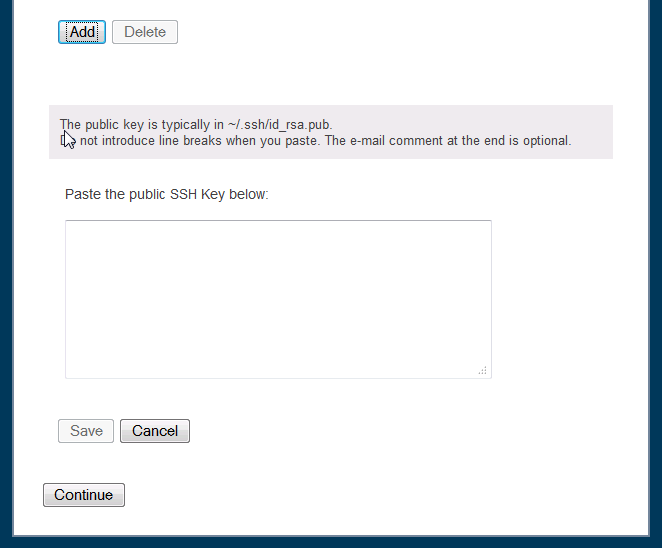
Note: If your AccuRev user account is already associated with an SSH public key, that key will be automatically inserted in this field.) Your public SSH key file is typically
~/.ssh/id_rsa.pub. You can choose to do this later through My Account > Public Keys, but until this is set, you will not be able to use ssh protocol for Git clone, pull, and push operations. For details, see the Public Keys menu item. - Click Continue when done.
Install the AccuRev trigger
Once the installation is done and you have completed the initial “bootstrap” page and the self-registration page, you need to install the AccuRev trigger server_master_trig.pl on the AccuRev Server.
To install the trigger:
Note: If you are using GitCentric in a replication environment, you need to perform this procedure on the master AccuRev Server. In addition, if you later add other AccuRev Servers to your GitCentric configuration, you must install server_master_trig.pl on those servers as well.
- Check to see if a triggers directory exists under <ac_home>/storage/site_slice. If not, create it.
- Copy the
server_master_trig.pl file from
<gc_home>/bin to the
AccuRev Server
triggers directory:
> cd <gc_home>/bin
> cp server_master_trig.pl <ac_home>/storage/site_slice/triggers
> cd <ac_home>/storage/site_slice/triggers
> chmod +x server_master_trig.pl
- Locate the
################ ACCUREV CLIENT PATHsection in the server_master_trig.pl file and specify the path for your AccuRev Client. For example:$::AccuRev = "/usr/accurev/bin/accurev";
- Establish a persistent
AccuRev login on the
AccuRev Server with:
accurev login-n <user><password>
- Test that
server_master_trig.pl can compile:
- Look at the first line of server_master_trig.pl and note the Perl executable that it expects to find (for example, “#!/usr/bin/perl”).
- Using this path, use the
perl -ccommand to test the trigger:> /usr/bin/perl -c ./server_master_trig.pl
You know that your installation is complete and functioning when you see the message:
server_master_trig syntax ok
If any errors appear, address them before proceeding. For example, if Perl is not installed in the expected location, modify the path in server_master_trig.pl (or install it where the script expects to find it). If any optional Perl modules are missing, such as XML::Simple, install them. For example, as root try installing:
 libxml-sax-expat-perl
cpan install XML::Simple
Repeat these steps of copying and configuring the server_master_trig.pl file for all AccuRev Servers that you add to GitCentric.
Note: For Windows: If you add a Microsoft Windows-based AccuRev Server to your GitCentric installation, you must convert the .pl file to a batch file using the PL2BAT utility, which is part of the Perl distribution:
>PL2BAT server_master_trig.pl
Open the GUI
Once you have completed all of login steps, you are ready to open the GitCentric user interface.
In your browser, navigate to the GitCentric installation:
http://<gitcentric_server_name>:8080/gitcentric
Adjust the 8080 port if necessary.
 Next steps:


