
Share this page


Place a new project under source control
Use this procedure to create a new Visual Studio project and place it under AccuRev control in an existing AccuRev workspace. If you want to create a new AccuRev workspace, see Creating an AccuRev Workspace.
- Create a new project in Visual Studio.
- On the New Project dialog box, check the Add Solution to AccuRev check box if it is not already selected.
-
Specify a name and location for the new project.
Tip: You must create the new project in an existing AccuRev workspace.
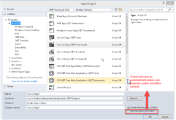
- Complete the Name, Location, and Solution name fields as appropriate and click OK. AccuRev Plug-In for Visual Studio PE displays the Add Files dialog box.
- Optionally, add a comment to record what you are placing under AccuRev control and why; if there are files that you do not want to place under AccuRev control at this time, clear their check boxes.
- Click the Advanced button if you want to specify file type and file locking settings.
- Click the Add button to add the solution files to the AccuRev depot.


