
Share this page


The input mask option is used to prompt users for data input using a mask pattern. If the user attempts to enter a character that conflicts with the input mask, an error occurs. For example, to prompt the user to enter a phone number, you can define the following input mask:
!\(000\)000-0000
This input mask limits the user to numeric characters only. It is displayed in an edit box as follows:
(___) ___ - ____
Note: You can define input masks for string type fields only.
-
In the Settings tab, select Masked. For details, see Customizing Project Entities.
-
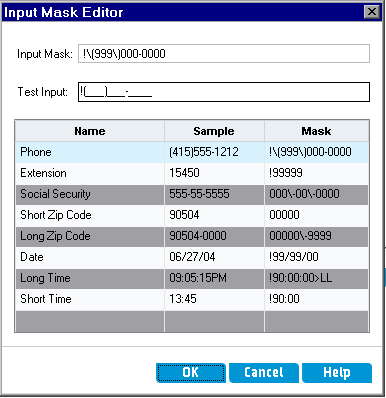
Under Masked Edit Attributes, click the Define button. The Input Mask Editor dialog box opens.
-
In the Input Mask box, type an input mask or select a predefined mask.
You can use the following characters when defining input masks:
Mask Character
Description
!
A space for a leading or trailing blank.
#
A digit.
.
A decimal.
:
A time separator.
/
A date separator.
\
Treats the next character in the mask string as a literal. For example, you can include the (, ), #, &, A, and ? characters in the mask.
>
Converts all the characters that follow to uppercase.
<
Converts all the characters that follow to lowercase.
A
An alphanumeric character (entry required). For example: a – z, A – Z, or 0 – 9.
a
An alphanumeric character (entry optional). For example: a – z, A – Z, or 0 – 9.
C
A character (entry required). Valid values are ANSI characters in the following ranges: 32-126 and 128-255.
c
A character (entry optional). Valid values are ANSI characters in the following ranges: 32-126 and 128-255.
L
An alphabetic character or space (entry required). For example: a – z or A – Z.
l
An alphabetic character or space (entry optional). For example: a – z or A – Z.
0
A digit (entry required). For example: 0 – 9.
9
A digit (entry optional). For example: 0 – 9.
_
Inserts spaces. When the user types characters in the field box, the cursor skips the _ character.
-
In the Test Input box, you can test the input mask.
-
Click OK to close the Input Mask Editor dialog box.
-
Click Save to save your changes to the Project Entities page.


