Share this page


You can create ALM projects in Oracle or Microsoft SQL.
Before you start
You can create a project in any of the following ways:
-
Create an empty project.
-
Create a project from a template. This option copies the customization of an existing template project. It does not copy project data from the template project. For details, see Creating Template Projects.
-
Copy the contents of an existing project. For details, see Copying Projects.
-
Import data from an exported project file. For details, see Importing Projects.
Note:
-
For information on the Oracle or Microsoft SQL permissions required by ALM, refer to the Micro Focus Application Lifecycle Management Installation and Upgrade Guide.
-
If your database server is connected to ALM over a WAN, the project creation process can be very time-consuming.

Creating a project
This section describes how to create a new project.
-
Select the domain in which you want to create the project.
-
Click the Create Project button. The Create Project dialog box opens.

-
Select one of the following options:
-
Create an empty project. Creates a new project.
-
Create a project from a template. Creates a new project by copying the customization of an existing template project, but not the project data.
ALM Editions: This option is not available for Quality Center Enterprise Edition. For more information about ALM editions and their functionality, see the Micro Focus Application Lifecycle Management User Guide
-
Create a project by copying data from an existing project. For details, see Copying Projects.
-
Create a project by importing data from an exported project file. For details, see Importing Projects.
-
-
Click Next.
If you selected Create a project from a template, the Use Template Customization dialog box opens.
ALM Editions: This dialog box is not available for Quality Center Enterprise Edition. For more information about ALM editions and their functionality, see the Micro Focus Application Lifecycle Management User Guide
If you did not select Create a project from a template, proceed to step 7.

Select the domain and template you want to use to create the project.
-
Select Link the project to the selected template to link the new project to the template.
ALM Editions: This option is not available for for Quality Center Enterprise Edition. For more information about ALM editions and their functionality, see the Micro Focus Application Lifecycle Management User Guide
Note: After you link a project to a template, the template administrator must apply template customization to the project. This applies the customization from the template to the linked project, and sets the applied customization to read-only in the project. For details, see Applying Template Project Customization to Linked Projects.
Click Next.
-
The following dialog box opens:

-
In the Project Name box, type a name for your project. The project name cannot be longer than 30 characters and can include only letters, digits, and underscores.
Note: Support of non-English characters depends on the database settings used by the server. To avoid any possible issues, do not use non-English characters in project names.
-
In the In Domain box, select a domain.
-
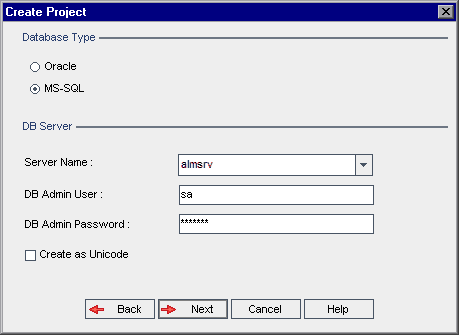
Click Next. The following dialog box opens:

-
Under Database Type, select Oracle or MS-SQL.
-
By default, the default values defined for the domain are displayed for Server Name, DB Admin User, and DB Admin Password. If additional database servers are defined, you can select another name from the Server Name list.
Note: For details on defining database servers, see Defining New Database Servers.
-
Click Create as Unicode to create the project as Unicode.
Note: The Create as Unicode check box is only displayed when creating a new project from an empty project in an MS-SQL server. Unicode is a feature of MS-SQL that allows multi-language support. In Oracle, multi-language support is defined when installing the server.
-
If your selected database server does not have the text search feature enabled, a message box opens. The message indicates that after this process completes, you can enable the text search feature. For details on enabling the text search feature, see Configuring Text Search.
-
If you are creating a Microsoft SQL project, proceed to step 16. For an Oracle project, the following dialog box opens.

In the Create in TableSpace box, select a storage location that has sufficient space to store the new project. You should not use UNDO as the storage location.
In the Temporary TableSpace box, select a temporary storage location that has sufficient space to store the new project.
Click Next.
-
The Add Project Administrators dialog box opens.

Selected Project Administrators lists users that are assigned as project administrators. Available Users lists users available in the project. When you assign project administrators, they are moved from the Available Users list to the Selected Project Administrators list. Project administrator users can add and administer other users in the project.
-
Refresh. Click the Refresh button
 to refresh the list of available users.
 -
Find. Type the name of a user in the Find box, and click the Find button
 to search the Available Users list.
 -
Add Selected Users. Select the users you want to assign as project administrators, and click the Add Selected Users button
 . Alternatively, double-click a user name. The selected users are moved to the Selected Project Administrators list.
 -
Delete. To remove a user from the Selected Project Administrators list, right-click the user name and click Delete.
You can also assign project administrators after you have created the project. For details, see Assigning Project Administrators.
-
-
Click Next. You can enable extensions that are available for your site's ALM edition.
Select the Enable check box for the extensions you want to enable.
Note
-
You cannot disable an extension for a project after you enable it. We recommend enabling only the extensions you need. Enabling extra extensions can affect performance and consumes additional disk space.
-
As you navigate from one extension to another, relevant license status information is displayed in the License Status section.
Extensions for which there is no license on the server are displayed in gray. It is possible to enable an extension for which you do not yet have a license. You can utilize the extension's added functionality later, after receiving the license.
-
You can also enable extensions for a project after you have created the project. For details, see Enabling Extensions for a Project.
-
-
Click Next. The following dialog box opens:

Verify the project details. To change any of the details, click Back.
-
Select Activate Project to activate the new project. Only activated projects are available to users in the Application Lifecycle Management Login window when they log in to a project. For details, see Deactivating and Activating Projects.
-
Select Enable Versioning to enable version control for the project. You can also enable version control after you have created the project. For details, see Enabling and Disabling Version Control for a Project.
-
Click Create. The new project is added to the Projects list.