
Share this page


You can create a template project by importing data from an exported template project file created in the current version. For details on exporting projects, see Exporting Projects.
If you import a template that was previously exported from the same server, ALM recognizes that the same template already exists on the server, based on the template ID. You can choose to replace the existing template, or cancel the import process. If you choose to replace the existing template when prompted, ALM overwrites the template, but does not overwrite connections to linked projects. The new template remains linked to the same projects.
Note: The new template inherits the Unicode or ASCII definition of the imported template.
-
In Site Administration, click the Site Projects tab.
-
Select the domain where you want to create the template.
-
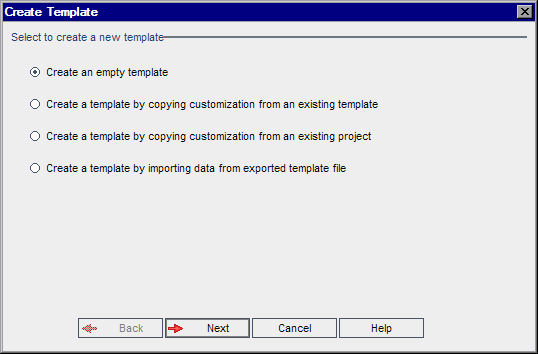
Click the Create Template button. The Create Template dialog box opens.
-
Select Create a template by importing data from exported template file. The Create Template: Select File for Import dialog box opens.
-
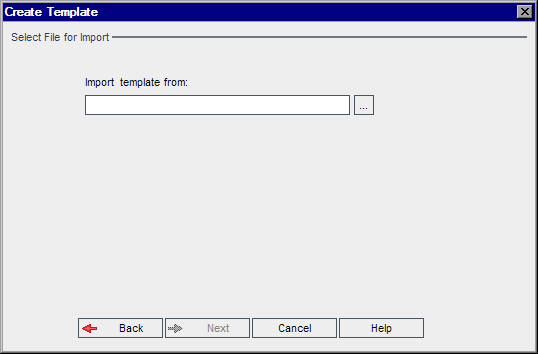
Click the browse button to the right of the Import template from box to locate the template project that you want to import. The Open dialog box opens.
-
Locate the directory and select the ALM Project Export file that you want to import. Click Open. The selected file is displayed in the Import template from box.
-
Click Next. The following dialog box opens.
-
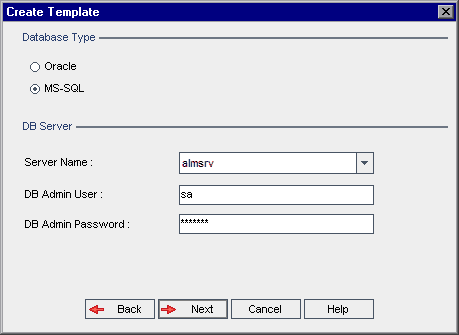
Under Database Type, select Oracle or MS-SQL.
The default values defined for the domain are displayed for Server Name, DB Admin User, and DB Admin Password. If additional database servers are defined, you can select another name from the Server Name list.
Note: For details on defining database servers, see Defining New Database Servers.
-
Click Next.
If your selected database server does not have the text search feature enabled, a message box opens. The message indicates that after this process completes, you can enable the text search feature. For details on enabling the text search feature, see Configuring Text Search.
-
If you are creating a Microsoft SQL template, proceed to step 11. For an Oracle template, the following dialog box opens.
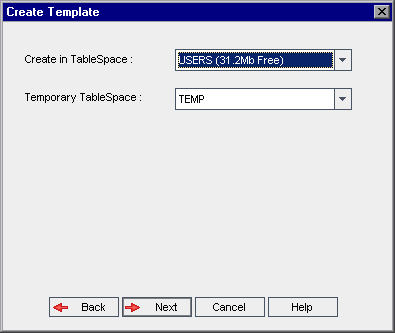
In the Create in TableSpace box, select a storage location that has sufficient space to store the new template. You should not use UNDO as the storage location.
In the Temporary TableSpace box, select a temporary storage location that has sufficient space to store the new template.
Click Next.
-
The Add Template Administrators dialog box opens.
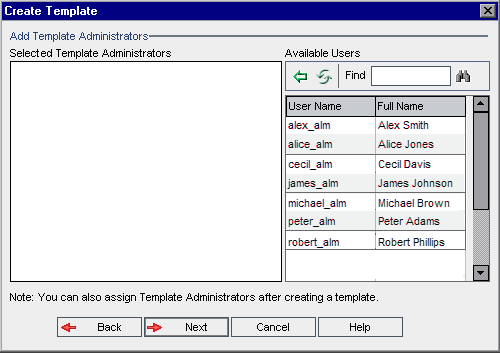
Selected Template Administrators lists users that are assigned as template administrators. Available Users lists users available in the template. When you assign template administrators, the users are moved from the Available Users list to the Selected Template Administrators list. Template administrator users can customize template projects and apply template customization to linked projects. For details, see Cross Project Customization.
-
Refresh. Click the Refresh button
 to refresh the list of available users.
 -
Find. Type the name of a user in the Find box, and click the Find button
 to search the Available Users list.
 -
Add Selected Users. Select the users you want to assign as template administrators, and click the Add Selected Users button
 . Alternatively, double-click a user name. The selected users are moved to the Selected Template Administrators list.
 -
Delete. To remove a user from the Selected Template Administrators list, right-click the user name and click Delete.
You can also assign template administrators after you have created the template. For details, see Assigning Project Administrators.
-
-
Click Next. The following dialog box opens.
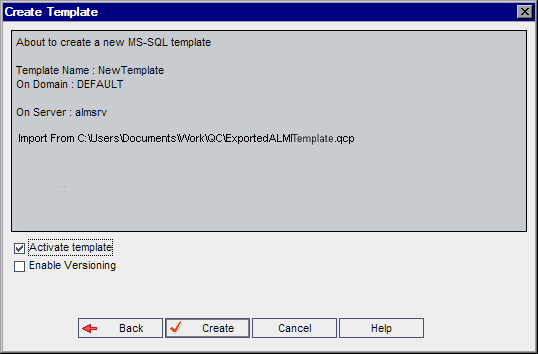
Verify the template details. To change any of the details, click Back.
- Select Activate template to activate the template. Only activated templates are available in the Application Lifecycle Management Login window. For details, see Deactivating and Activating Projects.
- Select Enable Versioning to enable version control for the template. You can also enable version control after you have created the template. For details, see Enabling and Disabling Version Control for a Project.
- Click Create. The new template is added to the Projects list under Template Projects.


