
Share this page


Comparing Baselines
You can compare two baselines in a library. For example, you can compare baselines at different stages of development to assess the impact of changes made to requirements in your project. You can then update the relevant tests in your project accordingly.
You can also compare a baseline to the current entities in the library. For example, suppose you create a baseline at the start of a new release. Over time, changes are made to requirements in the library. To determine whether product development is proceeding as planned, you can compare requirements in the initial baseline with the current requirements in the library.
In the following exercise, you will add test coverage to a requirement and then create another baseline. You will then compare your two baselines to evaluate the impact of the changes.
To compare baselines:
-
Modify a requirement.
-
On the ALM sidebar, under Requirements, select Requirements.
-
Select View > Requirement Details.
-
In the requirements tree, under Mercury Tours Application, expand Application Usability. Select Keyboard Support.
-
Click the Test Coverage tab. The Test Coverage tab displays coverage for this requirement.
-
If the Test Plan Tree tab on the right is not displayed, click the Select Tests button.
-
In the Test Plan Tree tab, expand the Mercury Tours Site and HTML Pages subject folders.
-
Double-click the HTML Page Source test. The test is added to the coverage grid.
-
-
Create a new baseline.
Repeat Steps 1 and 2 in Creating Baselines. Name your new baseline Baseline2.
-
Select a baseline with which to compare.
-
In the libraries tree, select Baseline1. Click the Compare To button, and select Select Baseline to compare the baseline with another baseline. The Select Baseline dialog box opens.
-
Click the arrow and select Baseline2 from the list. Click OK.
-
Click OK to close the Select Baseline dialog box. Click Yes to close the Warning dialog box. The Compare Baselines Tool dialog box opens.

The baselines are displayed in separate panes, with the more recently created baseline displayed in the right pane. In each pane, the library’s entities are displayed in the same hierarchical tree structure as defined in the specific module.
-
-
View requirement changes between the baselines.
-
Click the Go To Next Change button in the right pane to view the change.
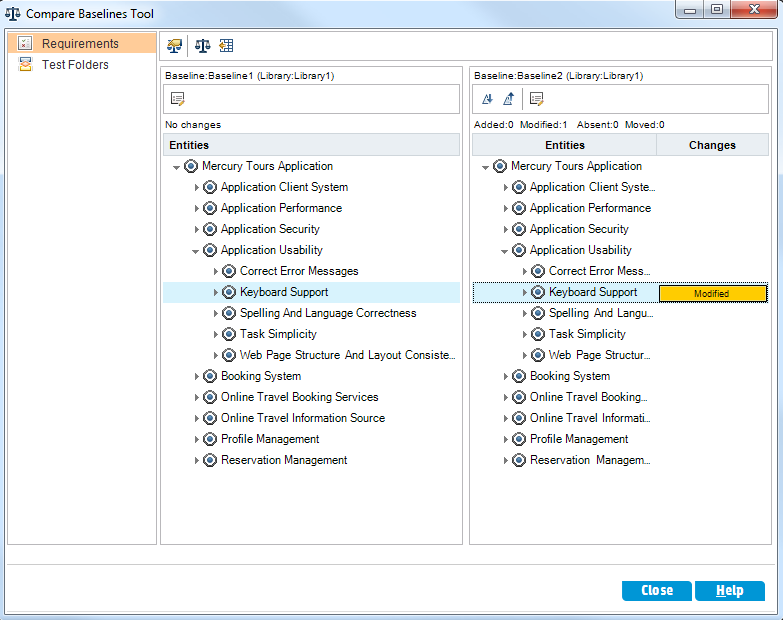
Differences between the two baselines are indicated in the Changes column. The tool indicates that there is a difference in the Keyboard Support requirement between the baselines.
-
To compare the modified requirement between baselines, select Keyboard Support and click the Compare Entities button on the toolbar. The Compare Entities dialog box opens.
-
Click the Test Coverage button on the sidebar.

The Test Coverage view displays details of the entity in each baseline.
-
Click Close.
-


