Share this page


Specify releases and cycles
You begin the application lifecycle management process by specifying releases and cycles. A release represents a group of changes in one or more applications that will be available for distribution at the same time. Each release can contain a number of cycles. A cycle represents a development and QA cycle based on the project timeline. The releases and cycles have defined start and end dates.
You can organize and track your upcoming releases by defining a hierarchical release tree containing releases and cycles. In this lesson, you will add a release to an existing release tree, and then add cycles to the release.
Define releases and cycles
In this exercise, you will define a release and then add cycles to the release. Releases and cycles each have start dates and end dates. The date range for a cycle must be contained within the date range of the release.
To define a release and its cycles:
-
Open the ALM_Demo project.
If the ALM_Demo project is not already open, log in to the project. For details, see Start ALM.
-
Display the Releases module.
On the ALM sidebar, under Management, select Releases.
-
Create a new release folder.
-
In the releases tree, select the root Releases folder. Click the New Release Folder button. The New Release Folder dialog box opens.
-
In the Release Folder Name box, type Service Packs.
-
Click OK. The Service Packs release folder is added to the releases tree.
-
In the Description box in the right pane, type the following description for the release folder: This folder contains service pack releases.
-
-
Add a release.
-
In the releases tree, make sure that the new Service Packs release folder is selected.
-
Click the New Release button. The New Release dialog box opens.
-
In the Name box, type Service Pack 1.
-
In the Start Date box, click the down arrow and select yesterday’s date. In the End Date box, click the down arrow and select the date two months from today’s date.
-
In the Description box, type the following description for the release: This release is the first service pack release.
-
Click OK. The Service Pack 1 release is added to the Service Packs release folder.
-
-
Add a cycle to the release.
-
In the releases tree, make sure that the Service Pack 1 release is selected.
-
Click the New Cycle button. The New Cycle dialog box opens.
-
In the Name box, type Cycle 1 - New Features.
-
In the Start Date box, click the down arrow and select yesterday’s date. In the End Date box, click the down arrow and select the date a month from today’s date.
-
In the Description box, type the following description for the cycle: This cycle tests new features added for this service pack.
-
Click OK. The Cycle 1 - New Features cycle is added to the Service Pack 1 release.
-
-
Add a second cycle to the release.
-
In the releases tree, right-click the Service Pack 1 release and choose New Cycle. The New Cycle dialog box opens.
-
In the Name box, type Cycle 2 - Full.
-
In the Start Date box, click the down arrow and select the date one month and a day from today’s date. In the End Date box, click the down arrow and select the date two month from today’s date.
-
In the Description box, type the following description for the cycle: This cycle fully tests all application features.
-
Click OK. The Cycle 2 - Full cycle is added to the Service Pack 1 release.
-

View releases and cycles
You can view the status of your releases and cycles. ALM shows a high-level overview of the progress of the currently selected release or cycle. It also shows the number of defects opened over the course of the currently selected release or cycle. You can also view the number of outstanding defects.
In this exercise you will learn how to display the progress and graphs of a selected release and cycle.
To view releases and cycles:
-
Make sure the Releases module is displayed.
On the ALM sidebar, under Management, select Releases.
-
Display the Progress graph for the Service Pack 1 release.
In the releases tree, select the Service Pack 1 release, located in the Service Packs release folder. In the right pane, click the Status tab. The Progress tab is displayed by default.
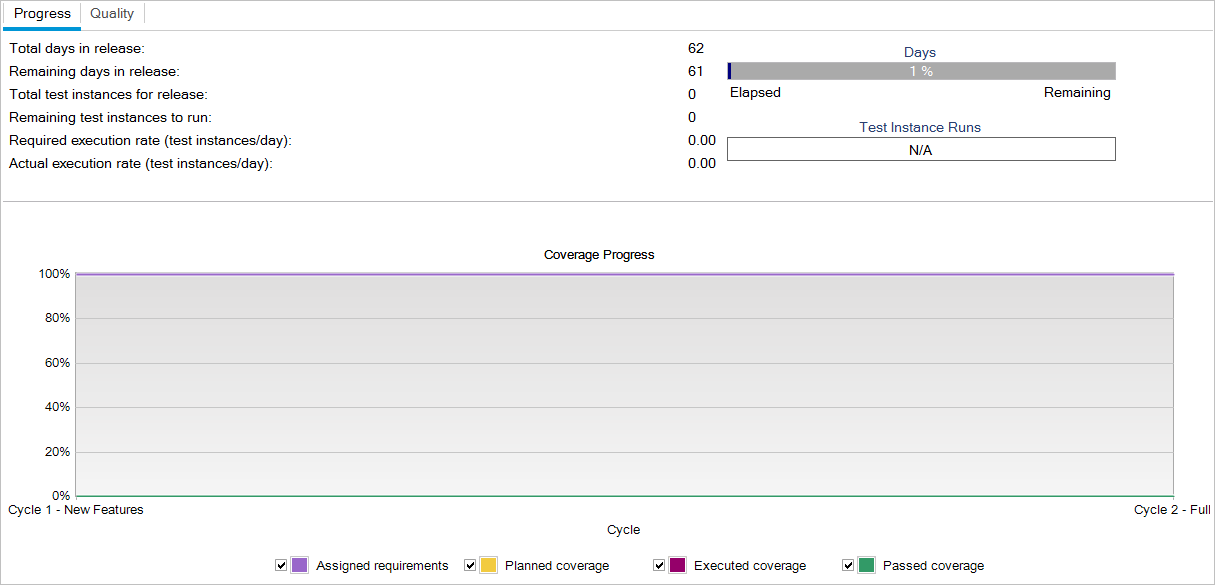
The Progress tab displays the progress of the release based on requirement coverage, elapsed and remaining time, and actual and remaining test instances to run. As you have not yet created requirements or tests, the information in the Coverage Progress graph indicates 0% progress.
-
Display the Progress graph for a cycle.
In the releases tree, select the Cycle 1 - New Features cycle, located in the Service Pack 1 release.
In the right pane, click the Progress tab. You can see that the information available is similar to that available for the release, but at the cycle level. As in the case of the release, you have not yet created requirements and tests, therefore the information in the Coverage Progress graph indicates 0% progress.