This section describes how to record components into a flow or business process test automatically while navigating any application.
Recording enables you to create component steps, or even a full business process test or flow, in your application without the need to manually create separate components and their associated application areas before starting to create steps. When recording, you perform user actions and create additional components as necessary.
Note: This task is part of a higher-level task. For details, see Create business process tests and flows.
-
Consider the following:
-
Make sure UFT One is installed on the client machine along with its ALM plug-in.
-
We recommend you close UFT One before recording.
-
Make sure that you belong to a user group that has the following task permissions: Modify Folder (Test Plan), Modify Test, Add Component Folder, Add Component, Add Step, Add Parameter, Modify Component, Modify Step, Modify Parameter.
-
In UFT One, select Tools > Options and click the Run node. Ensure that the Allow other products to run tests and components check box is selected in the Run pane.
-
-
Open and log into the application to record.
Log into the application you want to record, and navigate to the point at which you want to start recording.
-
Create or select a flow or business process test in ALM.
In the Test Plan module, before recording, do one of the following:
- Create a new flow or business process test in which to insert recorded components. For task details on creating flows, see Create business process tests and flows.
- Select an existing flow or test in which to insert recorded components.
-
In the Test Script tab toolbar, click
 to start recording.
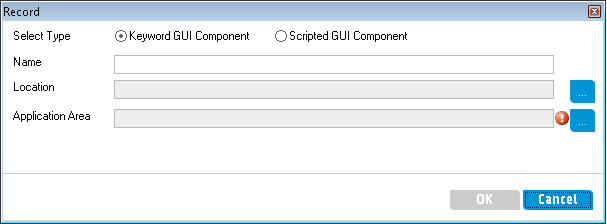
 The Record dialog box opens.

Enter the type of automated component to record (keyword GUI or scripted), the name of the component to record, the location, and the application area. Click OK. The Recording toolbar opens.
-
Work with the Recording toolbar.
When recording, the title bar flashes.

The activities you can perform from the toolbar include:
-
Stopping / pausing the recording
-
Assigning the recorded steps to different actions (GUI tests only)
-
Assigning the steps to a different component in the current Test Lab Mini App
-
Adding new business components
-
Capturing objects in your application
-
Changing the recording mode
-
Inserting checkpoints or object values
For details on all Recording toolbar buttons and activities, see the UFT One help.
-
-
Perform the operations that you want to record. In general, the operations you perform for a single flow or test should represent those of a single screen or transaction in your application. These operations are saved as actions, and you can see the actions listed in the Record toolbar.
As you perform actions, the toolbar provides a count of the number of steps performed in the application.
-
Add checkpoints while recording.
You can add object property checkpoints and object property output value steps to a component while recording.
Object property checkpoints enable you to check object property values during a test run to determine if they match expected values. The test results provide information about which object property checkpoints failed during a test run, and why.
Adding checkpoints and output values eliminates the need for you to add these steps after recording components.
-
While performing user actions in your application, in the toolbar, click Insert and select the type of checkpoint or output value to insert.
-
If necessary, select the object on which you want to insert the checkpoint or output value.
For user interface details on the Output Value Properties dialog box, see Output Value Properties Dialog Box.
-
Select the test object properties to check and click OK.
- Continue performing operations in your application to continue recording.
-
-
When you finish performing the operations that you want to record, click STOP in the toolbar.
-
Business Process Testing performs the following:
-
Creates automated business components in the Business Components module that correspond to screens, transactions, and so on, in your application.
-
Creates component steps based on the operations you perform.
-
Adds the created components to the flow or test.
-
Inserts the checkpoints and output values you defined.
-


