
Share this page


ALM Test Management extension for Azure DevOps
The ALM Test Management extension for Azure DevOps provides Azure DevOps users with test coverage and status information directly on native Azure DevOps epics, issues, tasks, or custom work item types.
Overview
The extension allows Azure DevOps users to continue planning and working in Azure DevOps with immediate visibility into the quality processes being managed in ALM. This extension helps Azure DevOps users understand test coverage and pass/fail status, while providing QA with full visibility and alignment to the development process being managed in Azure DevOps.
Supported ALM versions: 16.0.1 and later.
Note: You cannot use this extension in private browsing mode (in Incognito mode or private window.)

Prerequisite: enable CORS for ALM
By default, ALM Server doesn’t support Cross-Origin Resource Sharing (CORS). To use this extension, you should enable CORS for ALM.
To enable CORS for ALM:
-
Prerequisite: Make sure the ALM server is accessed via a secure protocol.
-
Stop the ALM service.
-
Edit the {ALM Deployment Path}\webapps\qcbin\WEB-INF\web.xml file.
{ALM Deployment Path} is the location of the repository directory which is specified during the ALM installation.
-
Add the following content by the end of the filter sections and before filter-mapping:
Copy code<filter>
<filter-name>cross-origin</filter-name>
<filter-class>org.eclipse.jetty.servlets.CrossOriginFilter</filter-class>
<init-param>
<param-name>allowedOrigins</param-name>
<param-value>https://microfocus-alm.gallery.vsassets.io,
https://microfocus-alm.gallerycdn.vsassets.io</param-value>
</init-param>
<init-param>
<param-name>allowedMethods</param-name>
<param-value>POST, GET, OPTIONS</param-value>
</init-param>
<init-param>
<param-name>exposedHeaders</param-name>
<param-value>Set-Cookie</param-value>
</init-param>
</filter>If you work with Azure DevOps Server, replace the value of the allowedOrigins parameter with an asterisk (*).
-
Add the following content after the filter-mapping whose filter-name is OSPCookieFilter:
Copy code<filter-mapping>
<filter-name>cross-origin</filter-name>
<url-pattern>/rest/*</url-pattern>
<url-pattern>/api/*</url-pattern>
<url-pattern>/authentication-point/*</url-pattern>
</filter-mapping>
-
-
In the {ALM Deployment Path}\webapps\qcbin\WEB-INF\jetty-web.xml file, add the following content after line 25.
Copy code<Call name="setAttribute">
<Arg>org.eclipse.jetty.cookie.sameSiteDefault</Arg>
<Arg>None</Arg>
</Call> -
In the {ALM Deployment Path}\wrapper\Wrapper.conf file, add the following content in the # SSO Configuration section:
Copy codewrapper.java.additional.36=-Dcom.hp.alm.platform.web.filters.allowedHttpVerbs=GET,POST,PUT,DELETE,OPTIONSNote: wrapper.java.additional.36 in the line above is an example. If wrapper.java.additional.36 is already used, use another available one instead.
-
Start the ALM service.
Set X-Forwarded-Proto header
If a web server is used in front of the ALM server, you should set the X-Forwarded-Proto header in the web server. This header identifies the protocol that ALM uses to connect with the web server.
For example, if you use Nginx, to set the X-Forwarded-Proto header, you add the following line directly after any proxy_pass line:
proxy_set_header X-Forwarded-Proto $scheme;For instructions about setting the header in other web servers, see the web server documentation.
Install
To install the ALM Test Management extension for Azure DevOps:
-
Prerequisite: Add test coverages for your requirements in ALM.
For details, see Create test coverage.
-
If you work with Azure DevOps Services:
-
Log in to the Azure DevOps Marketplace.
-
In the ALM Test Management Extension page, click Get it free.
-
Select your Azure DevOps organization, and click Install.
-
-
If you work with Azure DevOps Server (2019, 2020, or 2022):
-
Log in to the Azure DevOps Marketplace.
-
Click Download to download the ALM Test Management extension for Azure DevOps.
-
Log in to your Azure DevOps organization. In the left panel of the page, at the bottom, click Collection Settings.
-
In the left panel of the Collection Settings page, under General, click Extensions.
-
In the right top corner of the Extensions page, click Browse local extensions.
-
Scroll down to the bottom of the page, click Manage Extensions.
-
In the Manage Extensions page, click Upload extension to upload the the ALM Test Management extension for Azure DevOps you downloaded.
-
Go back to the marketplace page, select your Azure DevOps organization, and click Install.
-
Configure
Complete the following tasks to set up the extension.
Add a custom field to store ALM requirement ID
Add a custom field to an Azure DevOps work item. This custom field is used to store the ID of the ALM requirement that is mapped to the Azure DevOps work item.
-
Log in to your Azure DevOps organization.
-
In the left panel of the page, at the bottom, click Organization settings (or Collection Settings if you work with Azure DevOps Server).
-
In the left panel of the page, under Boards, click Process.
-
From the All process list, select an inherited process, and select the work item type you want to add the custom field to.
-
Click New field.
-
Give the custom field a name and select Integer as the type. Click Add field.
Add an ALM server configuration
You can add multiple ALM server configurations in the ALM Test Management extension for Azure DevOps.
To add an ALM server configuration:
-
Log in to your Azure DevOps organization. In the left panel of the page, at the bottom, click Organization settings (or Collection Settings if you work with Azure DevOps Server).
-
Under Extensions, click ALM Settings.
-
In the ALM Settings page, under the ALM Servers section, click Add an ALM server.
-
Configure the attributes of your ALM server, and click Create.
Field Description Name Enter the name for the ALM server configuration. ALM Server Enter the address for the ALM server.
Only ALM servers that use secure protocols are supported. For example, https://<ALM_server>:<port_number>/qcbin.
Client ID
API Key Secret
Enter the Client ID and API key secret of your API key to access ALM.
For information about managing ALM API keys, see Set up API key access.
-
Click Test connection to test the connection with your ALM server.
-
Click Create.
Add entity mappings
After adding an ALM server configuration, you can add entity mappings between ALM requirements and Azure DevOps work items.
To add an entity mapping:
-
Log in to your Azure DevOps organization. In the left panel of the page, at the bottom, click Organization settings (or Collection Settings if you work with Azure DevOps Server).
-
Under Extensions, click ALM Settings.
-
In the ALM Settings page, under the Entity Mappings section, click Add a mapping.
-
Enter the following information, and click Create.
Field Description ALM Server Select an ALM server configuration you added. ALM Domain Select the domain where the ALM project you want to map is located. ALM Project Select the ALM project to map. Azure DevOps Custom Field Select the custom field you created in Add a custom field to store ALM requirement ID.
Azure DevOps Projects Select the Azure DevOps projects where the Aure DevOps work item types you want to map are located. Azure DevOps Work Item Types Select the Azure DevOps work item types to map.
Note: The work item types of the selected Azure DevOps projects that have been mapped to ALM projects are not available for selection.
Synchronize
Data between Azure DevOps and ALM can be synchronized using Micro Focus Connect or manually.
| Synchronize with Micro Focus Connect |
If you use Micro Focus Connect to synchronize Azure DevOps with ALM, the value of the custom filed that stores the mapped ALM requirement ID can be set automatically. To synchronize with Micro Focus Connect, add a mapping between the ALM field Req ID and the custom field you added in Azure DevOps. |
| Synchronize manually |
You can manually enter the value for the custom field to synchronize Azure DevOps with ALM. To edit the value for the custom field:
|
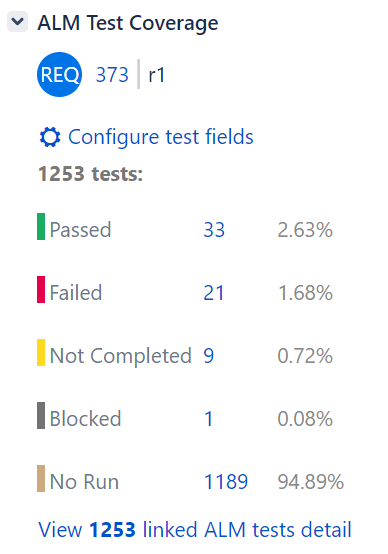
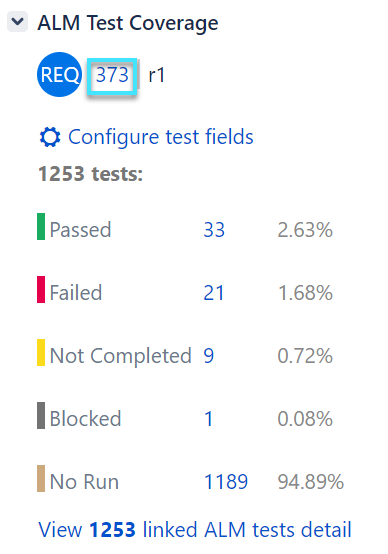
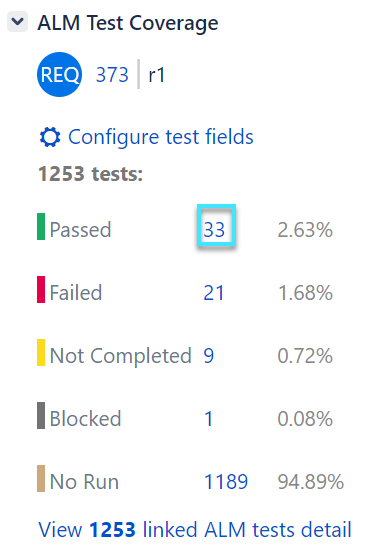
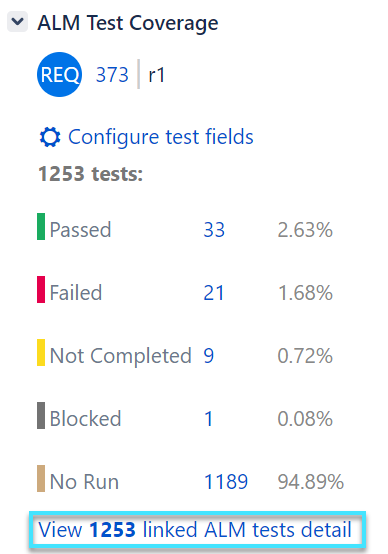
ALM Test Coverage widget summary
After you complete configuring the extension, the ALM Test Coverage widget is added to work item details.
-
The widget shows the number of tests related to the entity, and the test status of the last runs of these tests.
-
Click the requirement ID to drill down to the requirement and the details of its related tests in ALM Client.
-
Click the number of a specific test status to view the details of tests of the specific test status in a new widget. Click a test ID to drill down to the related test plan in ALM Client.
-
Click View <number> linked ALM tests detail to view the details of all the tests in a new widget. Click a test ID to drill down to the related test plan in ALM Client.
Troubleshooting
The following table lists the issues you may encounter when using this plugin and instructs you how to solve the issues:
| Issue | Solution |
|---|---|
|
The following error occurs when you click an Azure DevOps entity: No corresponding requirement in ALM. Make sure that the ID is correct. |
Check the configuration of the {ALM Deployment Path}\webapps\qcbin\WEB-INF\web.xml file. Make sure the value of the allowedOrigins parameter is set to the following: https://microfocus-alm.gallery.vsassets.io, https://microfocus-alm.gallerycdn.vsassets.io For details, see Prerequisite: enable CORS for ALM. |


