You can control access to ALM projects and modules by defining the user groups that can open them, and by determining the types of tasks each user group can perform according to permission levels.
Consider the following about user groups and permissions.
| Default user groups |
ALM includes predefined groups with default permissions. Each group has access to certain ALM tasks. The default user groups include:
|
| Custom user groups |
When a project requires that certain user groups have permissions that are outside the scope of their default permissions, you can add your own custom user groups and assign each group a unique set of permissions. |
| Cross project customization |
Working with a template project: User groups created in a template project are added in the linked projects when you apply the template customization. The users assigned to the user group in the template project are not applied to linked projects. Working with a linked project: User groups defined by a template project are displayed with a template icon
For details about cross project customization, see Cross project customization. |
After you set user group permissions, you can also define the ALM modules to which you want to give a user group access. When a user group member logs in to a project, only the authorized modules are displayed.
If default user groups do not meet the needs of your project, you can create custom user groups for your project. When you add a new user group, you set the group's permissions based on an existing user group.
To create a custom user group:
-
In the Project Customization window, in the left pane, click Groups and Permissions.
-
Click New Group to create a new group, and provide the following information.
Group Name Enter a name for the group. A group name cannot include the following characters:
( ) @ \ / : * ? " ` < > | + = ; , %
Set As Assign the permissions of an existing user group to the new group.
Select an existing user group that has similar access permissions to the new user group. This minimizes the level of customization you need to do.
Rename or delete a custom user group
You can rename or delete any custom user groups.
Before you rename or delete custom user groups
Consider the following before you rename or delete a custom user group.
-
If you are working with a project that is linked to a template project, you cannot rename or delete a user group defined by the template project.
-
If you delete a user group from a template project, ALM does not delete the group from the linked projects. After you next apply template customization to the linked projects, the user group is no longer read-only in the project and can be modified, renamed, or deleted by the project administrator.
To rename or delete a user group:
-
In the Project Customization window, in the left pane, click Groups and Permissions.
-
From the group list, select a group.
-
To rename the group, click Rename Group . Enter a new name for the group and click OK.
-
To delete the group, Click Delete Group and click Yes in the confirmation dialog box.
After you add a user to the project, you can assign the user to one or more user groups. By default, new users are assigned to the project as members of the Viewer user group.
You can assign a user to a default user group, or to a custom user group. You can change the access permissions for existing users at any time by changing the user group to which they are assigned.
Tip: You can also assign users to user groups from the Project Users customization module. For details, see Assign a user to a user group.
To assign a user to a user group:
-
In the Project Customization window, in the left pane, click Groups and Permissions.
-
From the group list, select the group to which you want to assign a user.
-
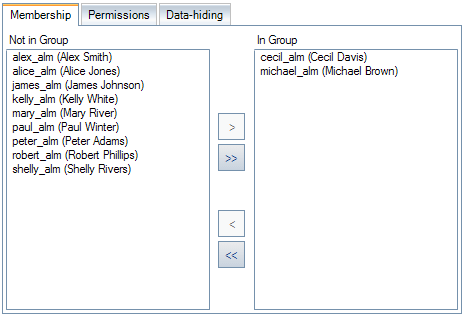
Select the Membership tab to see which users belong to the group.

The users assigned to the group are displayed in the In Group pane. Users not assigned to the group are displayed in the Not in Group pane.
-
To assign a user to the currently selected user group, select the user in the Not in Group list and click the right arrow button
 .
.To remove a user from the currently selected user group, select the user in the In Group list and click the left arrow button
 .
. To move all the user groups from one list to the other, click the double arrow buttons
 .
. -
Click Save.
Every user group has a set of permissions, which controls what types of tasks the group can perform.
User group permissions
Understand the following before you set user group permissions.
| Cannot modify permissions of default user groups | You cannot modify the permissions of a default user group. To view permissions for these groups, in the Groups and Permissions page, select the user group in the group list and click the Permissions tab. |
| Upgraded projects | If you upgrade a project, and the upgraded version contains a permission that was not present in the original version, ALM automatically assigns that permission to all users in the project. |
| Cross project customization - working with a linked project |
User groups defined by a template project are displayed with a template icon
|
To set permissions for a user group:
-
In the Project Customization window, in the left pane, click Groups and Permissions.
-
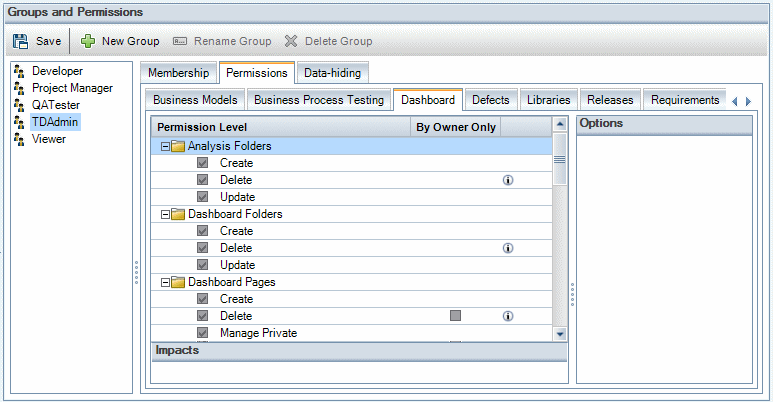
From the group list, select the user group for which you want to set permissions, and click the Permissions tab.
A set of tabs are displayed in alphabetical order, one tab for each ALM module plus tabs for specific purposes, such as for administration. Permission levels (such as Create, Update, and Delete) for the entities available in each module are listed under the Permission Level column.

-
Click a module tab. If necessary, to see the permission levels for each entity, expand the entity.
Information icon 
If a permission level of an entity is dependent on, or impacts, the permission levels of another entity, an  icon is displayed to the right of the By Owner Only column, and the Impacts pane at the bottom of the window displays information about the impact.
Options pane If additional options are available for a permission level, they are displayed in the Options pane at the right of the window. -
Select the checkboxes for the permission levels that the selected user group should have for each entity.
If a permission level has sublevels, expand the permission level to display the list of associated fields. Then select the fields that the selected user group can use.
-
Limit the capabilities of modifying a field as follows:
-
To limit the entities whose permission levels can only be modified by their owners, select the checkbox for the permission level in the By Owner Only column.
For example, to allow only the person who owns a requirement to delete the requirement, in the Permissions > Requirement > Delete permission level, select the checkbox in the By Owner Only column.
 ALM object owners
The following table describes users that are defined as the owners of the ALM objects.
ALM Object
Owner
Analysis folder
The Owner field displays the user who created the analysis folder. The owner is updated to the current user if the analysis folder is moved (cut and paste) to the user's private folders.
Analysis item
The Owner field displays the user who created the analysis item. The owner is updated to the current user if the analysis item is moved (cut and paste) to the user's private folders.
Baselines The Created By field displays the user who captured the baseline. Business Components
The Assigned To field displays the user or user group responsible for the component.
Business Process Model Elements The Import By field displays the user who imported the business process model elements. Business Process Model Models The Created By field displays the user who created the business process model models. Business Process Model Paths The Created By field displays the user who created the business process model paths. Dashboard folder
The Folder Owner field displays the user who created the dashboard folder. The owner is updated to the current user if the dashboard folder is moved (cut and paste) to the user's private folders.
Dashboard page
The Page Owner field displays the user who created the dashboard page. The owner is updated to the current user if the dashboard page is moved (cut and paste) to the user's private folders.
Defect
The Assigned To field displays the user to which the defect has been assigned.
Favorites The Owner field displays the user who created the favorite. Requirement
The Author field displays the user who created the requirement.
Test in the Test Plan module
The Designer field displays the user who created the test in the test plan module.
Resource in the Test Resources module
The Created By field displays the user who created the resource in the test resources module.
Test Configuration The Created By field displays the user who created the test configuration. Test in the Test Lab module
The Responsible Tester field displays the user testing the test in the test lab module.
Test run in the Test Lab module
The Tester field displays the user testing the test run in the test lab module.
-
To limit the values a user group can select from a lookup list type field, set transition rules of allowed field values in the Options pane. For details, see Set transition rules.
-
-
Click the Data-hiding tab to hide data from the current user group by module. For details, see Hide data for a user group (Data hiding).
-
Click Save.
You can limit a group's modifying permissions by setting transition rules for modifying values in fields. These rules determine the values that the group can modify in specified fields. Transition rules can be set only for lookup and user list fields.
Example: When modifying defect information, you can limit the items a user group can select in the Status field of a defect record. You can set a transition rule that only allows a user group to edit the Status field from Fixed to Closed.
Note: When Workflow is used to change a list of values for a field that is set with transition rules, only changes that satisfy both the workflow script and the transition rules are allowed. For details, see Workflow Event Reference.
-
In the Project Customization window, in the left pane, click Groups and Permissions.
-
From the group list, select the user group for which you want to set transition rules.
-
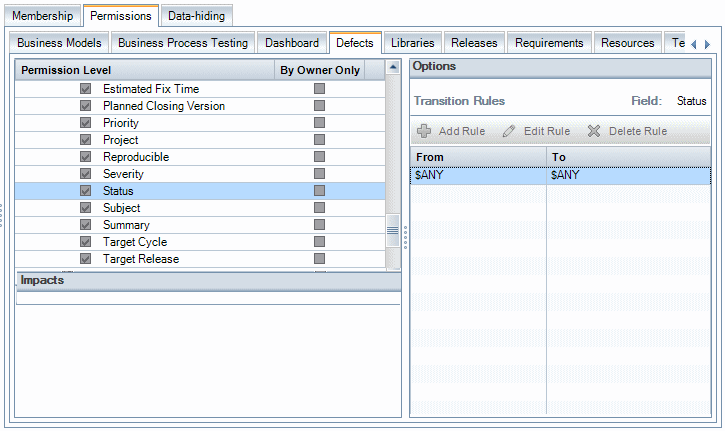
Click the Permissions tab. Click a module tab, such as Defects. The tab displays the entities available in the module and their corresponding permission levels.
-
Expand the module tab and select an entity and its permission level. For example, expand Defect and then expand Update.
-
Select a field. For example, select Status. The Transition Rules grid appears in the Options pane on the right side of the window.

-
Click Add Rule to add a transition rule.
From Do one of the following.
-
Select $ANY to allow the user group to modify the field, irrespective of the currently displayed value.
-
Select a value from the list. The user group is able to modify the selected field only when the field displays the value you select. For example, to allow the user group to edit the Status field of a defect only if Fixed is the current value, select Fixed.
To Do one of the following.
-
Select $ANY to allow the user group to change the field to any value.
-
Select a value from the list. The user group is able to change the value of the selected field only to the value you specify. For example, to allow the user group to change the value of the Status field only to Closed, select Closed.
-
-
To modify a transition rule, select a rule from the Transition Rules grid and click Edit Rule . In the Edit Transition Rules dialog box, modify the rule and click OK.
-
To delete a transition rule, select a rule from the Transition Rules grid and click Delete Rule. Click OK to confirm if prompted.
-
Click Save.
You can instruct ALM to hide specific records that a user group can view. You can hide records related to defects, libraries, requirements, business components, resources, tests, and test sets.
Consider the following before you hide data for a user group.
| For users of the default Viewer group |
When a user is created, it is added to the default Viewer group which has the data-hiding filter settings disabled, which means the user can view all data. If the user is added to another group that has data-hiding filters set, the user can still view all data as long as it is still in the Viewer group. Therefore, if you want the data hiding settings apply to the user, remove the user from the Viewer group. |
| Cross project customization - working with a linked project |
If you are working with a project that is linked to a template project, you cannot hide data for any field defined by the template project. For user groups defined by the template project, you can hide the data of user-defined fields defined by the project. In the Groups and Permissions page, select the user group in the group list, and click the Data-hiding tab to determine which data is visible. |
To hide data for a user group:
-
In the Project Customization window, in the left pane, click Groups and Permissions.
-
From the group list, select the user group for which you want to hide data.
-
Click the Data-hiding tab.
-
Click the entity for which you want to hide data. For example, click Defect. The pane at the right displays the filters currently set and the fields currently visible in the Defects module to the users of the selected group.
-
You can hide data by setting filters or by defining visible fields.
Set filters You can set filters for specific fields, limiting the records that the user group can view. For example, you can set the filter for the field Assigned To to [CurrentUser]. This instructs ALM to display only the records that are assigned to the current user.
To set filters:
-
Click Set Filter/Sort .
-
Set one or more filters, and click OK.
For details on filtering, see Filter Dialog Box.
If you are filtering requirements for a user group according to the Req Parent field, all requirements under the selected parent are displayed in the requirements grid. The requirements tree does not display any requirements.
Empty test subject folders and test set folders are not included in any filter results.
Define visible fields You can select which fields in a module the user group can see and which should be hidden. Users belonging to a specific user group need to view only data that relates to their work. For example, you may want to hide the Path field in the Test Plan module from user groups that should not be able to access test scripts from the file system. You cannot hide required fields.
To define visible fields:
-
Click Set Visible Fields .
-
To hide a field, move the field from the Visible Columns to the Available Columns.
The fields marked with a
 cannot be moved.
 -
Click OK.
-
-
Click Save.
For each ALM project, you can control the modules that each user group can access. you can better utilize your ALM licenses by preventing users from accessing unnecessary modules. For example, if a user group uses ALM only to add defects to a project, you can limit the group's access to the Defects module only.
You can specify module access for the following modules: Defects, Test Plan, Test Lab, Requirements, Dashboard, Business Components, Releases, Business Process Models, Libraries, and Web Runner.
If access to the Business Components module is not enabled for a user group, those users can still view existing business process tests in read-only mode.
To customize module access for user groups:
-
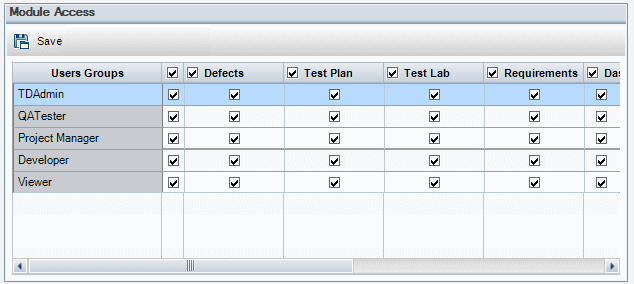
In the Project Customization window, in the left pane, click Module Access.

Checkmarks indicate the modules that a user group can access.
-
To select or clear a cell in the table, select the checkbox in the cell.
To select or clear all modules for a user group, click the checkbox in the column to the right of the user group name.
To select or clear all user groups for a module, click the checkbox to the left of the module name (in the same cell).
To select or clear all user groups for all modules, click the checkbox in the column to the right of the User Groups heading.
-
Click Save to save your changes.
 See also:


 in the linked project. You can assign users to user groups defined by the template project.


