
Share this page


You can create requirement types for your project, and customize their properties.
Requirement type overview
In the Requirements module, you can assign each requirement to a requirement type.
| What a requirement type controls |
Each requirement type controls the following:
Example: You can create a requirement type Security Requirement for requirements connected to security. You can then create a user-defined field Security Hazards containing a list of possible security hazards a requirement might cover. This field is not relevant for requirements of other types, so you would not make it available for any type except for Security Requirement. |
| Cross project customization |
If you are working with cross project customization, consider the following:
|

ALM provides the default requirement types Undefined, Folder, Group, Functional, Business, Testing, and Business Model. You can also create your own custom requirement types.
-
In the Project Customization window, in the left pane, click Requirement Types.
-
Click New Type.
Name. Enter a name for the type.
Create As. Assign properties of an existing requirement type.
Tip: Select an existing requirement type that has similar properties to the new type you want to create. This minimizes the level of customization you need to do.
-
Click OK.
-
Configure the new requirement type. See Configure requirement types.
-
Click Save to save your changes to the Requirement Types page.
To delete a requirement type
You can delete a requirement type. If requirements of a requirement type already exists in your project, you cannot delete the requirement type. To delete the type, you must first delete all requirements of the type, or change their types. You cannot delete the default requirement types Folder, Group, and Undefined.
-
In the Project Customization window, in the left pane, click Requirement Types.
-
Select a requirement type.
-
Click DeleteType.
-
Click OK to confirm.
-
Click Save to save your changes to the Requirement Types page.
Configure requirement types
You can configure a requirement type by changing its icon, by setting options for test coverage and risk analysis, and by defining which fields are available and which are required for each requirement type. You can also define a rich text template for each requirement type.
To configure a requirement type:
-
In the Project Customization window, in the left pane, click Requirement Types. The Requirement Types page opens.
-
Select the requirement type.
-
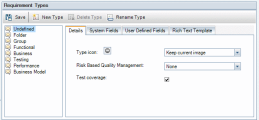
In the Details tab, you can set the following:
Type icon Select an icon from the Type icon list.
In the Requirements module tree views, you can identify to which type a requirement belongs by checking the icon displayed next to the requirement.
You cannot change the icon for the default requirement types Folder and Group.
Risk-Based Quality Management Select one of the following options from the Risk-Based Quality Management box:
-
Perform Analysis.
-
Perform Assessment.
-
None. Select this one if you do not want to enable risk-based quality management for requirements of this requirement type.
For details on risk-based quality management, see Risk-based quality management.
Test coverage Select the Test coverage checkbox if you want to enable test coverage for requirements of this requirement type.
You cannot clear the Testing Coverage checkbox for a requirement type if requirements of that type already have test coverage. To clear the checkbox, you must either delete the requirements of that type with test coverage, remove the test coverage from those requirements, or change their requirement type.
-
-
In the System Fields tab, set the target system fields as required fields for the requirement type.
To select a system field as a required field, in the Required column, select the checkbox for the field.
To set all system fields as required fields at one time, select the checkbox next to the Required column heading.
Note: Some system fields cannot be set as optional.
-
In the User Defined Fields tab, select which user fields are available for the requirement type, and which of these fields are required.
-
To make a user-defined field available for the requirement type, in the In Type column, select the checkbox for the field.
For details on user-defined fields, see Customize project entities.
-
To set an available user-defined field as a required field for the requirement type, in the Required column, select the checkbox for the field.
-
-
In the Rich Text Template tab, use the HTML editor to define a page layout as the initial view in the Rich Text tab of the Requirements module.
-
You can only define one template per requirement type.
-
You cannot include graphics in the template. You can only add graphics from within the Rich Text tab of the Requirements module.
-
The template is applied automatically to all newly created requirements of this requirement type.
-
The template can also be applied manually to existing requirements from within the Rich Text tab. Applying the template overwrites any existing content.
-
-
Click Save to save your changes to the Requirement Types page.
 See also:


