Format test plan data
Before you export test plan data from Word to ALM, you can place data as paragraphs or tables. You then use the Microsoft Word add-in toolbar buttons to mark test plan fields. You can format the fields so that when you export them to ALM, the subject folders are on the same hierarchical level, or different hierarchical levels, in the test plan tree.
Place test plan data in Word document
The Word document can contain test plan data as paragraphs or as tables.
Data as paragraphs
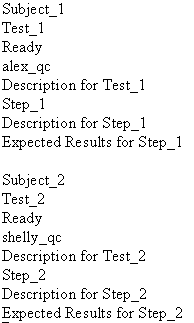
When the data are provided as paragraphs, each field of the test plan must be on a separate line. For each subject folder, the name of the subject folder must appear first. The tests of that subject folder must appear under the name of the subject folder. The test steps of each test must appear under the test. The following example shows the data for two subject folders, each with one test containing one test step.
Data as tables
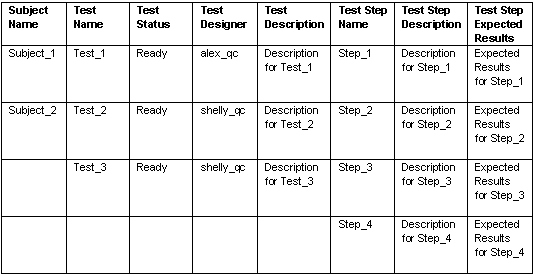
When the document contains a table, the first column must be the name of the subject folder. The following example shows the data for two subject folders, listed in a table. In this example, Subject_2 contains two tests and Test_3 contains two test steps:
Mark test plan fields
After placing your data as paragraphs or as tables, you mark your test plan fields. To mark a test plan field, highlight the text and click the appropriate button on the ALM Test Plan toolbar. An icon is added next to the marked text line. A bookmark is inserted into the document to allow the add-in to identify the marked text when it is exported to ALM.
When marking test plan fields, consider the following:
-
You can export subject folders, tests and test steps. For a test you can export the test name, status, designer, and description. For a test step you can export the test step name, description, and expected results.
-
To define a subfolder for an existing subject folder, place the new subfolder definition under the existing subject folder name.
-
If a test step with the same name exists on the same level in the test plan tree, the test step is changed to contain the new information. If your document contains two test steps on the same hierarchical level with the same name, only the second test step is created.
-
The data for each field should be on the same line as the icon that marks it. The only exceptions are the Expected Results field and the Description field. Data for these fields can extend to additional lines and can include returns and indents.
-
Data intended for ALM fields that have selection lists must match the entries in those selection lists exactly.
To mark the test plan fields:
-
Open a Word document containing test plan text.
-
Highlight a text line or a table cell in your document, and click the appropriate button in the ALM Test Plan toolbar:
Field Toolbar Button Icon subject folder name 

test name 

current status of the test 

designer of the test 

description of the test 

test step name 

description of the step 

expected results of the step 

-
Repeat for all test plan data. Any text in the document that is not marked is ignored.
-
Click the Close Folder button to close each subject folder with the Close Folder mark
 . The location of this mark depends on whether the folders are on the same hierarchical level or on different hierarchical levels.
For more information, see Example: subject folders on the same hierarchical level or Example: subject folders on different hierarchical levels.
-
To unmark one or more fields, use the undo buttons or remove the mark manually. For more information, see Delete formatting from Word document.
-
When all test plan data has been marked, export the test plan to ALM. For more information, see Export data from Microsoft Word to ALM.
Example: subject folders on the same hierarchical level
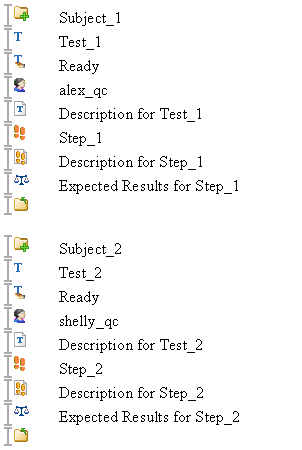
To define subject folders on the same hierarchical level in the test plan tree, use the Close Folder button to place the Close Folder mark directly after the data for each subject folder. This causes a subject folder to be placed on the same level as the preceding subject folder.
When the document contains paragraphs, insert a line after the last line of the subject folder data and mark it with the Close Folder mark:
When the document contains a table, add a column to the end of the table, and insert the Close Folder mark at the end of the data for each subject folder:

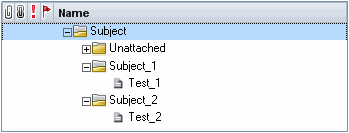
After you export the test plan to ALM, the subject folders in the test plan tree are displayed on the same hierarchical level.
Example: subject folders on different hierarchical levels
You can define a subject folder to be a subfolder of the preceding subject folder. To do this, use the Close Folder button to place the Close Folder mark for the parent folder after all its subfolders.
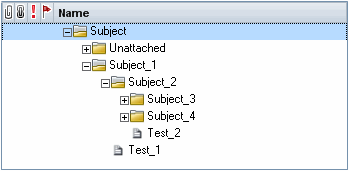
For example, to define Subject_2 as a subfolder of Subject_1, and Subject_3 and Subject_4 as subfolders of Subject_2, place the Close Folder mark for Subject_2 after the definitions of its subfolders. Place the Close Folder mark for Subject_1 at the very end.
When the document contains paragraphs, place each Close Folder mark on its own line in the appropriate location. Note that the Close Folder marks for Subject_1 and Subject_2 are inserted after Subject_3 and Subject_4.
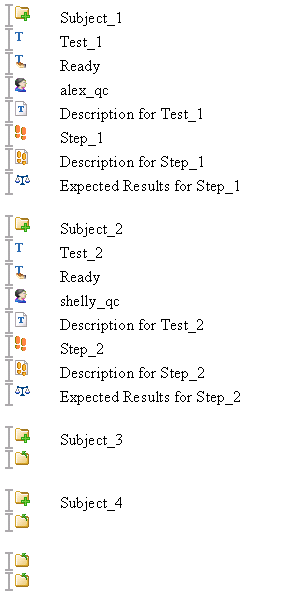
When the data are provided as a table, add a column to the end of the table and place each Close Folder mark in the appropriate location:

After you export the requirements to ALM, Subject_2 is displayed as a child of Subject_1, and Subject_3 and Subject_4 are displayed as children of Subject_2.
 Next steps:


