Create and design project report templates
Project report templates are Microsoft Word files that determine the layout and style in which data is displayed in project reports. Users assign templates to project reports in the Analysis View module.
In this topic:
About project report templates
There are various types of templates that affect different aspects of template reports. Predefined templates are provided for each of the template types.
|
Template Type |
Description |
|---|---|
|
Document Templates |
Defines the outline of the report layout. For example, a document template dictates the design of the title page, whether the report includes a table of contents, page orientation, page numbering, and more. |
|
Style Templates |
Defines the formatting (for example, tables, section headings, paragraphs) applied to Microsoft Word styles. |
|
History Templates |
Defines the format in which history information is displayed in report sections. |
|
Section Templates |
Defines the fields that are included in report sections and the format in which they are displayed. Section templates are defined separately for each ALM entity. |
Note:
-
Depending on permissions, users can create and use custom report templates, in addition to the project report templates. For details on custom templates, see Create a custom report template.
-
Template fonts need to be installed on the client machine of the user generating the report in order for them to be properly visible in the generated document.
Create report templates
You can create a report template, and make it available for users to assign to project reports.
To create a report template:
-
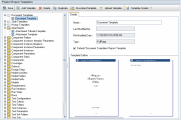
In Project Customization, in the left pane, click Project Report Templates.
-
In the templates tree, select a template type or category of the template you want to create.
-
Click the down arrow next to the Template Creator button, and select one of the following:
-
Create From Default Style Template. Creates a template file using the default style template. This is the default option if you click Template Creator.
-
Create From Style Template. Creates a template file using a selected style template.
-
-
Design a new template file in Microsoft Word using the Template Creator tab. For details on designing template files, see Design Section templates.
-
Save and close the file.
-
In Project Customization, in the left pane, click Project Report Templates, and select the template type for which you created the template file.
-
Click Add Template, and select the template file that you created. The following fields are displayed for the project report template:
|
Field |
Description |
|---|---|
|
Name |
The name of the project report template. |
|
Last Modified By |
Read-only. The name of the ALM user who last made changes to the project report template. |
|
File Modified Date |
Read-only. The date and time on which changes were last made to the project report template. |
|
Type |
Read-only. Indicates whether the project report template is a full page or tabular template. Full Page. Defines the layout of ALM entity records on a page. Tabular. Defines the layout of ALM entity records in a table. |
| Default <Type> Report Template | To set the new template as the default template for the type, select Default <Category> Report Template. When a user adds a section to a report, the default project template for the entity is initially selected. |
To edit a report template:
-
In Project Customization, in the left pane, click Project Report Templates.
-
Select the template you want to edit, and click Download Template. A copy of the template file is saved on your computer, and the file opens in Microsoft Word.
-
Edit the template using the Template Creator tab. For details on designing template files, see Design report templates.
-
Save and close the template file.
-
In Project Customization, select the template, click Upload Template, and select the template file on your computer file system.
To duplicate a report template:
-
In Project Customization, in the left pane, click Project Report Templates.
-
Select the template you want to duplicate, and click Duplicate.
-
Edit the duplicated template.
To delete a report template:
You can delete report template when it is not set as the default template in its type, or is not being used by any project reports.
To delete a report template, select the template and click Delete.
Design report templates
You design document, history, and section report templates using the Template Creator tab in Microsoft Word.
Overview of Template Creator
With the Template Creator tab in Word, you select and arrange merge fields in a Microsoft Word document. Merge fields represent ALM field labels and values, or contain instructions for building the report. When you generate a report, the merge fields in the report templates are replaced by actual data.
To enable the template creator:
-
Install Microsoft Office (32 bit or 64 bit) on your machine.
For supported Office versions, see Support Matrix.
-
Allow macros in Microsoft Word.
-
In Word, click the Office button, and then click Word Options.
-
Select Trust Center > Trust Center Settings > Macro Settings. Select Enable all macros.
-
Guidelines for creating full-page and tabular templates
Section templates can be designed in either full-page or tabular formats.
Note: Templates should consist of only one Word section. Only those text and fields in the first Word section are included in the generated report.
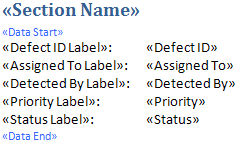
In a full-page template, you arrange fields of an entity across several lines of a page. Typically, merge fields of a field's label and value are displayed on the same line, separated by a colon or tab.
For example: Detected By Label : Detected By
In full page templates, the section of the template that is repeated for each record must be surrounded by Data Start and Data End merge fields.
Example:

Tabular templates
In a tabular template, you arrange fields of an entity in a two-row table. The top row of the table contains merge fields of field labels. The bottom row of the table contains merge fields of the corresponding field values.
In tabular templates, the first cell in the value row must begin with a Table Start merge field, and the last cell in the value row must end with a Table End merge field.
Example:

Design Document templates
In Document template files, you define the outline of the report layout. For example, a Document template dictates the design of the title page, whether the report includes a table of contents, page orientation, page numbering, and more.
Elements used in Document templates
The following elements are used in Document templates.
| ReportName |
A merge field that is replaced in reports by the value of the report's Name field. |
| Custom fields | Merge fields that represent information you want users to include in reports, for example Author and Project. You can use any string as a custom field. Users enter actual values for custom fields when configuring project reports. |
| DocumentData | A merge field that marks the point at which the report sections begin. |
| Document design |
Document formatting that you define in a Document template is used in project reports that use the Document template. This includes headers and footers, page numbers, and page layout. |
| Fixed text |
Fixed text that you type in a Document template is displayed in reports. For example, enter your organization name on the cover page, or enter Created by: before the custom field Author. |
To design a document template:
-
In the Template Creator tab, click Template Type
 , and select Document.
 -
To include the report name, click Insert Field Value
 , and select ReportName.
 The ReportName tag retrieves the report name from the Name field of the template-based report.
-
To include customized information in areas such as the title page, headers and footers, click Insert Custom Field
 . In the Custom Field dialog box, enter a custom field name (for example, Author). When you create a report, you enter actual values that are displayed on the report cover page.
Repeat the step to include additional custom fields.
-
Design the document with elements such as headers, footers, and page numbers.
-
Place the cursor at the point at which report data should begin, click Insert Field Value
 , and select DocumentData.
Design Style templates
In Style template files you define the formatting that is applied to Microsoft Word styles in all sections of a report.
For example, in a Style template you define the formatting for the Normal style. As a result, text in section templates that is assigned the Normal style, is displayed in the format you defined in the Style template.
Style formatting that is defined in the Style template overrides the formatting defined in other templates used in a project report.
Consider the following for designing Style templates:
| Heading styles |
The Heading 1, Heading 2, and Heading <n> styles that you define in a Style template are automatically applied to report sections, according to the level of the section in the report. For details on applying heading styles in section templates, see Design Section templates. |
| Table styles |
To ensure a uniform style for all data tables displayed in a report, define the Project Report Table Style. By default, tables you create in tabular templates use this style. |
| Text |
Any text that you enter in a Style template is ignored by project reports. |
Design History templates
In History template files, you define how history information is displayed in all report sections.
Note:
- To display History information in project reports, section templates must include History merge fields.
- History templates can only be in tabular format. For details, see Guidelines for creating full-page and tabular templates.
Elements used in History templates
The following elements are used in History templates:
-
History fields. Merge fields that represent history field labels and values.
-
Fixed text. Fixed text that you type in a history template is displayed in reports. For example, Enter History in a heading row above the history merge fields.
To design a History template:
-
In the Template Creator tab, click Template Type
 , and select History.
 -
Click Formatting
 , and select Tabular, to create a tabular template.
 -
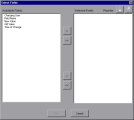
To include a field in the template, select a field in the Available Fields pane, and click the right arrow
 .
.To remove a field from the template, select a field in Selected Fields pane, and click the left arrow
 .
.To move all fields from one pane to the other, click the double arrows
 .
.Tip: Use the Ctrl or Shift key to select multiple fields.
-
Click the Reorder buttons to change the order of fields in the template.
-
Click Insert. The fields you selected are inserted in tabular layout.
Design Section templates
In Section templates, you define how information is displayed in report sections. You define separate section templates for each ALM entity that can be included in report sections.
Note: Section templates can be in either a full-page or tabular format. For details, see Guidelines for creating full-page and tabular templates.
Elements used in Section templates
The following elements are used in section templates:
| Section Name | A merge field that is replaced in reports by the value of a section's Name field. |
| Section Filter | A merge field that displays the data filter applied to the report section. |
| Entity fields |
Merge fields that represent entity field labels and values. Date and time fields are formatted using a SHORT DATE/TIME format associated with the locale defined on the ALM server. The report designer cannot change these formats. |
| History | A merge field that inserts history information of the entity record. Use the merge field in full-page templates, within the data area. |
| Graphs |
A merge field that inserts graphs that have been added to the report. By default graphs are added to the end of a report. |
| Fixed text | Fixed text that you type in a section template is displayed in reports. |
-
In the Template Creator tab, click Template Type
 , and select a section.
 -
Click Formatting
 , and select either Full Page or Tabular, to create a full-page or a tabular template.
 -
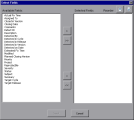
To include a field in the template, select a field in the Available Fields pane, and click the right arrow
 .
. To remove a field from the template, select a field in Selected Fields pane, and click the left arrow
 .
.To move all fields from one pane to the other, click the double arrows
 .
.Tip: Use the Ctrl or Shift key to select multiple fields.
-
Click the Reorder buttons to change the order of fields in the template.
-
Click Insert. The fields you selected are inserted in full-page or tabular layout.
-
To include history information of records in a full-page template, place the cursor before the Data End tag, click Insert Field Value
 , and select History.
Note: History information is displayed according to the History template assigned to the report.
-
To include the section name, or details of the section filter, click Insert Field Value
 , and select Section Name or Section Filter. Make sure these fields are placed outside the data area.
 -
A section template can be used at any level of a report. To ensure that a section header displays in a style appropriate to its level in the report, place the cursor on the Section Name merge field. Make sure you click Set Auto Heading Style
 .
. -
To ensure that tables use the uniform table style defined in the Style template, place the cursor in the table area. Make sure you click Set Table Style
 .
.
 See also:


