
Share this page


Manage projects
This section describes how to manage and maintain projects and templates. In this topic, the term "project" refers to both projects and template projects.
View and edit project details
You can view project details such as database and project directory. You can also edit some project settings, including the maximum number of users allowed to connect concurrently to the project.
Permission:
To edit project details, you should have the following permission:
-
On-premises: Site admins.
-
SaaS: Site admins or customer admins, or have one of the following permissions:
-
Projects > Project Details Update
-
Projects > Create Project
-
To view or edit the details of a project:
-
Open the Site Administration > Projects tab.
-
In the Projects list, click the project you want to view or edit.
-
Check the Details tab.
Field Description Domain Domain where the project is located. You can move the project to another domain by selecting a different value in this field.
Note: When you save the change, you are prompted to deactivate the project if it is still active.
Alternatively, you can move the project to a different domain by using drag and drop in the Projects list.
If a project's domain changes, it does not change the physical location of the project.
Project Name Name of the project. Project Status Status of the project: active or inactive. Created From Domain If the project is copied from another project or a template, this field displays the domain of the project or template that is copied from.
Created From Project If the project is copied from another project or a template, this field displays the project or template that is copied from. Database Type Type of the project database: MS-SQL or Oracle. Database Name Name of the project database. Database Server Name of the server where the project database is located. Maintenance State Indicates whether a maintenance task is being performed on this project. Tasks include verifying, repairing, upgrading, and realigning a project. Possible values are:
-
Idle. No maintenance is being performed on this project.
-
Corrupted. Maintenance cannot be completed because the project is corrupted. To resume, a backup copy of this project must be restored.
-
Under maintenance task. Maintenance is being performed on this project.
For details, see Verify, repair, upgrade, and restore projects.
Connection String Connection string of the project database server.
To edit the connection string, click the Change Connection String link. If the project is still active, you are prompted to deactivate it.
For details about connection strings, see Add database servers.
Versioning Indicates whether or not version control is enabled for the project. Project Directory The location of the project repository in the file system. Unicode Supported Indicates whether or not this project supports Unicode. DB User Password Click the Change Password link to modify the password for accessing the database. Enable/Rebuild Text Search Enables and rebuilds the text search indexes.
For details about configuring Text Search, see Configure Text Search.
Note: If the operation of enabling and rebuilding the text search indexes times out before it completes, you can change the default timeout value by defining the TEXT_SEARCH_TIMEOUT parameter. For details, see Site Parameters.
Search Language Displays the default search language of the project.
If Text Search is enabled, you can select another search language.
For details, see Select search language for a project.
Exception File Enter the location of the exception file to be used when running the upgrade process.
For details, see Define an exception file.
Promote Repository Cleanup Clean up the repository of the current project as soon as possible.
For details, see Define project repository cleanup.
Postpone Repository Cleanup Postpone the repository cleanup of the current project, or to stop a cleanup that is in progress.
For details, Define project repository cleanup.
Automatic Calculations State Click it to enable automatic PPT calculations for the project.
For details about PPT, see Project planning and tracking (PPT) calculations.
Run Now Click it to manually trigger PPM calculations for the project. Enable Quality Insight Enables or disables Quality Insight for the project.
Note:
-
Only project administrator (for on-premises) or customer administrators (for SaaS) can enable or disable Quality Insight.
-
You can enable Quality Insight for a project only when it is enabled at the site level and the customer level (for SaaS). For details, see Quality Insight.
-
If you enable Quality Insight, the Quality Insight dedicated user is automatically added to the project.
Send Email Automatically If you select this option, you enable the mail configuration settings for the project. This sends emails to specified users every time defined defect fields are updated.
If you do not select this option, mail configuration settings for the project have no effect and emails are not sent.
For details on configuring mail, see Configure automail.
Linked to Template Name of the template to which this project is linked.
If the project is not linked to a template, it is displayed
N/A.User Quota The number of users allowed to connect concurrently to the project.
-
Unlimited Connections: Select this option if there is no limit on the number of users allowed to connect concurrently to the project.
-
Maximum Connections: Enter the maximum number of users you allow to connect concurrently to the project.
Note: The maximum number of users allowed to connect concurrently to the project should not exceed the number of users allowed to connect to its domain. For details, see Create domains.
Description Description of the project.
By default, it shows the project creation time.
-
-
Click Save to save your changes.

Mange project users
You can control access to a project by adding users to or removing users from the project.
Permission:
To add site users to or remove site users from a project, you should have the following permission:
-
On-premises: Site admins.
-
SaaS: Site admins or customer admins, or have the User Management > Update User Membership in Projects permission.
To add users to a project:
-
Open Site Administration > Projects tab.
-
In the Projects list, click the project you want to add users to.
-
In the Users tab, click Add Users.
You can add users from the Users list or copy users from existing projects.
Option Details Add From the Users List To add site/customer users to the current project:
-
From the users list, select the users you want to add to the project.
You can use the search button to search users by keywords that are found in the usernames, full name, or email.
-
Click Save.
Copy From Another Project To copy users from existing projects:
-
From the Projects list, click the project whose users you want to copy.
You can use the search button to search users by keywords that are found in usernames. The filtered users are highlighted in the Projects list.
-
Select the users you want to copy, and click Save.
Tip: To check which users and how many users are selected before adding them to the project, click View Selected.
If you want to deselect a user, click Delete in the Action column.
-
-
Assign groups to the project users.
To assign groups to a project user, click the Group drop-down field, and select the user groups you want to assign to the user.
Scenario Details When you copy users from other projects These users are added with the same user group they had in the project from which they were copied. If the user group does not exist in this project, the users are added with the Viewer group privileges.
If you copy a user from another project in which the user is a project administrator (TDAdmin user group), the user is automatically assigned as a project administrator in the new project.
When you add users from the Users list These users are added with the Viewer group privileges (read-only privileges).
To remove users from a project:
When a user is no longer working on a project, remove the user from the project to ensure project security. Removing a user from a project does not delete the user from the Users list.
To remove users from a project:
-
In the Users tab, select the users to remove.
-
Click Remove Users, and click Yes in the confirmation dialog box.
Enable extensions for a project
Extensions provide added functionality. If you have a license for an extension, you can utilize its added functionality after enabling the extension on a per project basis.
You cannot disable an extension for a project after you enable it. We recommend you enable only the extensions you need. If you enable extra extensions, it may affect performance and consume additional disk space.
Permission:
To enable extensions for a project, you should have the following permission:
-
On-premises: Site admins.
-
SaaS: Site admins or customer admins, or have one of the following permissions:
-
Projects > Project PC Extension Details Update
-
Projects > Project Lab Update
-
To enable extensions for a project:
-
Open Site Administration > Projects tab.
-
In the Projects list, click the project you want to enable extensions for, and click the Extensions tab.
The tab lists the extensions that are already enabled for the project.
-
To enable additional extensions, click Enable Extensions.
The Enable Extensions dialog box opens, displaying the list of extensions available for your edition on the server.
Extension Description Download ALM Dev Extension Enables you as the project administrator to perform customizations necessary for working with IDE Connectors. ALM Functional Testing Lab for Mobile and Web Extension Enables you to run tests with the OpenText Functional Testing Lab server. ALM Lab Extension for functional and performance testing Enables you to work with Lab Management and OpenText Enterprise Performance Engineering, in order to provision and deploy test environments on a private or public cloud, as well as to schedule and execute tests with or without user intervention.
Also requires that you install Manage projects.
Application Lifecycle Intelligence (ALI) ALI is a set of capabilities, reports, and metrics providing complete traceability that enables stakeholders to make informed decisions.

Note: Extensions without licenses on the server are displayed in gray. It is possible to enable an extension for which you do not yet have a license. You can utilize the extension's added functionality later, after receiving the license.
-
Select the extensions you want to enable and click Enable.
Link a template to projects
You link a template to projects as part of cross project customization. The template administrator uses cross project customization to apply template customization to the linked projects. You can link a template to multiple projects, however, you can link a project to only one template.
You can also link a template to a project when you create a project. For details, see Create projects.
Permission:
To link a template to a project, you should have the following permission:
-
On-premises: Site admins.
-
SaaS: Site admins or customer admins, or have one of the following permissions:
-
Projects > Update Template Linked Projects List
-
Projects > Create Project
-
To link a template to projects:
-
Open Site Administration > Projects tab.
-
In the Projects list, click the template project you wan to link to projects, and click the Linked Projects tab.
This tab lists the projects that are already linked to the template.
-
To link more projects to this template, click Add Projects.
-
From the All Projects list, select the projects you want to link to the template, and click the right arrow
 .
. -
Click Save.
To unlink projects from a template:
-
In the Linked Projects tab, select the projects to unlink.
-
Click Remove Projects and click Yes in the confirmation dialog box.
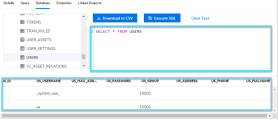
View and query project database tables
You can query specific data that is stored in your project. You query a project by defining and running SQL queries.
Permission:
To run a query on a project, you should be site admin.
To query a project table:
-
Open Site Administration > Projects tab.
-
In the Projects list, click the project for which you want to query the tables, and click the Database tab.
-
From the project's tables list, select a table. The "SELECT *" query for this table is automatically run and all the data for the table is displayed in the SQL query results grid.
-
Define a query by typing an SQL statement in the SQL pane.
-
Click Execute SQL. The data returned by the query is displayed in the SQL query results grid.
To export the query results, click Download to CSV.

Export a project
Exporting projects enables you to take project data from a server, and back it up in another location or another media device. For example, you may want to create self-contained project image files that are backed up on a USB storage device or DVD. You can send the media device to a server in another location, and import the project files.
Permission:
To export a project, you should be site admin.
Before your start
Consider the following before you export a project:
| Area | Details |
|---|---|
| Extension |
If you export an OpenText Application Quality Management project that has extensions installed, all data from the project is exported, including data for the extensions. You can only import such an exported project to a server that has the relevant extensions installed. |
| Disk space | Ensure adequate disk space in your home directory on the OpenText Application Quality Management client machine to temporarily store the exported project file, even if you choose an alternate location for saving the file. |
| Import to original server |
You cannot import the project onto the original server, if a project with the same PUID exists on that server. |
| Export during off-peak hours | It may take some time to export large projects. It is recommended you perform this operation during off-peak hours. |
| Restore non-Lab Management project |
If the project was not part of Lab Management, when restoring access to the project:
|
To export a project:
-
Prerequisite: You can only export a project after it is deactivated.
-
Open Site Administration > Projects tab.
-
In the Projects list, select the project you want to export, click Export
 .
.If the project is active, you are prompted to deactivate it.
-
Wait until the export is completed.
You can check the task status and download the project file from Task Status. For details, see Monitor asynchronous executions.
Remove a project
You can remove a project or a template from the Projects list. This does not delete the project from the server and you can restore the project if necessary. For details on restoring access to a project, see Restore access to a project.
Permission:
To remove a project, you should be site admin.
To remove a project from the Projects list:
-
Prerequisite: Make sure the project you want to remove is not in use.
-
Open Site Administration > Projects tab.
-
In the Projects list, select the project you want to remove, and click Remove
 .
. -
Click Yes in the confirmation dialog box.
Delete a project
You can delete a project from the Projects list. This deletes the contents of the project from the server and you cannot restore the project.
Permission:
To delete a project, you should have the following permission:
-
On-premises: Site admins
-
SaaS: Site admins or customer admins, or have the Projects > Delete Project permission.
To delete a project:
-
Prerequisite: Make sure the project you want to delete is not in use.
-
Open Site Administration > Projects tab.
-
In the Projects list, hover over the project you want to delete, and click Delete
 .
. -
Click Yes in the confirmation dialog box.
If there are active users connected to the project, the users are disconnected automatically.
Deactivate or activate a project
You can deactivate or activate a project. When you deactivate a project:
-
The project name is removed from the Projects box in the login window.
-
The project is not deleted from the server.
-
Any users currently connected to the project are forced to log out.
Permission:
To activate or deactivate a project, you should have the following permission:
-
On-premises: Site admins
-
SaaS: Site admins or customer admins, or have one of the following permissions:
-
Projects > Update Project Activation Status
-
Projects > Project Details Update
-
Projects > Manage Project Versioning
-
Projects > Create Project
-
Projects > Project PC Extension Details Update
-
Projects > Project Lab Update
-
To deactivate a project:
-
Open Site Administration > Projects tab.
-
In the Projects list, select the project you want to deactivate, and click Deactivate
 .
. -
Click Yes in the confirmation dialog box.
To activate a project:
-
Open Site Administration > Projects tab.
-
In the Projects list, select the project you want to activate, and click Activate
 .
.
Enable or disable version control for a project
You can enable version control for a project. For details on version control, see Version control.
You can also disable version control for a project. When you disable version control for a project, OpenText Application Quality Management no longer stores previous versions, and deletes all version history for the project. If you enable version control for the project again, previous history is not available.
Permission:
To enable or disable version control for a project, you should have the following permission:
-
On-premises: Site admins
-
SaaS: Site admins or customer admins, or have one of the following permissions:
-
Projects > Manage Project Versioning
-
Projects > Create Project
-
To enable version control for a project:
-
Open Site Administration > Projects tab.
-
In the Projects list, select the project for which you want to enable version control, and click Enable Versioning.
-
If the project is active, you are prompted to deactivate it. Click Yes in the confirmation dialog box to deactivate it.
-
In the Enable Versioning dialog box, click OK to enable version control for the project.
Note: After enabling version control for a project, you should review all its workflow scripts and make adjustments for each checked in entity. This includes the following entities: Req, Test, Resource, and Component.
For each checked in entity that includes a Post function in its script, you must modify the script. To modify, add a Checkout function before every Post function. Making this modification prevents the Check Out dialog box from opening each time a call to a Post function is made. For details, see Workflow Event Reference.
To disable version control for a project:
-
Open Site Administration > Projects tab.
-
In the Projects list, select the project for which you want to disable version control, and click Disable Versioning.
-
If the project is active, you are prompted to deactivate it. Click Yes in the confirmation dialog box to deactivate it.
-
In the Disable Versioning dialog box, click OK.
-
Click Yes in the confirmation dialog box.
Restore access to a project
You can restore access to an OpenText Application Quality Management project or template project that is not in your current projects list. For example, you may want to access a project from another server. After you restore access to a project, it is added to the projects list.
Permission:
To restore access to a project, you should be site admin.
Before you restore access to a project
Consider the following before you restore access to a project.
-
Make sure the project's database exists in the Servers > DB servers tab of Site Administration on your server. The server needs to access the project contents from the project's database.
For details about adding DB servers, see Add database servers.
-
If the project you want to restore access to is linked to a template project, restore access to the template project first. If the template project and the linked project are in different databases, make sure the template project’s database is accessible when restoring access to the linked project.
-
Under the ALM user authentication mode, after you restore a project, the project users that are new to Site Administration are locked. You can manually unlock these users to activate them. For details, see Manually unlock users.
To restore access to a project:
-
Navigate to the project's dbid.xml file.
For details about the location of the dbid.xml file, see Understand project structure.
-
Open the file, update the following values, and save the file.
Parameter Description DB_NAME Update to the database schema name as it appears in the database server. DB_CONNSTR_FORMAT Update to the value of the empty project. See the note for details. DBSERVER_NAME This is the name of the database server as defined in the DB Servers tab in Site Administration. DB_USER_PASS Update if the encrypted pass phrase differs than the previous installation. PHYSICAL_DIRECTORY Update to the new location of the project repository. End the path with a backslash (\). Note:
-
To identify the values of DB_CONNSTR_FORMAT and DB_USER_ PASS, it is recommended to create a new, empty project in Site Administration, open the project's dbid.xml file, and copy these values. You can later delete the empty project.
-
Make sure not to change the original value for PR_SMART_ REPOSITORY_ENABLED.
-
l If you are restoring LAB_PROJECT or LoadRunner Enterprise projects as part of the upgrade process, make sure not to edit the PROJECT_ UID value. You must restore these projects with their original PROJECT_UID value to maintain the links between LAB_PROJECT and its associated LoadRunner Enterprise projects. This is important for shared data, such as timeslots, runs, and so on.
-
- Open Site Administration > Projects tab.
- Click Project Restore.
-
In the Restore Project window, define the following.
UI Element Details dbid.xml file location Click Browse to select the file that includes the project you want to restore access to.
After you select the file, the database type, name, server, and the directory path of the project are displayed.
Restore Into Domain Select the domain in which you want the restored project to be located.
-
Click Restore.
If your database server does not have Text Search enabled, a message box opens. You can enable Text Search before or after this process completes.
-
Click Yes to continue this process. After the process completes, you can enable Text Search
-
Click No to stop this process. Enable Text Search and then restart the process.
For details about enabling Text Search, see Configure Text Search.
-
-
When the restore process completes, click OK.
-
Click Close to close the Restore Project window and view the restored project in the projects list.
Ping a project
You can ping a project to see whether or not it is accessible.
Permission:
To ping a project, you should have the following permission:
-
On-premises: Site admins
-
SaaS: Site admins or customer admins, or have one of the following permissions:
-
Projects > Update Project Activation Status
-
Projects > Project Details View
-
Projects > Project Details Update
-
Projects > Manage Project Versioning
-
Projects > Create Project
-
Projects > Project PC Extension Details Update
-
Projects > Project Lab Update
-
To ping a project:
-
Open Site Administration > Projects tab.
-
In the Projects list, select the project you want to ping, and click Ping.
If the project is accessible, the "Ping finished successfully" message pops up.
If the project is inaccessible, the "Connection test failed" message pops up.
Convert projects to Unicode
Using Unicode, your projects can support multiple languages. You can run the Unicode conversion process at the individual project level, or at the domain level to convert multiple or all projects to Unicode.
Permission:
To convert a project to Unicode, you should be site admin.
Before the Unicode conversion
Understand the following before converting projects to Unicode:
| Area | Details |
|---|---|
| Supported project types |
You can only convert the following types of projects to Unicode:
|
| Increase memory | Unicode increases the memory required for the database server. |
| Cannot convert projects with long columns |
Projects with columns whose length is greater than 4000 cannot be converted to Unicode. The validation process fails and an error message is generated. To fix the problem, either reduce the column length to 4000 or add the columns to the alm_i18n_exceptions.xml exception file before converting. System-defined columns and system-defined user fields must be reduced and cannot be added to the exception file. |
To convert an individual project to Unicode:
-
Open Site Administration > Projects tab.
-
From the projects list, select the target project, and click Maintain Project > Convert Project to Unicode.
-
Click Convert to Unicode.
If the project is still active, you are prompted to deactivate it first.
To abort the conversion process, click Abort and click Yes in the confirmation dialog box.
To pause the conversion process, click Pause. To continue, click Resume.
-
Wait until the repair process completes.
To export the repair log to a text file, click Export Log.
To clear the repair log, click Clear Log.
To convert multiple or all projects of a domain to Unicode:
-
Open Site Administration > Projects tab.
-
From the projects list, select the target domain, and click Maintain Project > Convert to Unicode in Domain.
Convert to Unicode in Domain is only available if the domain contains projects that can be converted to Unicode.
-
Select target projects or the click checkbox in the Project Name column to select all projects.
-
Click Convert to Unicode.
If any of the selected projects are still active, you are prompted to deactivate them first.
To abort the conversion process, click Abort and click Yes in the confirmation dialog box.
To pause the conversion process, click Pause. To continue, click Resume.
-
Wait until the repair process completes.
To export the repair log to a text file, click Export Log.
To clear the repair log, click Clear Log.
 See also:


