Share this page


Jira SAFe Plugin
Micro Focus Connect supports several Jira plugins, such as the SAFe plugin, the Jira Elements Connect (nFeed) plugin, and the ScriptRunner plugin.
This topic describes how to use the Jira SAFe Epic to Feature Translator plugin to translate a Jira epic to a feature.
Overview of the SAFe plugin
The Jira SAFe plugin translates the epic (in English) and/or equivalent language specific equivalents for other locales. Micro Focus Connect expects a Jira epic to be named Epic, and when it encounters a name other than that, it may fail. The following sections describe how to use the plugin to avoid these failures.
The Jira SAFe Translator plugin uses the term "Feature" to describe the Jira "Epic". In order to accommodate this behavior, you must set a locale in which you reinstate the original term of "Epic" and configure the data source user to use that locale.
You should aim to choose a locale that is unused in your Jira data center. The recommended locales are English (UK) or English (USA).

Configure as an administrator
Follow these steps to configure the Jira Administrator settings.
- Log in to Jira as an administrator.
- Click the Manage Apps tab.
- At the Atlassian Marketplace for Jira, select SAFe Translator plugin menu > Configuration. The SAFe EPIC to Feature Translator configuration page opens.
-
Unlock the custom fields:
-
Make sure the Unlock the fields radio button is black indicating that the fields are unlocked.

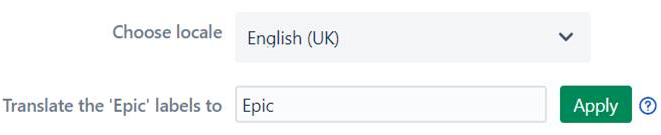
- From the Choose locale dropdown menu, select English (UK).
-
From the Translate the 'Epic' labels to dropdown menu, select Epic.
- Click Next.
-
-
Translate the custom fields:
- Go to Administration > Issues > Custom fields.
-
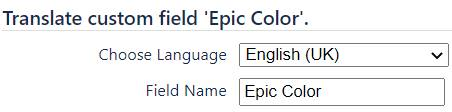
Click Translate and enter new values in the Field Name box for each custom field : Epic Color, Epic Link, Epic Name, Epic Status.
- Click Next.
-
Lock the custom fields:
- Make sure the Unlock the fields radio button is green indicating that the fields are locked.
- Clear the cache.
- Click Next.
Configure as a unique user
Follow these steps to configure your unique data source user settings.
- Log in to Jira as a unique Micro Focus Connect data source user.
- In the profile section, under Preferences, click the pencil Edit button.
- In the Update User Preferences menu, select English (UK) from the Language dropdown, and click Update.
Translate existing Jira data sources
If you have Micro Focus Connect Jira data sources that were created before performing these configurations, you may receive error messages informing you that those features are no longer present. To correct this, you can do one of the following:
- Define a new Micro Focus Connect Jira data source after the changes are made.
-
Trim the Feature type from the existing data sources. This is done by using the trimJiraTypes<dataSourceName> argument in the Micro Focus Connect REST client command mfcFullRestClient.jar.
For details, see SSL/TLS configuration.
The operation updates the specified data source to include only the types used in connections that involve the data source. This also results in improved performance.