Share this page


Use-case: Syncing ALM/QC and Azure DevOps
The following use-case provides an example of how to set up a connection between ALM/QC and Azure DevOps.
Overview
This topic illustrates the end-to-end flow of setting up a synchronization. Although your actual environment may require different configuration steps, we recommend that you review this use-case to understand the end-to-end workflow.
In this example, the Quality team will work in ALM/QC, and the Development team will be working in Azure DevOps with a Scrum workflow project. The example will create epics, features, and product backlog items in Azure DevOps and synchronize them with ALM/QC requirements. Micro Focus Connect will be configured to originate in either endpoint system.
Caution: We do not recommend testing this procedure in a production environment. To learn the Micro Focus Connect workflow, use a demo environment with demo data on both Azure DevOps and ALM/QC.

Environment configuration
This use-case has the following configuration:
-
An Azure DevOps Scrum Workflow Project called AOS Scrum. Note that the default Basic process type does not contain the relationships required for synchronization.
-
An Azure DevOps account email address, and a related API token with full Read/Write access to the Azure DevOps instance and project. This token is required for Cloud Azure DevOps instance access only.
-
An ALM/QC account (non-SSO) with full Read/Write access to the ALM/QC domain and projects.
-
An ALM/QC project called AOS.
Step 1: Define the ALM/QC data source
In Micro Focus Connect, first define an ALM/QC and Azure DevOps data source. After defining each data source, Micro Focus Connect collects sample data from each source regarding their types, fields, and values.
-
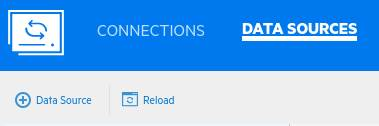
In the Data Sources area, click the + Data Source button, and specify a data source name and product (for example, Azure DevOps and Micro Focus ALM).
Note: Be careful to use names that reasonably describe your connection. Avoid using blank spaces or special characters in names. If needed, data source and connection names can be changed using the Rename script. For details, see Batch utility scripts.
-
Type the ALM/QC server name, username, and password. Confirm the port as well, and click Next.
-
Select a space, and click Next.

-
Select the correct domain, and click Next.
-
Select a project that has types, fields, and values similar to the data that you want to sync, and click Next.
After setting up the connection you can synchronize with multiple projects in the selected space.
-
Click Save. Micro Focus Connect verifies that the values you have entered are valid.
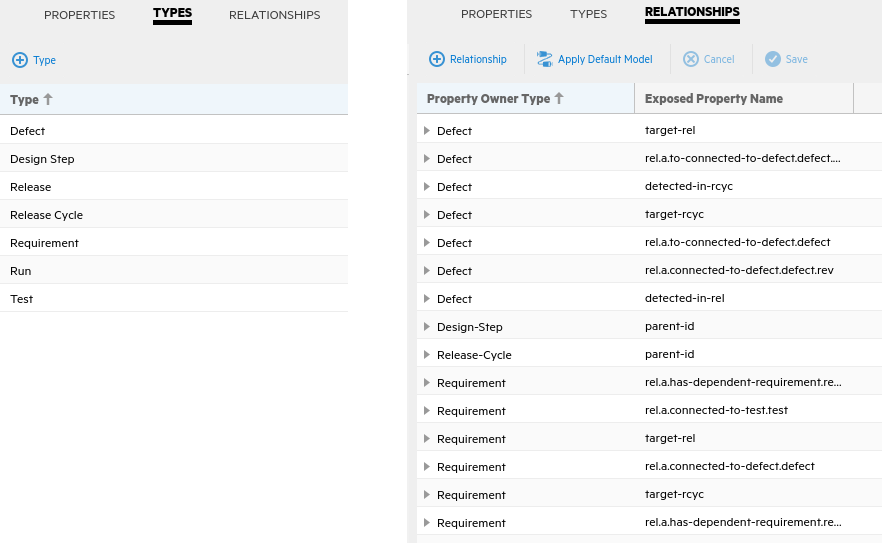
On the Types tab, you can see the entities that Micro Focus Connect identified in the ALM/QC project as available for synchronization. On the Relationships tab, you can see the available relationships.
Step 2: Define the Azure DevOps data source
You now repeat the above steps to define the Azure DevOps data source.
-
Click the + Data Source button, and specify the Azure DevOps data source name and product (for example My Azure DevOps, and Azure DevOps).
-
Type the Azure DevOps server URL, such as https://dev.azure.com/<nameofyourorganization>. Enter your user name. In the password field, enter your Personal Access Token. Click Next.
-
From the Sample Project dropdown list, select your project and click Save.
Note: If you have multiple projects in Azure DevOps that you intend to sync, and all these projects have the same workflows, you can use a common data source and a single connection (or connections) stemming from that data source.
However, if you have multiple projects with different workflows, such that the entity types and relationships are different, you must describe each such project on a different data source and corresponding connections.
This is true of the majority of products that are synchronized using Micro Focus Connect, including ALM/QC.
-
We recommend that you leave the remaining fields as set by default, and click Save. Micro Focus Connect verifies that the values you entered are valid.
On the Types tab, you can see the entities Micro Focus Connect identified in the Azure DevOps project that are available for synchronization. If you have custom types that you want to add, click + Types and select the type you want to add.
On the Relationships tab, you can see the available relationships.
Step 3: Create Connection Wizard > Data Sources tab
You now create a connection between the two data sources using the Create Connection Wizard. First you specify the data sources:
-
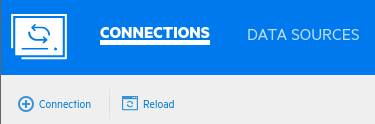
In the Connections window, click the + Connection button.
-
In the Data Source tab, name your connection. In this example, the connection is Nimbus ALM Azure DevOps.
-
Leave the settings as set by default, and click Next.
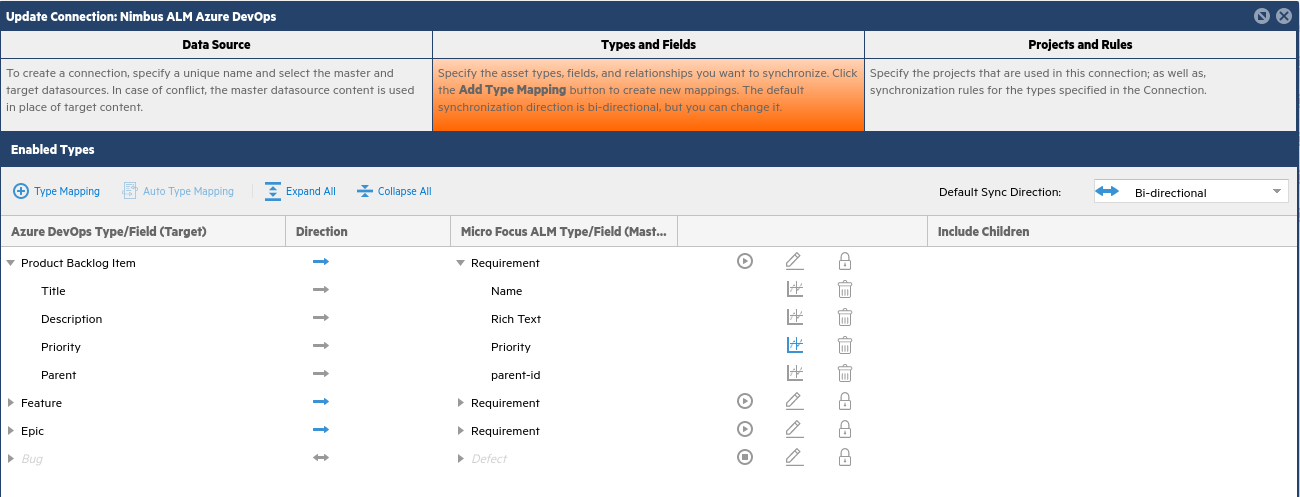
Step 4: Create Connection Wizard > Types and Fields tab
Micro Focus Connect creates an initial auto-mapping of fields, which you will now enhance in the Types and Fields tab.
-
Click Add Type Mapping.
-
Select Product Backlog Item on the left and Requirement on the ALM/QC side. Change the direction of the type mapping to be To Master. This means product backlog items will originate in Azure DevOps and sync to ALM/QC.
-
Add additional fields to sync for these types by clicking + Field Mapping, as shown in the next image. When done, click OK.
-
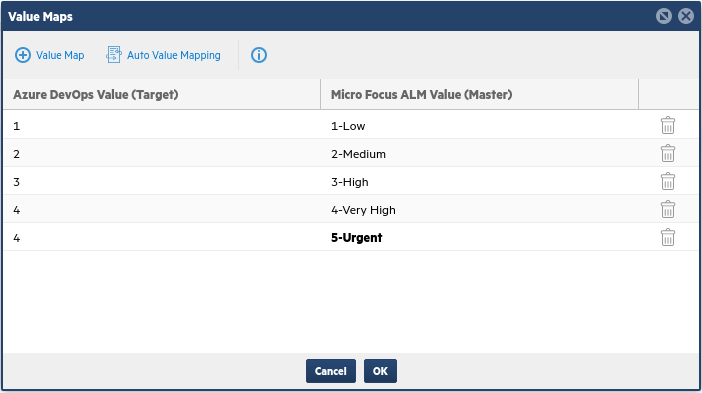
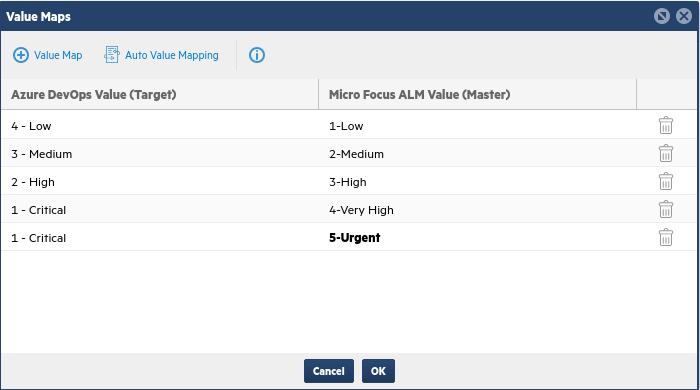
After adding the four fields, click the small blue icon to the right of the Priority field mapping. This is where you map the priority value options between the two systems. In this example, Azure DevOps has four values and ALM/QC has five. Therefore, priority number 4 in Azure DevOps should be mapped to both Very High and High in ALM/QC.
Note: The bolded font on 5-Very High indicates which will value be set on the ALM side when syncing the priority from Azure DevOps. You will follow this same process for any enumerated list value fields that you sync.
-
Add another type to map, and this time choose Feature on the left and Requirement on the right. Ensure the arrow at the type level is again set to To Master.
Note: Type level direction indicates which system the items can originate from. Field level direction indicates which system the fields can be updated from. This example sets the type and field level directions to match, but it is common to have type level direction to be unidirectional and some fields to be bidirectional.
Parent -> parent-id is an example of mapping relationships. In this example, Parent is a relationship field on Azure DevOps features used to create the hierarchy in the ALM/QC requirement tree. If you leave out this field mapping, then epics, features, and product backlog items will sync into the ALM/QC tree as a flat list.

-
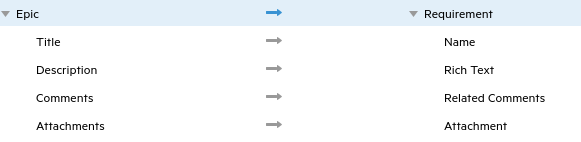
Add type mapping from Epic on the left to Requirement on the right. Ensure the arrow at the type level is again set to To Master.
-
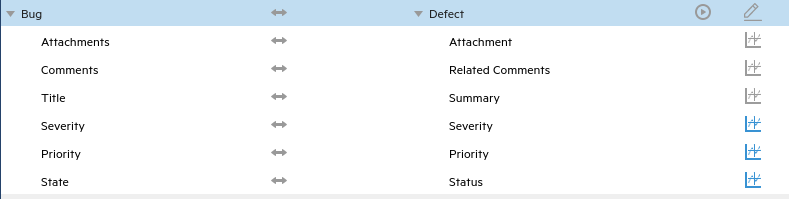
Add type mapping from Bug to Defect. For this type, set the type level direction to bidirectional, as well as the fields for updates.
-
Set the value maps for the Severity, Priority, and Status fields, as follows.
Click the blue icon to the right of the Severity field mapping, set these value maps and click OK.
-
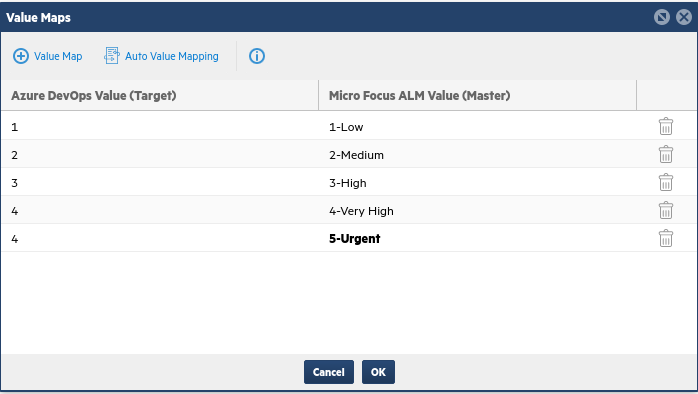
Click the icon to the right of the Priority field mapping, set these value maps and click OK.
-
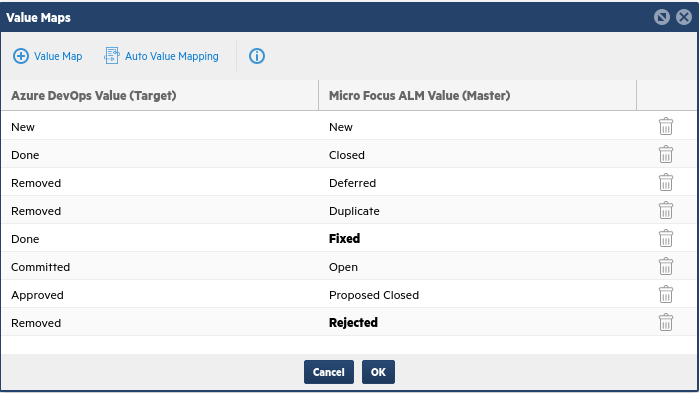
Click the icon to the right of the State/Status field mapping, set these value maps and click OK.
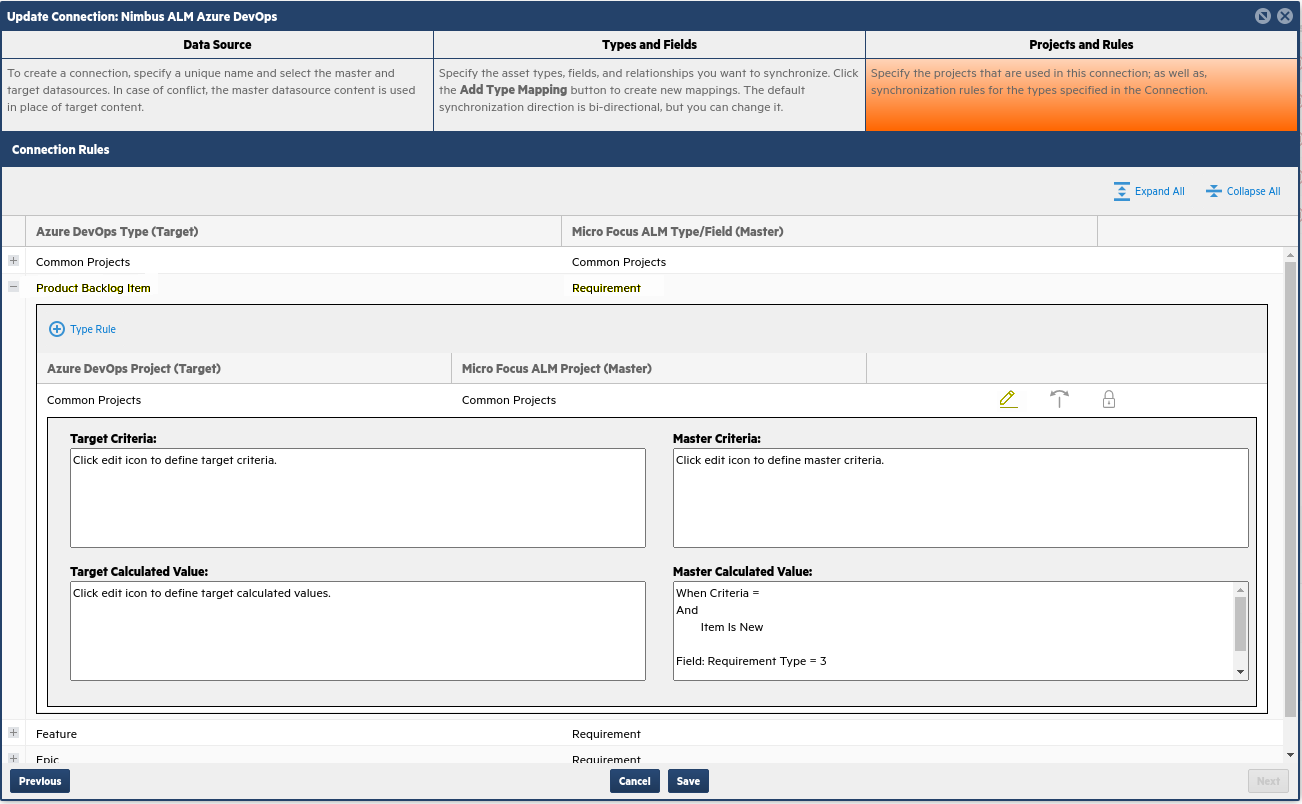
Step 5: Create Connection Wizard > Projects and Rules tab
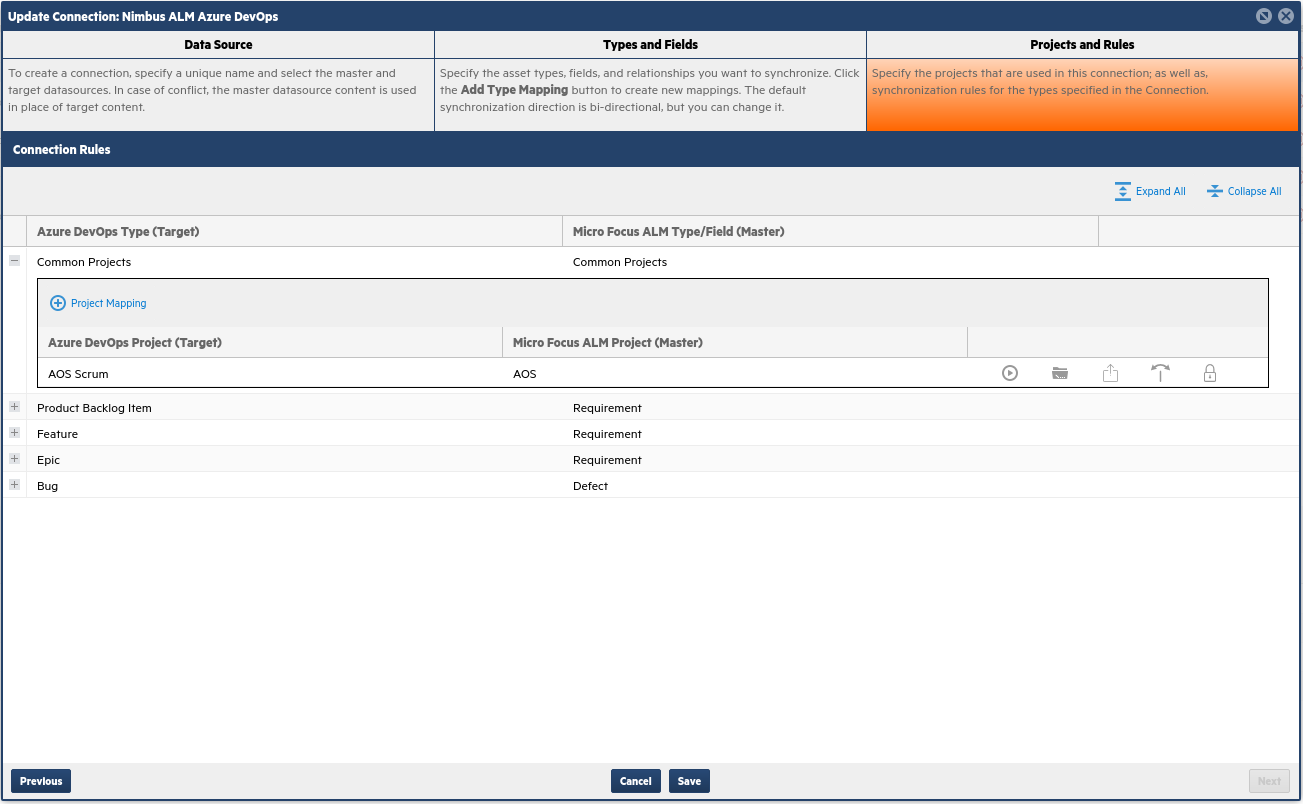
In the Projects and Rules tab, define which projects to sync.
-
Click Collapse All at the top right. Under Common Projects, click + Project Mapping. Select AOS Scrum under Azure DevOps Project on the left, and select AOS under Micro Focus ALM Project on the right.
-
Collapse the Common Projects section and expand the Product Backlog Item/Requirement type set.
Note: If you are syncing multiple projects in a connection, you need to decide whether using Common Projects is sufficient. In most cases, it is not.
If you map many Azure projects to a single ALM/QC project in a given connection, or vice versa, you need to set sync criteria for the specific mapped types that fan the artifacts out to the individual projects. In his case, you cannot use Common Projects. The entire Common Projects block must be empty.
You need to create separate sync sets joining the types and projects being synchronized with the relevant sync criteria guiding the artifacts picked for each such sync set. It is very rare that you would use Common Projects to contain multiple projects, spanning multiple type sync sets.
-
Click the Edit connection type rule button to edit the calculated values. In the Edit dialog box, you instruct Micro Focus Connect to set the requirement type when new items are created in ALM from Azure DevOps.
-
Select the Calculated Value (Master) tab, then click + Calculated Value.
-
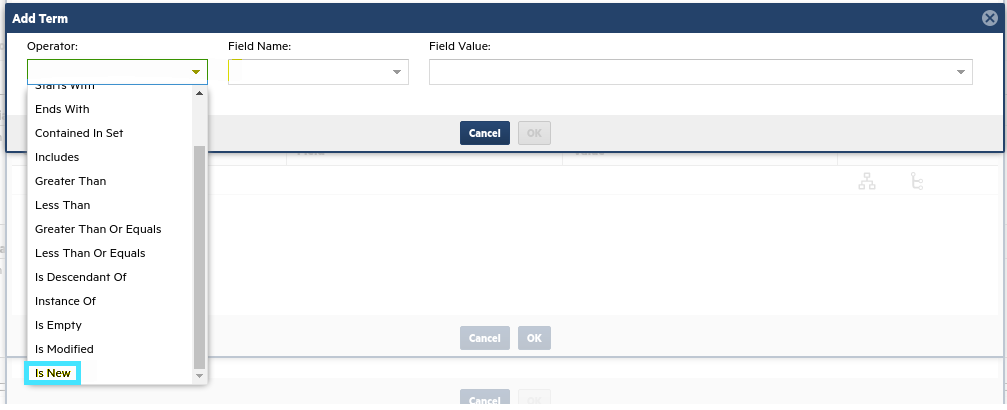
Click the Add Child Criteria button
 . The Add Term dialog box opens.
 -
Select Is New from the operator list and click OK.
This tells Micro Focus Connect to calculate and set this value when a new requirement is created in ALM/QC.
-
In the Set field list, choose Requirement Type. In the To value list, select the requirement type that you want product backlog items to become when they are created in ALM/QC. Click OK.
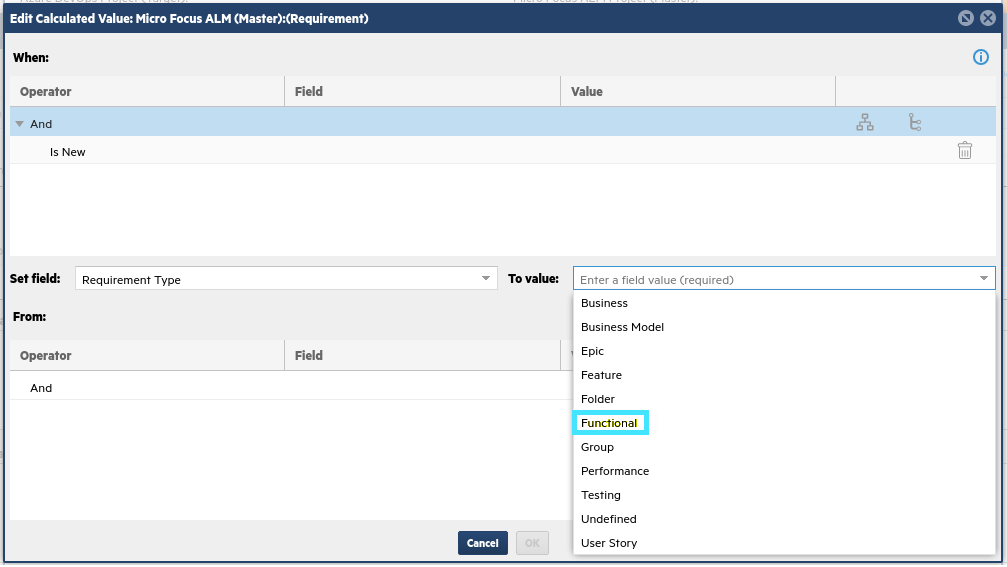
When you select a type, ALM/QC converts it to an integer, that represents the type in the database.

-
Repeat this process for Feature/Requirement sync, but choose a different requirement type.
This use-case chooses requirement types that do not have additional required fields.

-
Repeat the above steps for an Azure DevOps Epic to an ALM/QC Requirement, and choose another requirement type.
-
Save the connection.
-
Go to Azure DevOps and ensure you have at least one Epic, one Feature, and one Product Backlog Item. In ALM/QC, create at least one Defect.
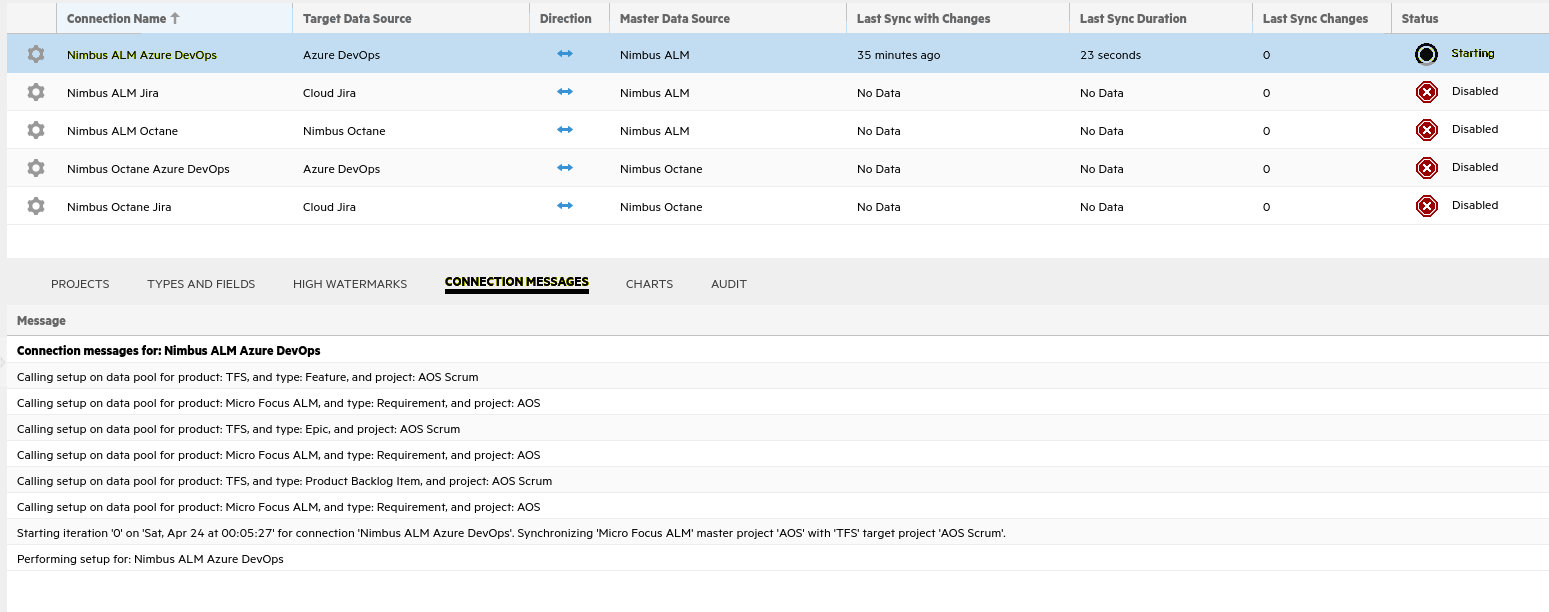
Step 6: Run one sync iteration in the Connections tab
In this step you synchronize the fields, to make sure that everything is set up properly.
-
Click the Modify Connection button to the left of the connection name
 , and choose Run One Iteration. This runs a single synchronization iteration, to validate the setup.
 -
As the iteration runs, click the Connection Messages tab in the lower pane. and click your connection name in the top pane. This shows you the status of your iteration.
-
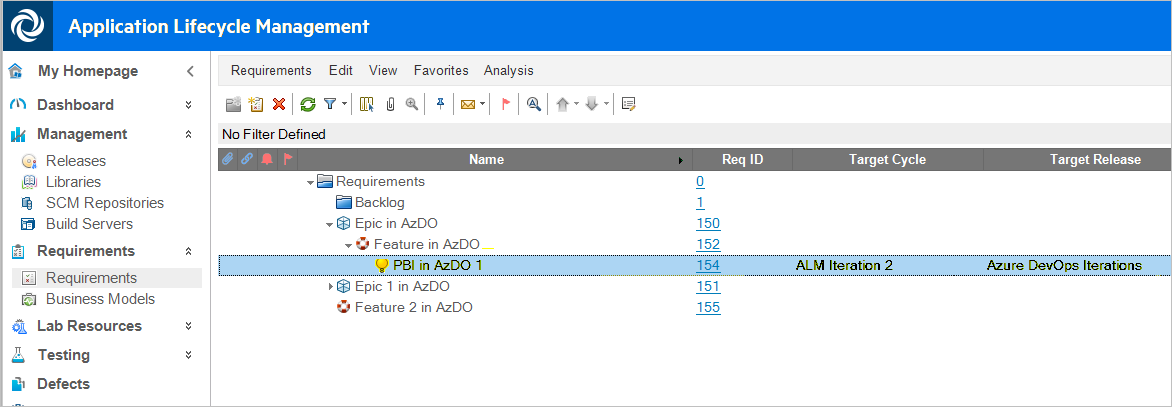
In the Audit tab in the lower pane, click Run. This generates an audit of items that were added, updated, and failed. In the example below, you can see that several requirements were updated that had already synched.
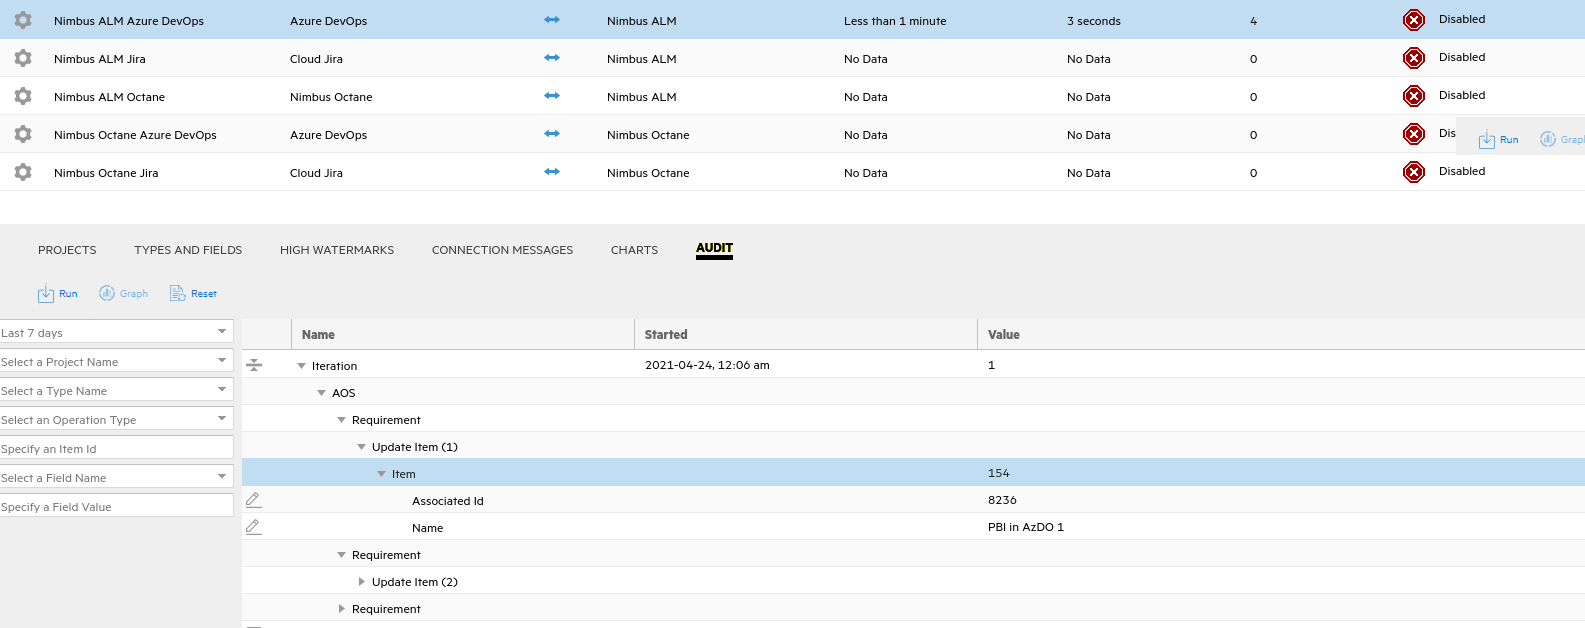
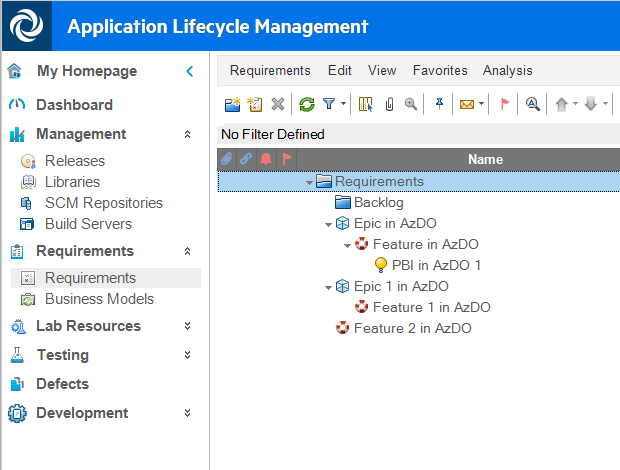
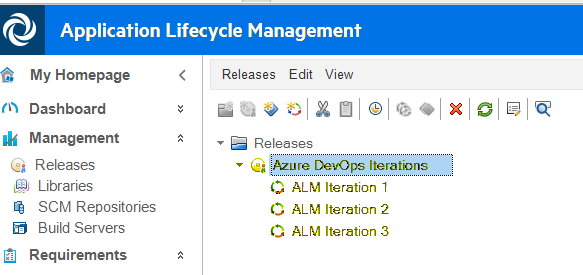
Below is the result in ALM/QC. The hierarchy is built to match the parent-child relationships you have in Azure DevOps.
Note: Running a single iteration does not always sync everything. Micro Focus Connect might need multiple iterations to align everything (for example links, relationships, and other hierarchies).
Similarly, running a single iteration three times is not as effective as starting the connection and letting it run for three iterations before stopping it again. Micro Focus Connect employs caching mechanisms for links and relationships, so the first iteration might provide prerequisites for later iterations (which is not possible with Run One Iteration).
Step 7: Map relationship links
After everything has synched as expected, edit your connection to add more types and fields.
-
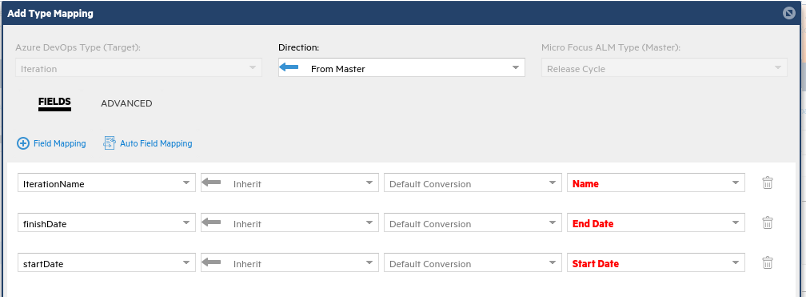
Add a new type mapping for Azure DevOps iterations with ALM/QC release cycles. For this example, set the direction to From Master with the following fields.
-
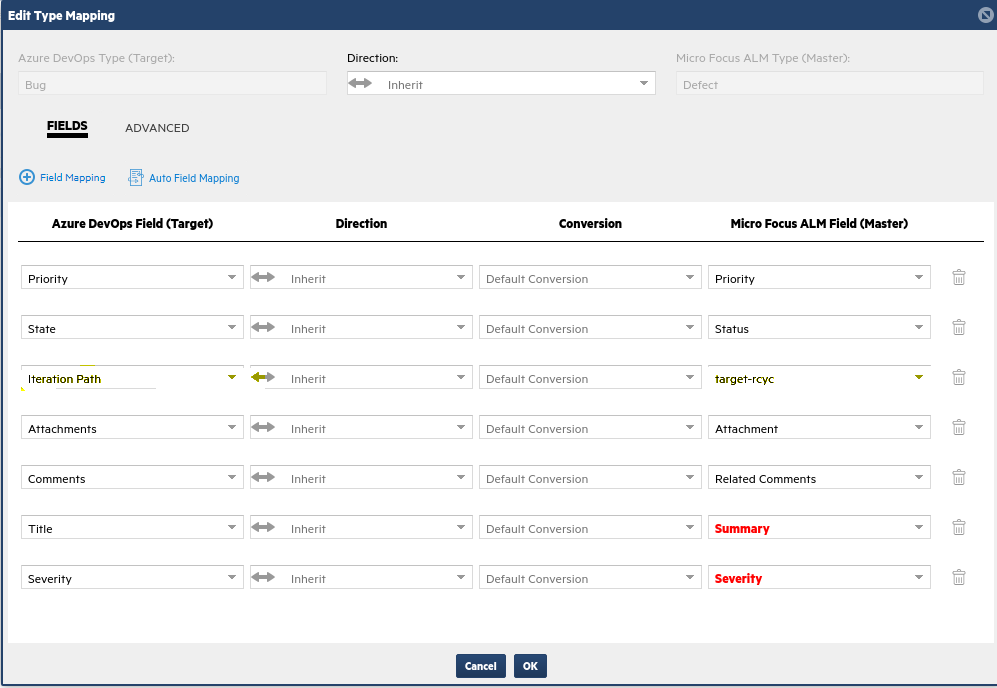
Edit the bug-defect mapping. Choose + Field Mapping, and add Iteration Path <-> target-rcyc if not already mapped. Click OK.
When Azure DevOps or ALM/QC users set an iteration or target release cycle in one system, the bug or defect will be updated on the related bug or defect in the other system.
-
Choose + Field Mapping and add Iteration Path -> target-rcyc. Click OK and save changes.
When Azure DevOps users set a planned iteration on a product backlog item, that information will show on the related requirement in ALM as the target release cycle.

-
In ALM/QC, create a single release called Azure DevOps Iterations. Create 3 release cycles inside it called ALM Iteration 1, ALM Iteration 2, and ALM Iteration 3.
These will sync to Azure DevOps as available iterations, and Azure DevOps users will set the target iterations on product backlog items and bugs to indicate in which iteration or release cycle they will be delivered.
Note: Although it is possible to sync iterations from Azure DevOps to ALM/QC, this will not be covered in our example.
G
-
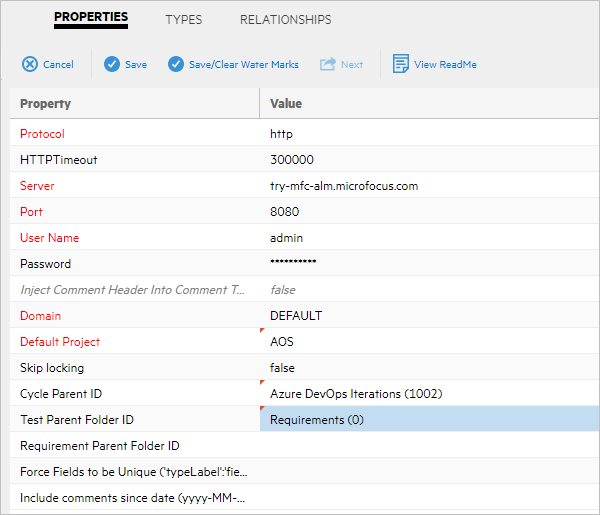
This example instructs Micro Focus Connect to look at the default release for cycles.
To set the default release, navigate to the Data Source tab. Select your ALM data source in the left pane. In the Properties tab, select your new ALM release from the Cycle Parent ID drop down list.
Click Save
 .
.
Step 8: Run synchronization
-
On the Connections tab, click the gear icon to the left of the connection name, and choose Run One Iteration to test the latest changes.
-
In Azure DevOps, confirm that ALM Iterations 1-3 are visible in the Iteration field.

-
When available, open a product backlog item in Azure DevOps, and set the Iteration field to one of the iterations that just came from ALM/QC as shown above.
-
Run one iteration. In ALM/QC, refresh your requirements view and confirm that your product backlog item has a target release and target iteration now set.