Share this page


Use-case: Syncing ALM/QC and Jira
The following use-case provides an example of how to set up a connection between ALM/QC and Jira.
Overview
This topic illustrates the end-to-end flow of setting up synchronization. Although your exact environment may require different configuration steps, we recommend that you review this use-case to get an idea of what the end-to-end workflow involves.
In this example, our development is managed in Jira, and our QA is managed in ALM/QC. This means that stories are created in Jira and synced to ALM/QC. QA tracks their testing in ALM/QC and pushes their results to Jira.
Caution: We do not recommend testing this procedure in a production environment. To learn the Micro Focus Connect workflow you can use a demo environment with demo data on both Jira and ALM/QC.

Prerequisites
-
On the ALM/QC side, you need a user with full read/write access for the domains and projects being synchronized.
-
On the Jira side you need to have a project, and a board that includes everything in that project. This is required because Micro Focus Connect reads Jira content from the board.
-
You need to have installed the Jira connector, which is not downloaded as part of the default Micro Focus Connect package. The Jira connector can be downloaded from the Connectors Marketplace.
Step 1: Define the ALM/QC data source
In Micro Focus Connect, you first define an ALM/QC data source and a Jira data source. After defining each data source, Micro Focus Connect collects sample data from each source regarding their types, fields, and values.
-
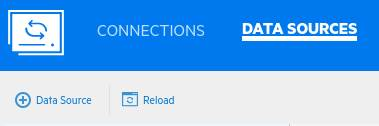
In the Data Sources area, click the + Data Source button, and specify a data source name and product (for example, Jira and Microfocus ALM).
Note: Data sources and connections cannot be renamed, so choose names that will be useful over time.
-
Type the ALM/QC server name, username, and password. Confirm the port as well, and click Next.
-
Select a space, and click Next.

-
Select the proper domain, and click Next.
-
Select a project that has types, fields, and values similar to the data that you want to sync, and click Next.
(After setting up the connection you can synchronize with multiple projects in the selected space.)
-
Select a default cycle parent and requirement parent from the dropdown menus.
This is needed because in Jira sprints can be unrelated to releases, while ALM/QC always links cycles with releases. Micro Focus Connect assigns any unrelated sprints from Jira to this default release in ALM/QC.
-
Click Save. Micro Focus Connect verifies that the values you have entered are valid.
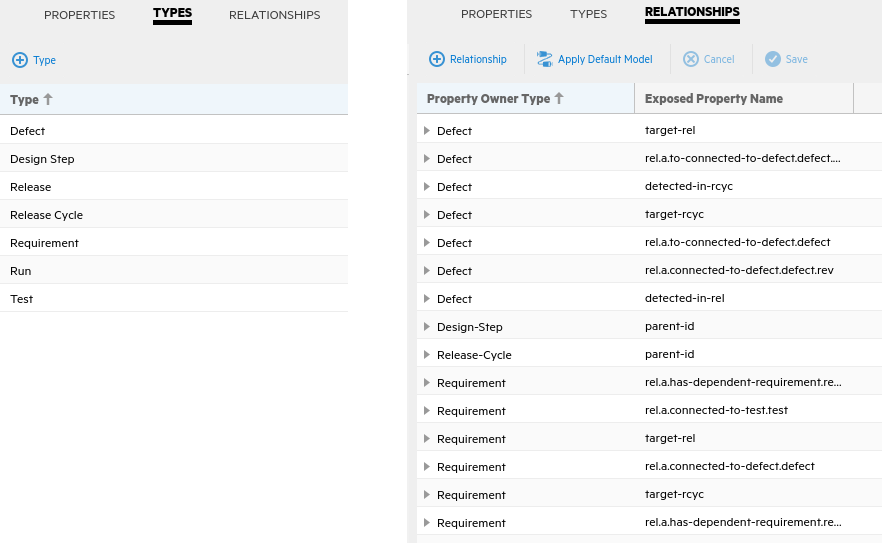
On the Types tab, you can see the entities that Micro Focus Connect identified in the ALM/QC project as available for synchronization. On the Relationships tab, you can see the available relationships.
Step 2: Define the Jira data source
You now repeat the above steps to define the Jira data source.
-
Click the + Data Source button, and specify the Jira data source name and product (for example, Jira 1 and Jira).
-
Type the Jira server URL defined as http://<server>:<port>, and enter a user and password that has full read/write privileges for the Jira instance. (For Jira Cloud, enter a user and token.) Click Next.
- Note:
- If you receive a message indicating a problem with certificates, import your Jira certificate to the Micro Focus Connect web server to enable Micro Focus Connect to access Jira. For details, see Configure Micro Focus Connect for SSL/TLS.
- The Jira user account must use English UI settings (en-us or en-uk). In addition, if you are using the SAFe add-on for Jira, review locale information in Translate Jira epics to features .
-
Select a project that has types, fields, and values similar to the data that you want to sync. Click Next.
-
Select a board for the project.
Tip: We recommend that you create a dedicated board for Micro Focus Connect showing everything in the project, rather than use an existing user board where you might change filters and block visibility to Micro Focus Connect.
Optional: In the Types field you can filter which types you want to sync for performance purposes. Click Next.
-
We recommend that you leave the remaining fields as set by default, and click Save. Micro Focus Connect verifies that the values you entered are valid.
On the Types tab, you can see the entities Micro Focus Connect identified in the Jira project that are available for synchronization. If you have custom types that you want to add, click + Types and select the type you want to add.
On the Relationships tab, you can see the available relationships.
Step 3: Create Connection Wizard > Data Sources tab
You now create a connection between the two data sources using the Create Connection Wizard. First you specify the data sources:
-
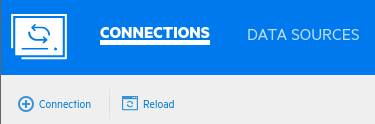
In the Connections window, click the + Connection button.
-
In the Data Source tab, name your connection (for example, ALM and Jira Backlog Sync).

-
Select ALM/QC as the master and Jira as the target data source. Leave the remaining settings as set by default, and click Next.
Step 4: Create Connection Wizard > Types and Fields tab
Micro Focus Connect creates an initial auto-mapping of fields. You enhance the mappings in the Types and Fields tab.
Map between types and fields on both ends:
-
In the upper right, the Default Sync Direction is set to bi-directional. Keep this default setting. This effects both creation and updates of entities and types. Instead, you modify the direction in the type and field levels.

-
Our use-case creates stories in Jira and pushes them to requirements in ALM/QC. Click + Type Mapping and select Story on the Jira side, and Requirement on the ALM/QC side. Set the direction from Jira to ALM/QC.
-
Click + Type Mapping. Select Epic on the Jira side and Requirement on the ALM/QC side. Set the direction from Jira to ALM/QC (similar to stories).
-
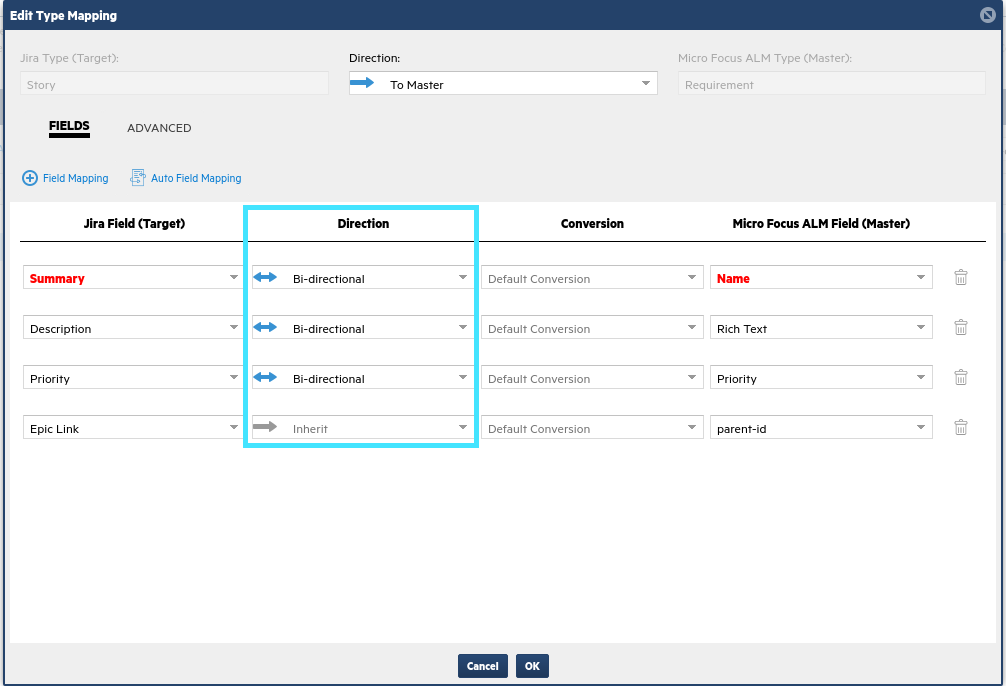
Click the pencil next to the Story/Requirement type to edit its settings, and set the type's Direction as -> To Master. The direction set on the type is used for the creation of items, so when a story is created in Jira, it is pushed to ALM/QC (but not from ALM/QC to Jira).

-
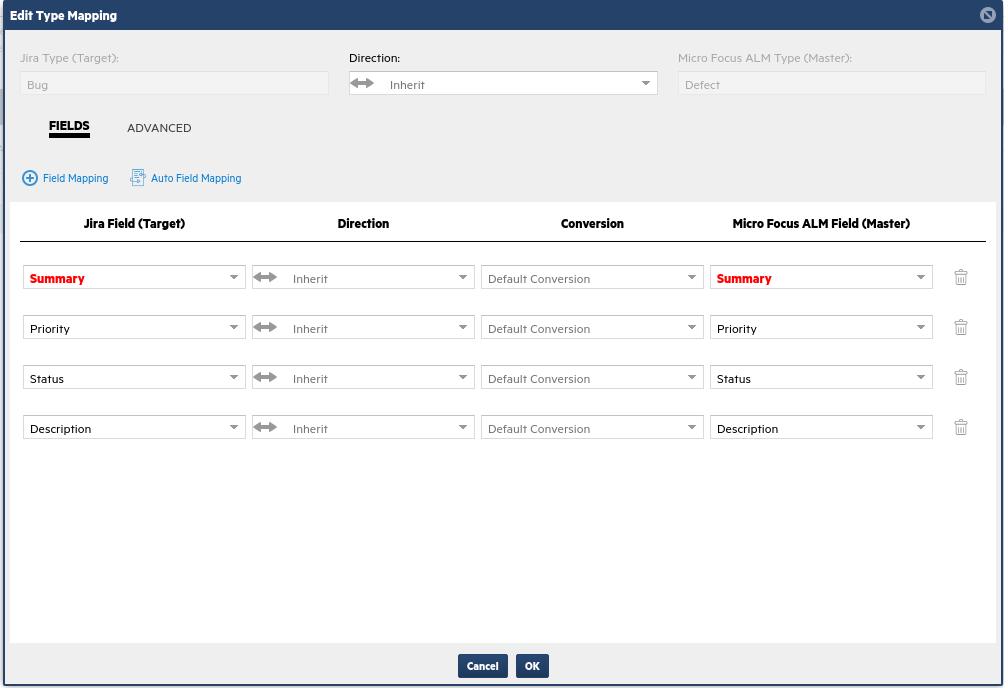
Click + Field Mapping to add the fields below. The direction of mapping between the fields impacts the direction of updates between the data sources.
-
Although this use-case pushes stories from Jira to ALM/QC, you want to allow users in ALM/QC to update these fields and push updates to Jira, so you edit these fields to be bi-directional.
-
The only exception is the Epic Link field, which is uni-directional to the ALM/QC parent-id field. This is a relationship field that indicates which Epic/Requirement in ALM/QC will be a parent of any given Story/Requirement.
Note: You can click + Field Mapping to add other fields such as points, priority, and so on.
However, you cannot sync a link to an item, before you sync the item itself. Therefore, you will return to this screen after you synchronize the basic fields and add link fields, such as Sprint.
If you are not sure if a field is a link field, you can look at the Data Source > Relationships tab. If you see a field listed there, it is a link field, and you need to first sync the items before you can sync their links.
-
-
List fields typically need to be mapped. For example, priority in Jira needs to mapped with priority in ALM/QC because they are not automatically aligned with one another.
Click the Value Mapping button to the right of the Priority row, and map each unmapped value.

For example, if 5-Urgent in ALM/QC is not mapped to a value in Jira, click Select a Value in the Jira column and choose the value Highest.

-
This use-case also sync epics from Jira as requirements in ALM/QC. Click + Type Mapping, and select Epic on the Jira side, and Requirement on the ALM/QC side.
Set the direction from Jira -> ALM/QC (similar to stories). For now, just map these fields to sync between epics and requirements..

-
Our use-case syncs bugs and defects. They can originate in either system, so you can leave them as bi-directional. Map the values from ALM/QC defects to Jira bugs as follows:
If a field is required in one of the sides, it is highlighted in red. Make sure to map any required fields that are not automatically populated.
Similar to the value maps you set for stories, you also need to set value maps for fields like Priority and Status on Defects.
-
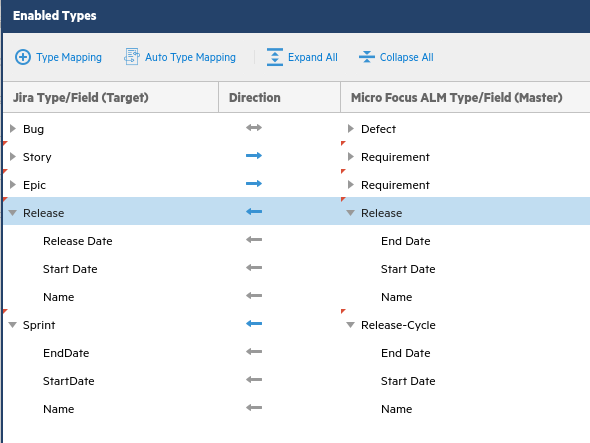
Our use-case also adds releases and sprints/release cycles using the above steps. You add each type, and map them as uni-directional from ALM/QC to Jira. (None of their fields need to be value-mapped.)
Alternatively, you can manually enter the sprint/cycle and release names in Jira and ALM/QC, and schedule runs of the matchByNameJiraAlmQc script to populate the cross references in the Micro Focus Connect database. For details, see MatchByName scripts.
-
Click Next.
Step 5: Create Connection Wizard > Projects and Rules tab
In the Projects and Rules tab, you define which projects to sync. You can use the projects that you entered as the sample projects, or other projects.
-
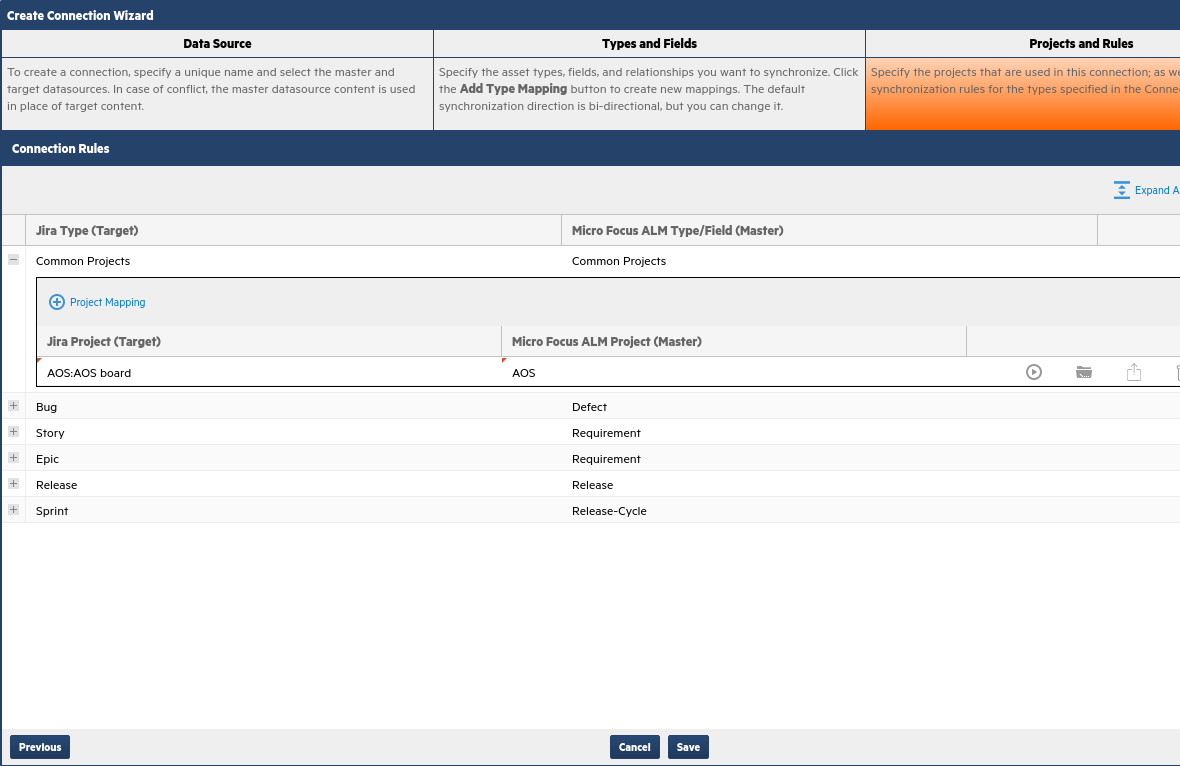
If you map projects under the Common Projects heading, then all the types being synchronized will apply to the same two projects. In our use-case, stories/requirements, bugs, epics/requirements, releases, and sprints/release cycles will all be synchronized in the sample projects.
-
You could specify one project for stories and another for defects, or use different rules for different types (for example, only sync defects with a certain severity or priority). However, for simplicity, our use-case maps common projects.
-
At the top section under Common Projects, select the projects you want to connect. Do not set any projects under the individual types for this use case. When expanded, each individual type set should only show Common Projects.
-
Click Save.
-
Our use-case is for the requirements in ALM/QC to automatically set a specific requirement type, based on whether it is a Jira epic or a story. If you have custom requirement types defined for these, you can assign them accordingly. For this example, you will use default requirement types in ALM.
-
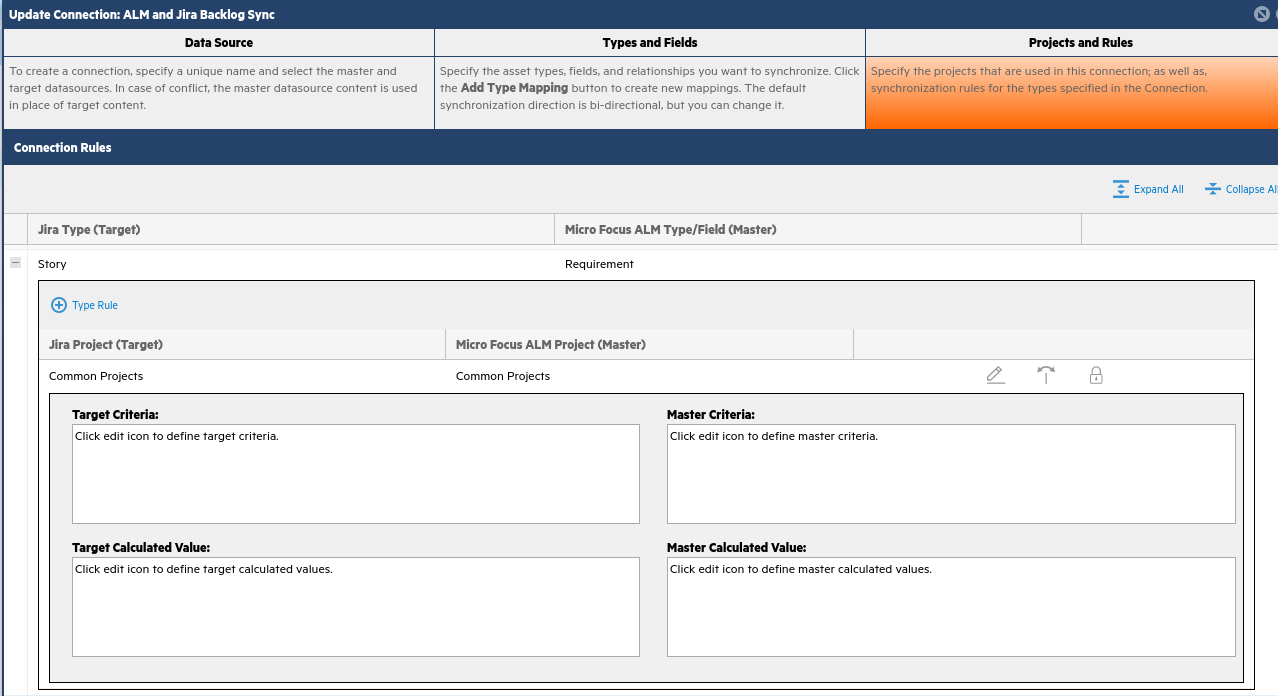
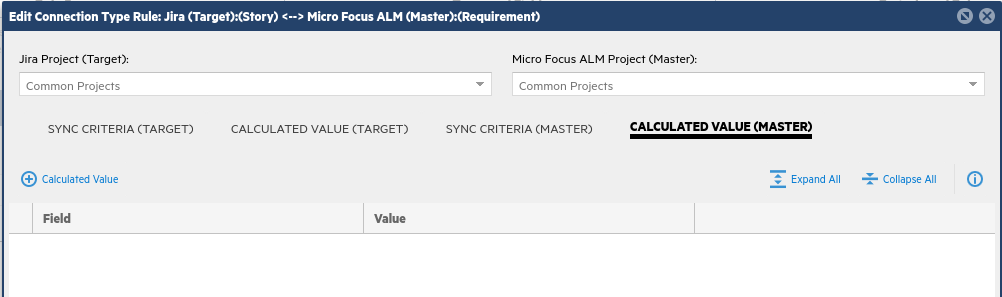
In this view, expand Story/Requirement type. Click the pencil button to the far right of the Common Projects labels.
-
Click on the tab to the right labeled Calculated Value (Master), then click + Calculated Value below.
-
Use calculated values to automatically set the ALM/QC requirement type on creation, since there is no similar field in Jira from which to synchronize.
In the Add Calculated Value window (shown below), in the When criteria section, click the Add Child Criteria icon on the far right. From the drop down menu, choose Is New and Click OK.
-
Choose the Set Field to be Requirement Type.
-
In the To Value field, select Functional for this example.
When a story is created from Jira as a requirement in ALM/QC, it will be set as a Functional requirement.
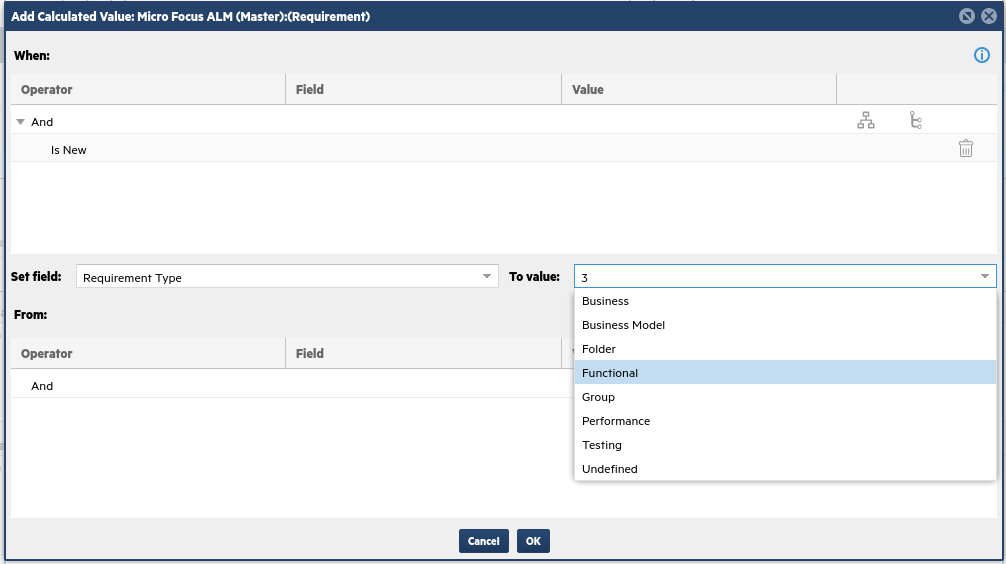
Note: After you select Functional, an integer appears in its place. This is the correct behavior, as ALM/QC stores these types as integers.
-
Click OK.
-
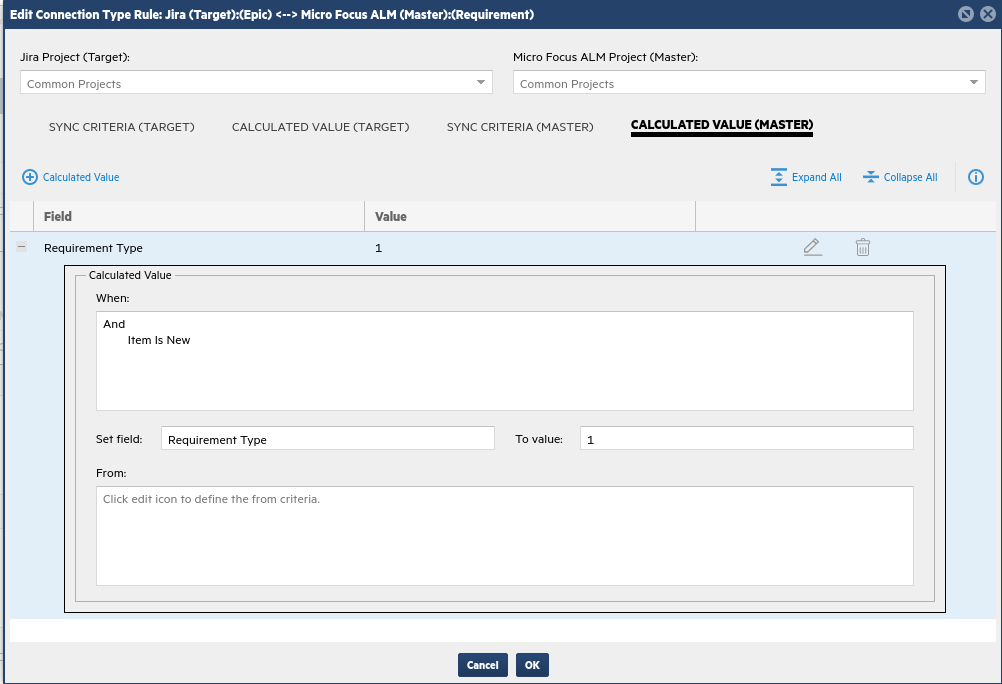
Repeat the above steps for Epic/Requirement as shown in the image below.
For epics, set the requirement type to Folder.
Step 6: Run one sync iteration in the Connections tab
For this step, you synchronize, to make sure everything is set up properly. We recommend that you first synchronize standalone types: stories, epics, and bugs. Then synchronize sprints and releases, which have dependencies. This makes it easier to debug issues that may arise.
-
On the Connections tab, you can see the new connection.

Click the gear icon to the left of the connection name, and choose Run One Iteration.
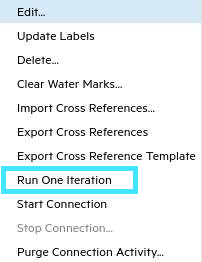
This runs one sync iteration, to test that it works properly.
Note: Running one iteration does not sync everything completely, especially if the sync was never run before, such as links between items or items that are in certain parent/child relationships.
-
Click the connection row. In the lower pane, open Connection Messages to track progress and look for errors. When the Status shows Disabled, the iteration is done.
-
In the Audit tab of the lower pane, click Run to run an audit. This gives you an idea of which types synced, and if there were any errors.
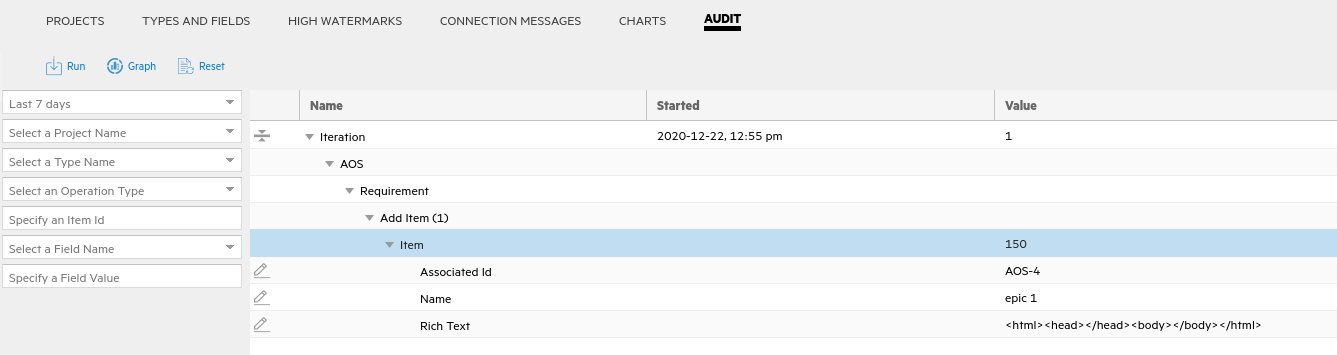
We recommend now looking at Jira and ALM/QC to verify that the expected items synced between them.
Step 7: Map relationship links
Now that you have synchronized epics, stories, sprints, and releases, you can add their relevant relationship links.
-
In the Connections tab, edit the new connection.
-
In the Types and Fields tab, edit the Story type.
-
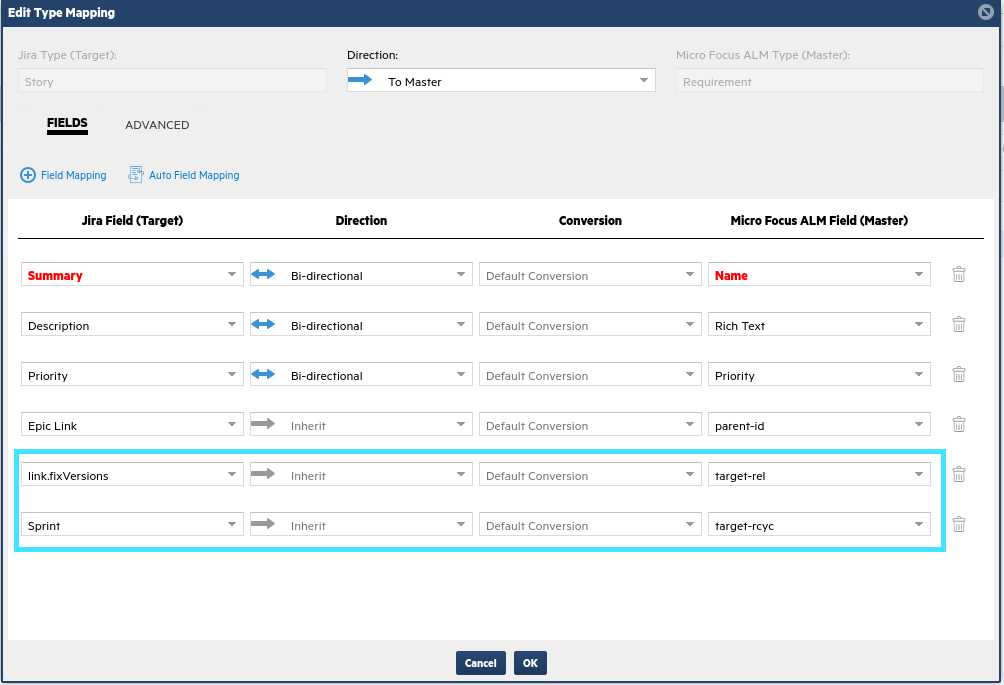
Add the following link mappings from Jira to ALM/QC:
-
link.fixVersions > target-rel
-
Sprint > target-rcycl
These enable you to sync links between stories and their related releases, and sprints.
-
Step 8: Run synchronization
-
On the Connections tab, click the gear icon to the left of the connection name, and choose Run One Iteration to test the latest changes.
-
After the synchronization has been set up properly, choose Start Connection to run the synchronization continuously at the frequency defined for the connection.
Tip: For every iteration, Micro Focus Connect sets a watermark so that it only looks for changes since the last iteration. If you run sync and do not see expected changes, this may be because you changed mappings since the last iteration, but the change is not registering because of an existing watermark. In this case, choose Clear Watermarks from the Connection gear icon before running sync.
Map ALM/QC release cycles to Jira sprints
This section describes how to map an ALM/QC release cycle reference (or ALM Octane sprint) to a Jira sprint reference or to a specific default reference.
Jira sprints are architecturally different from ALM/QC release cycles and ALM Octane sprints. Some of the differences are:
-
Jira sprints are not children of Jira releases. In ALM/QC, release cycles are children of releases and in ALM Octane, sprints are children of releases.
-
In Jira, Start Date and End Date values are not required. For an ALM/QC release cycle and for an ALM Octane sprint, Start Date and End Date values are required.
To account for these differences and cover the edge conditions, Define calculated values.
Syncing sprints and releases from ALM/QC or ALM Octane to Jira is relatively straightforward. The Jira sprints will be created without any issue, since there is no Jira release child tree dependency.
Syncing sprints from Jira to ALM/QC results in the ALM/QC sprints all being children of the release (specified in the data source). You need to set up Master calculated values for the Start and End Dates to account for missing dates in Jira.
To set up the configuration, you need to map the ALM/QC release cycle (or ALM Octane sprint) type to the Jira sprint type. To map references to types, you must also map the referred type. If the configurations are not set up correctly, Micro Focus Connect throws the SkipSyncItemExceptions exception.
Once the types are mapped, when the artifacts synchronize, their cross references are stored in the Micro Focus Connect database. The reference relationships for the derived types such as Bug–Defect, will synchronize correctly.
To ensure a correct tree structure of the ALM/QC sprints, ensuring to which releases the sprints belong, you must manually create the sprints and releases in Jira and ALM/QC. Leave the dates as flexible as required in Jira, but set them in ALM/QC in order to comply with the date enforcement policies. Ensure that the sprint names in Jira match the release names in ALM/QC exactly, with case-sensitivity.
Mapping to Jira
This section describes how to map an ALM/QC release cycle reference to a Jira sprint reference. However, the same guidelines apply to all of the following use-cases:
-
ALM/QC release cycle reference to a Jira sprint reference
-
ALM Octane sprint to a Jira sprint
-
ALM/QC or ALM Octane release to a Jira release.
To perform the mappings:
- Create a Jira sprint with the same name as the default ALM/QC release cycle (or ALM Octane sprint).
-
Set the data source sprint and release cycle types createItems property value to false for both Jira and ALM/QC. You must also explicitly exclude any properties from the Jira sprint to ALM/QC release cycle type map. This ensures that Micro Focus Connect will not synchronize all sprints to release cycles across the two endpoint products. Instead, it forces Micro Focus Connect to use the typeset as a lookup table for explicitly included cross references.
-
Export the Jira Sprint and the ALM/QC sprint IDs. Import this cross reference for the type-specific project map—Jira sprint to release cycle. For details, see Manage cross references.
Alternatively, run the matchByName script to create the sprint and release cross references in the Micro Focus Connect database. For details, see MatchByName scripts.

Map Jira epics and stories to ALM/QC requirements
This section provides an example of how to map Jira epics and stories to ALM/QC requirements in one direction.
Prepare ALM/QC
To prepare ALM for the synchronization:
-
In ALM/QC, create a folder to store all of Jira artifacts that need to be synchronized.
-
Add a custom UDF (user-defined-field) to identify the folder.
-
Create a public filter to return all JIRA artifacts, filtered by the custom UDF.

Data Source Configuration
To configure the data source, set the default Requirement folder:
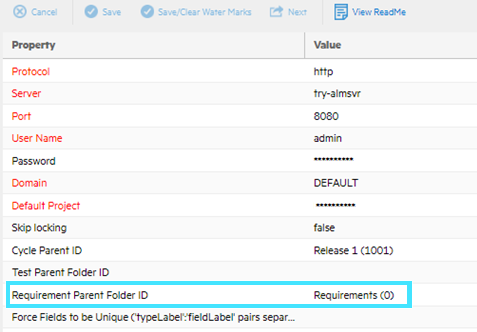
Types and fields example configuration
This section describes how to synchronize the Epic Link to a string.
-
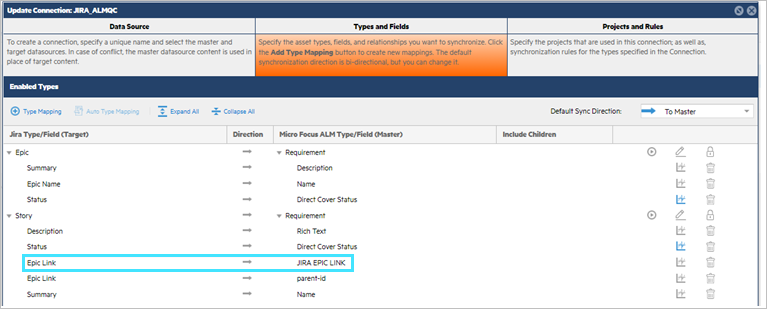
Navigate to the Types and Rules area.
-
Under Story, set Epic Link to JIRA EPIC LINK. This step is just for testing, in order to see the underlying data that is being synchronized, in this case the Epic Link with the string represented by JIRA EPIC LINK.
Epic project and rules
This section describes how to set up the mapping for Jira epics. You do not set common projects—projects are set at the type level.
-
Navigate to the Projects and Rules area.
-
Set the project path: click the Set project path button
 to set the path for the Master.
 -
Click + Type Rule.
-
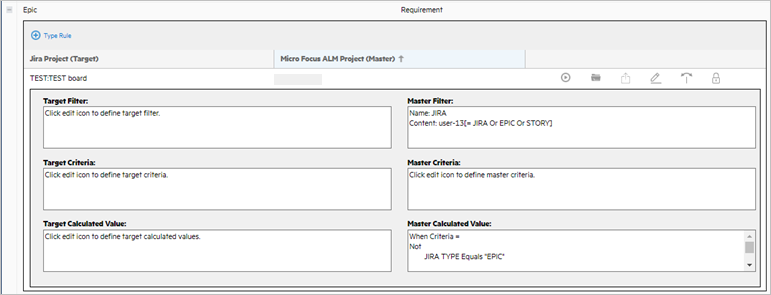
Add the ALM/QC filter. This helps reduce the number of requirements that are returned from ALM/QC. Click the Filter (Master) tab and add the ALM/QC filter to the Filter Details box. In this example, the filter can have the following form:
user-13[=JIRA Or EPIC or STORY] -
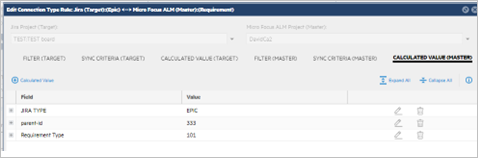
Set the master's calculated values:
-
Click the Calculated Value (Master) tab.
-
Click + Calculated Value and set the value of the custom UDF, JIRA TYPE to EPIC.
-
Click + Calculated Value and set the value of parent-id to the folder that you created to hold all of the Jira artifacts.
-
Click + Calculated Value and set the value of Requirement Type to the desired level, on our example, 101.
-
Story project and rules
This section describes how to set up the mapping for Jira stories. You do not set common projects—projects are set at the type level.
-
Navigate to the Projects and Rules area.
-
Set the project path: click the Set project path button
to set the path for the Master. -
Click + Type Rule.
-
Add the ALM/QC filter. This helps reduce the number of requirements that are returned from ALM/QC. Click the Filter (Master) tab and add the ALM/QC filter to the Filter Details box. In this example, the filter can have the following form:
user-13[=JIRA Or EPIC or STORY] -
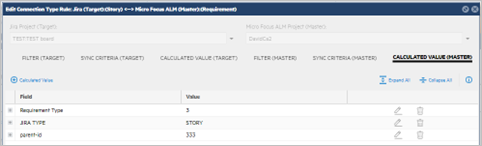
Set the master's calculated values:
-
Click the Calculated Value (Master) tab.
-
Click + Calculated Value and set the value of the custom UDF, JIRA TYPE to STORY.
-
Click + Calculated Value and set the value of parent-id to the folder that you created to hold the empty Jira artifacts (in cases where this is no EPIC link).
-
Click + Calculated Value and set the value of Requirement Type to the desired level, in our example, 5.
-
Synchronize the Jira Teams field with an ALM/QC UDF
This section describes how to set up synchronization between a Jira Teams field and an ALM/QC user-defined field to allow the synchronization of Jira Teams data using a custom mechanism, not involving the manipulation of value maps. This is only an example and is not guaranteed to work for all data sets.
To set up the synchronization:
-
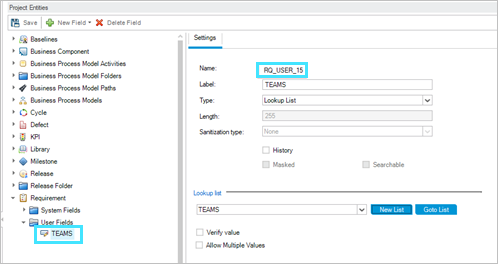
In ALM/QC create a List type user-defined field to hold the Jira Teams data.
-
Run the mfcQueryTemplates.bat script to determine the Custom Field ID of the Teams field in Jira. Examine the JSON data returned by the utility. For details, see QueryTemplates. The script generates files based on the data source, type, and property set. For example:
Utility settings Generated file name File contents set DATA_SOURCE=JIRA
JIRA.txt
Syncable types for the data source
set TYPE=Story
JIRA.Story.txt
Syncable fields for the data source
set PROPERTY=Team
JIRA.Story.Team.txt
Field's return values
The following is a sample of the contents of a JIRA.Story.txt file:
Example: Field name:Team details:{"SyncableField":{"fieldName":"Team","fieldLabel":"Team","fieldType":"FIELD_TYPE_ENUM","fieldUnits":"UNITS_NONE","fieldRequired":"NOT_SURE", "isReadOnly":false,"isMultiValued":false,"isParentField":false,"isHtml":false,"isUserField":false,"uniqueField":false,"isLinkField":false,"referredToLinks":[],"connectorFieldInfo":"fieldId=10107"}}
From the text generated in the file, we can see that the field ID of the Team custom field ID in Jira is 10107. The value to use in the script is: customfield_10107.
-
Create a property bag file jiraalmqccustomsync.property.bag.txt in the UserMaps folder in the Micro Focus Connect installation with the values retrieved in the above steps. Set the ALM/QC value to the name given to the field in ALM/QC, in this example RQ_USER_15.
customfield_10107=RQ_USER_15
Alternatively, you can use the ID of the UDF:
customfield_10107=user-15
-
Locate the mfcJiraAlmQcCustomSync.bat script in the utility folder under the Micro Focus Connect installation. Run the script as an administrator.
 See also: