Share this page


Custom Jira mappings and synchronizations
This topic describes special mapping and synchronization use cases for Jira with ALM/QC and ALM Octane.
Map ALM/QC release cycles to Jira sprints
This section describes how to map an ALM/QC release cycle reference (or ALM Octane sprint) to a Jira sprint reference or to a specific default reference.
Jira sprints are architecturally different from ALM/QC release cycles and ALM Octane sprints. Some of the differences are:
-
Jira sprints are not children of Jira releases. In ALM/QC, release cycles are children of releases and in ALM Octane, sprints are children of releases.
-
In Jira, Start Date and End Date values are not required. For an ALM/QC release cycle and for an ALM Octane sprint, Start Date and End Date values are required.
To account for these differences and cover the edge conditions, Define calculated values.
Syncing sprints and releases from ALM/QC or ALM Octane to Jira is relatively straightforward. The Jira sprints will be created without any issue, since there is no Jira release child tree dependency.
Syncing sprints from Jira to ALM/QC results in the ALM/QC sprints all being children of the release (specified in the data source). You need to set up Master calculated values for the Start and End Dates to account for missing dates in Jira.
To set up the configuration, you need to map the ALM/QC release cycle (or ALM Octane sprint) type to the Jira sprint type. To map references to types, you must also map the referred type. If the configurations are not set up correctly, Micro Focus Connect throws the SkipSyncItemExceptions exception.
Once the types are mapped, when the artifacts synchronize, their cross references are stored in the Micro Focus Connect database. The reference relationships for the derived types such as Bug–Defect, will synchronize correctly.
To ensure a correct tree structure of the ALM/QC sprints, ensuring to which releases the sprints belong, you must manually create the sprints and releases in Jira and ALM/QC. Leave the dates as flexible as required in Jira, but set them in ALM/QC in order to comply with the date enforcement policies. Ensure that the sprint names in Jira match the release names in ALM/QC exactly, with case-sensitivity.
Mapping to Jira
This section describes how to map an ALM/QC release cycle reference to a Jira sprint reference. However, the same guidelines apply to all of the following use-cases:
-
ALM/QC release cycle reference to a Jira sprint reference
-
ALM Octane sprint to a Jira sprint
-
ALM/QC or ALM Octane release to a Jira release.
To perform the mappings:
- Create a Jira sprint with the same name as the default ALM/QC release cycle (or ALM Octane sprint).
-
Set the data source sprint and release cycle types createItems property value to false for both Jira and ALM/QC. You must also explicitly exclude any properties from the Jira sprint to the ALM/QC release cycle type map. This ensures that Micro Focus Connect will not synchronize all sprints to release cycles across the two endpoint products. Instead, it forces Micro Focus Connect to use the typeset as a lookup table for explicitly included cross references.
-
Export the Jira sprint and the ALM/QC sprint IDs. Import this cross reference for the type-specific project map—Jira sprint to release cycle. For details, see Manage cross references.
Alternatively, run the matchByName script to create the sprint and release cross references in the Micro Focus Connect database. For details, see MatchByName.

Map Jira epics and stories to ALM/QC requirements
This section provides an example of how to map Jira epics and stories to ALM/QC requirements in one direction.
Prepare ALM/QC
To prepare ALM for the synchronization:
-
In ALM/QC, create a folder to store all of Jira artifacts that need to be synchronized.
-
Add a custom UDF (user-defined-field) to identify the folder.
-
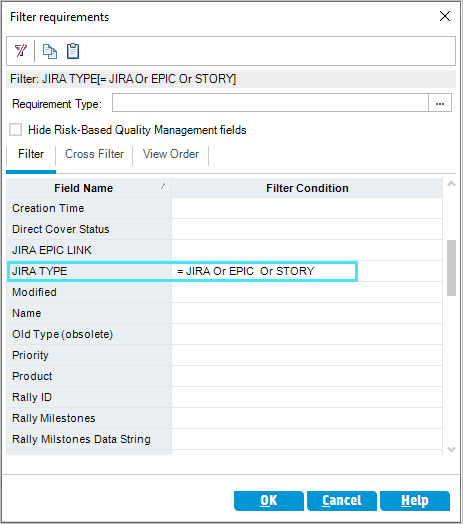
Create a public filter to return all JIRA artifacts, filtered by the custom UDF.
-
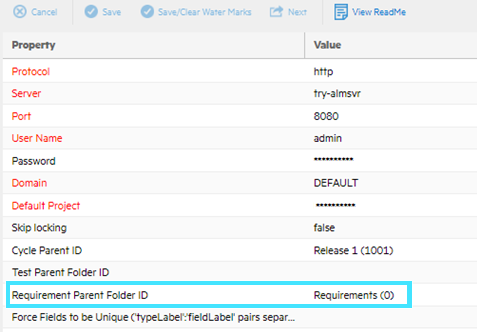
Configure the data source by choosing a default Requirement folder:
Configure the types and fields
This section illustrates how to synchronize an epic link to a string.
-
Navigate to the Types and Rules area.
-
Under Story, set Epic Link to JIRA EPIC LINK. This step is just for testing, in order to see the underlying data that is being synchronized, in this case the Epic Link with the string represented by JIRA EPIC LINK.

Define epic mapping
This section describes how to set up the mapping for Jira epics. You do not set common projects—projects are set at the type level.
-
Navigate to the Projects and Rules area.
-
Set the project path: click the Set project path button
 to set the path for the Master.
 -
Click + Type Rule.
-
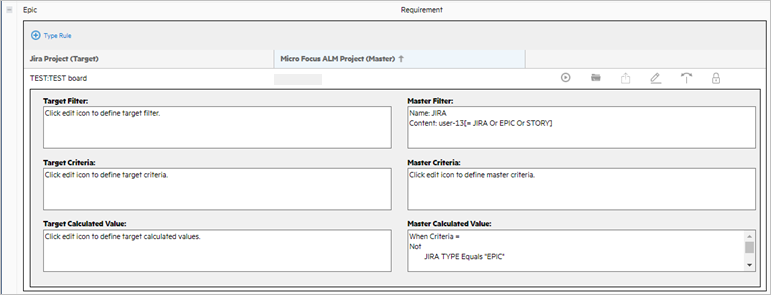
Add the ALM/QC filter. This helps reduce the number of requirements that are returned from ALM/QC. Click the Filter (Master) tab and add the ALM/QC filter to the Filter Details box. In this example, the filter can have the following form:
user-13[=JIRA Or EPIC or STORY] -
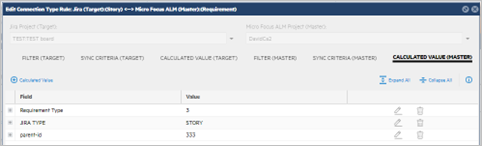
Set the master's calculated values:
-
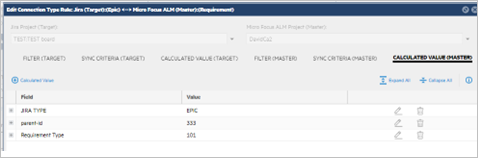
Click the Calculated Value (Master) tab.
-
Click + Calculated Value and set the value of the custom UDF, JIRA TYPE to EPIC.
-
Click + Calculated Value and set the value of parent-id to the folder that you created to hold all of the Jira artifacts.
-
Click + Calculated Value and set the value of Requirement Type to the desired level, on our example, 101.
-
Define Jira story mapping
This section describes how to set up the mapping for Jira stories. You do not set common projects—projects are set at the type level.
-
Navigate to the Projects and Rules area.
-
Set the project path: click the Set project path button
to set the path for the Master. -
Click + Type Rule.
-
Add the ALM/QC filter. This helps reduce the number of requirements that are returned from ALM/QC. Click the Filter (Master) tab and add the ALM/QC filter to the Filter Details box. In this example, the filter can have the following form:
user-13[=JIRA Or EPIC or STORY] -
Set the master's calculated values:
-
Click the Calculated Value (Master) tab.
-
Click + Calculated Value and set the value of the custom UDF, JIRA TYPE to STORY.
-
Click + Calculated Value and set the value of parent-id to the folder that you created to hold the empty Jira artifacts (in cases where this is no EPIC link).
-
Click + Calculated Value and set the value of Requirement Type to the desired level, in our example, 5.
-
Synchronize Jira Teams fields with ALM/QC
This section describes how to set up synchronization between the Jira Teams field and an ALM/QC user-defined field to allow the synchronization of Jira Teams data using a custom mechanism, not involving the manipulation of value maps. This is only an example and may not work for all data sets.
To set up the synchronization:
-
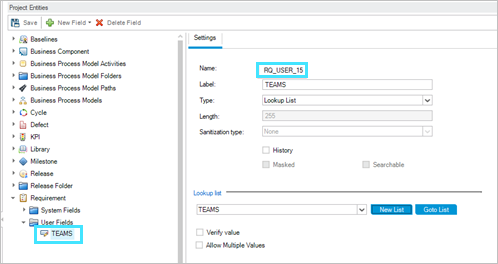
In ALM/QC, create a List type user-defined field to hold the Jira Teams data.
-
Run the mfcQueryTemplates.bat script to determine the Custom Field ID of the Teams field in Jira. Examine the JSON data returned by the utility. For details, see QueryTemplates. The script generates files based on the data source, type, and property set. For example:
Utility settings Generated file name File contents set DATA_SOURCE=JIRA
JIRA.txt
Syncable types for the data source
set TYPE=Story
JIRA.Story.txt
Syncable fields for the data source
set PROPERTY=Team
JIRA.Story.Team.txt
Field's return values
The following is a sample of the contents of a JIRA.Story.txt file:
Example: Field name:Team details:{"SyncableField":{"fieldName":"Team","fieldLabel":"Team","fieldType":"FIELD_TYPE_ENUM","fieldUnits":"UNITS_NONE","fieldRequired":"NOT_SURE", "isReadOnly":false,"isMultiValued":false,"isParentField":false,"isHtml":false,"isUserField":false,"uniqueField":false,"isLinkField":false,"referredToLinks":[],"connectorFieldInfo":"fieldId=10107"}}
From the text generated in the file, you can see that the field ID of the Team custom field ID in Jira is 10107. The value to use in the script is: customfield_10107.
-
In the UserMaps folder of the Micro Focus Connect installation, create a property bag file jiraalmqccustomsync.property.bag.txt with the values retrieved in the above steps. Set the ALM/QC value to the name given to the field in ALM/QC, in this example RQ_USER_15.
customfield_10107=RQ_USER_15
Alternatively, use the ID of the UDF:
customfield_10107=user-15
-
Locate the mfcJiraAlmQcCustomSync.bat script in the utility folder under the Micro Focus Connect installation. Run the script as an administrator.
Synchronize the Jira Teams field with ALM Octane
This section shows a sample synchronization between the Jira and ALM Octane Teams field. The example uses a custom mechanism, not involving the manipulating of value maps. This is only an example and may not work for all data sets.
To set up the synchronization:
-
Run the mfcQueryTemplates.bat script to determine the Custom Field ID of the Teams field in Jira. Examine the JSON data returned by the utility. For details, see QueryTemplates. The script generates files based on the data source, type, and property set. For example:
Utility settings Generated file name File contents set DATA_SOURCE=JIRA
JIRA.txt
Syncable types for the data source
set TYPE=Story
JIRA.Story.txt
Syncable fields for the data source
set PROPERTY=Team
JIRA.Story.Team.txt
Field's return values
The following is a sample of the contents of a JIRA.Story.txt file:
Example: Field name:Team details:{"SyncableField":{"fieldName":"Team","fieldLabel":"Team","fieldType":"FIELD_TYPE_ENUM","fieldUnits":"UNITS_NONE","fieldRequired":"NOT_SURE","isReadOnly":false,"isMultiValued":false,"isParentField":false,"isHtml":false,"isUserField":false,"uniqueField":false,"isLinkField":false,"referredToLinks":[],"connectorFieldInfo":"fieldId=10107"}}
From the text generated in the file, you can see that the field ID of the Team custom field ID in Jira is 10107. The value to use in the script is: customfield_10107.
-
In the UserMaps folder of the Micro Focus Connect installation, create a property bag file jiraoctanecustomsync.property.bag.txt with the values retrieved in step 1. Make sure to set the ALM Octane Team value to team.
customfield_10107=team
There is a switch in ALM Octane to create teams based on the teams list in Jira. By default, this option is set to true, creating all teams that exist in JIRA, in ALM Octane. Set it to false to enable the customization.
createoctaneteams=false
-
Locate the mfcJiraOctaneCustomSync.bat script in the utility folder under the Micro Focus Connect installation. Run the script as an administrator.
Synchronize Jira tasks and sub-tasks with ALM Octane
This section describes how to synchronize between Jira and ALM Octane tasks and sub-tasks. This is only an example and is not guaranteed to work for all data sets or scenarios.
Before using Micro Focus Connect to synchronize your applications, make sure you are familiar with the data structures of both endpoint systems, and the differences in systems' behaviors. Also note any customizations performed on each of the systems. For details, see Micro Focus Connect basics.
Micro Focus Connect uses the following to address differences between two systems that need to be synchronized:
-
Sync Criteria
-
Calculated values
-
Server-side filters
In this ALM Octane Jira bi-directional scenario, the following differences exist:
| Endpoint | Properties |
|---|---|
| ALM/Octane |
|
|
Jira |
|
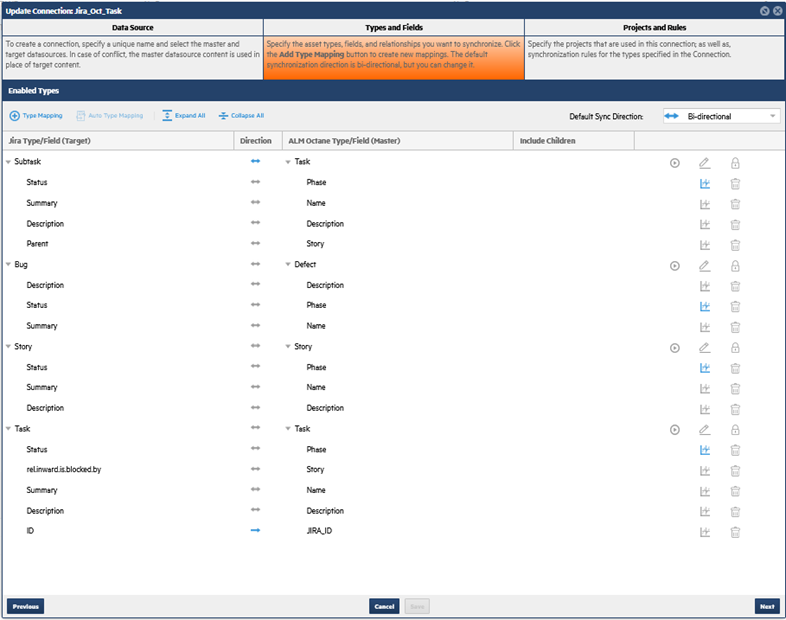
Basic mappings
Firstly, make sure the type mapping is correct. You must map all available list values of any mapped enumeration fields. In this example, the enum mapping for the Status/Phase fields is editable, as indicated by the blue symbol in the edit column. If the enum mapping is detected as being incorrect, the symbol turns red.
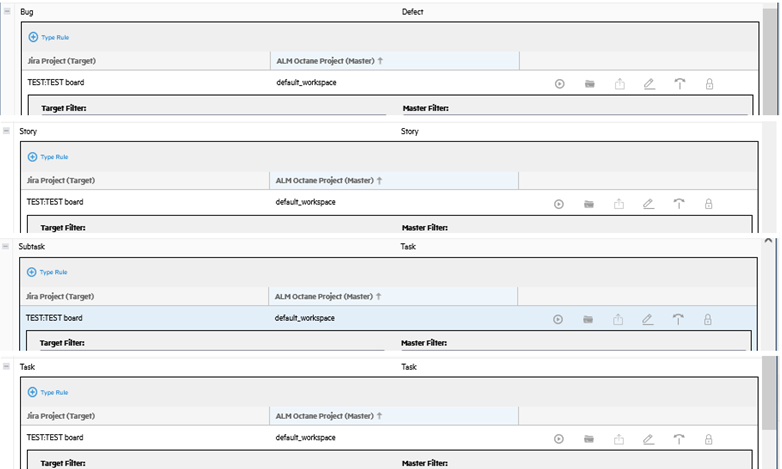
Project mapping
Since you are mapping multiple types, the Common Projects area should not be used. Each type must have its own, type-specific project mapping. For details, see Add projects and rules to a connection.
Application configuration
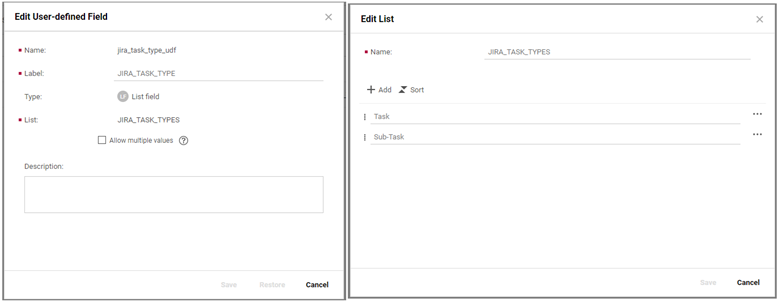
This section describes the mapping of a type from one endpoint, to multiple types on another endpoint, through a single configuration. The mapping is from an ALM Octane Task to a Jira Task and Sub-task. Since an ALM Octane Task can be associated with a Jira Task or Sub-Task, you must differentiate between the two types within ALM Octane to ensure that the correct data is synchronized with the appropriate Jira type.
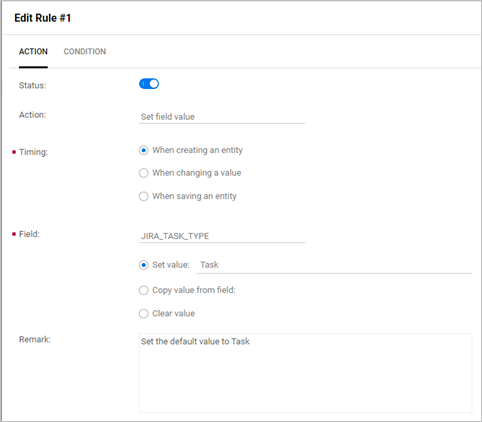
This can be achieved by creating a custom UDF (user-defined field) for the Task type in ALM Octane. In this case, a List UDF and a rule were created to set the default value to Task. This can be changed by a user in ALM Octane to then synchronize with a Sub-task in Jira. The field should not be changed after Micro Focus Connect has already synchronized the item with Jira. It should only be editable by an ALM Octane user when creating a new Task item.
Sync criteria and calculated values
Follow these steps to prepare for the synchronization and specify synchronization criteria and calculated values:
-
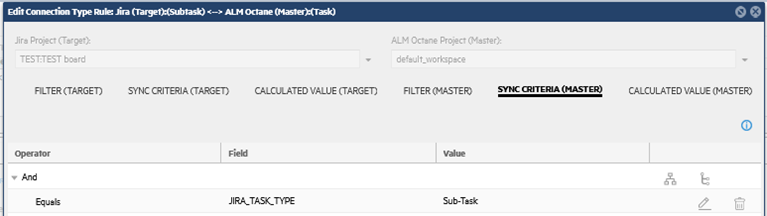
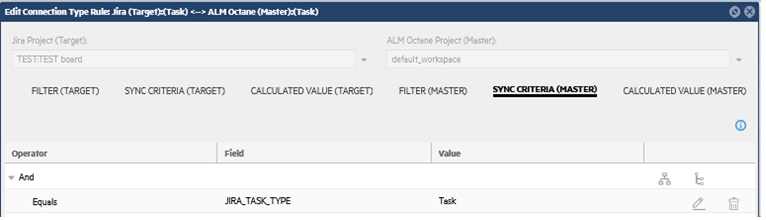
In the Edit Connection Type Rule box for the Jira (Target Sub-Task) <--> ALM Octane (Master Task) , open the Sync Criteria (Master) tab.
Set the rule to only include ALM Octane tasks that have the JIRA_TASK_TYPE UDF set to Sub-Task.
-
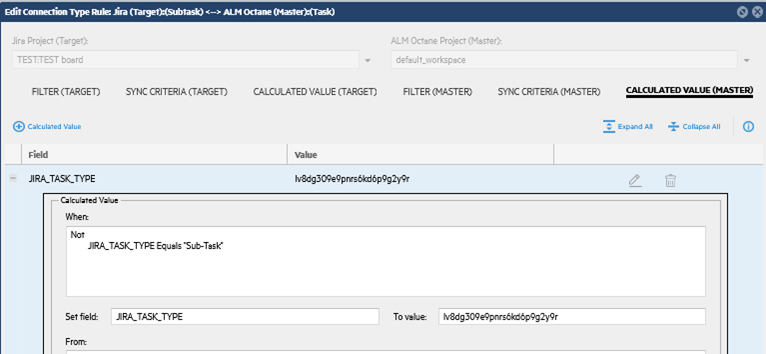
In the Edit Connection Type Rule box for the Jira (Target Sub-Task) <--> ALM Octane (Master Task) , open the Calculated Value (Master) tab.
Set the JIRA_TASK_TYPE UDF to Sub-Task when creating a Task in ALM Octane.
-
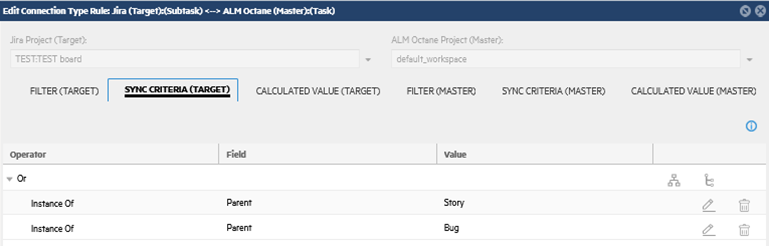
In the Edit Connection Type Rule box for the Jira (Target Task) <--> ALM Octane (Master Task) , open the Sync Criteria (Target) tab.
Create a Sync Criteria (Target) to restrict Jira sub-tasks that are associated with Stories and Bugs. This criteria excludes custom types.
-
In the Edit Connection Type Rule box for the Jira (Target Sub-Task) <--> ALM Octane (Master Task) , open the Sync Criteria (Master) tab.
Set the JIRA_TASK_TYPE UDF to Task when creating a Task in ALM Octane.
-
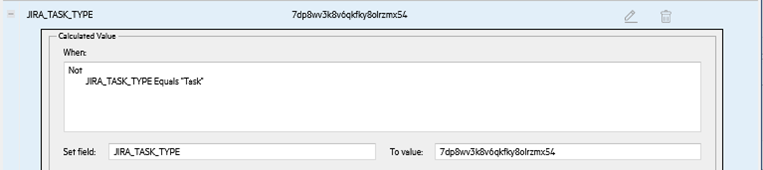
In the Edit Connection Type Rule box for the Jira (Target Sub-Task) <--> ALM Octane (Master Task) , open the Calculated Value (Target) tab.
Set the JIRA_TASK_TYPE UDF to Task when creating a Task in ALM Octane.
-
In the Edit Connection Type Rule box for the Jira (Target Sub-Task) <--> ALM Octane (Master Task) , open the Sync Criteria (Target) tab.
When a task is created in Jira, make sure the relationship type is set to blocks, the default.

As a result, the sync criteria only synchronizes tasks that are set to relinward.is.blocked.by.
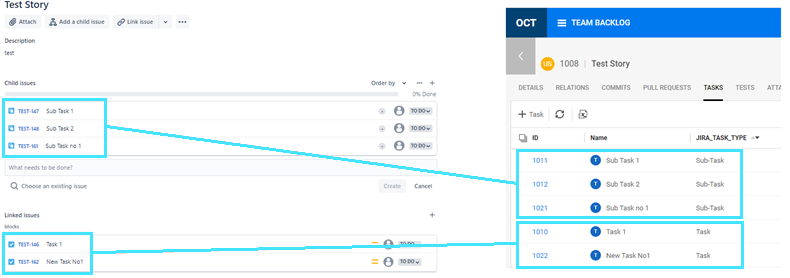
The screen below shows the result of the synchronization described above, showing the mappings of Jira on the left, and ALM Octane on the right.
 See also: