Share this page


Install all server components
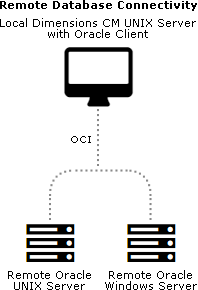
Remote schema requirements for Oracle
Your environment may require a schema to be installed on a remote Oracle database. For example, users on a local node want to use a remotely administered database.
To use a remote Oracle database, a client must be set up on the local node to perform database operations between the local server and the remote database. The client can be any of the following:
-
Oracle RDBMS
-
An Oracle client.
-
An Oracle instant client.
-
A full Oracle Enterprise installation.
-
Multiple database connectivity mechanisms are supported. The diagram below shows the connectivity supported by UNIX Oracle. An Oracle client can connect to either a Windows or a UNIX remote RDBMS server.
Remote schema requirements for PostgreSQL
To use a remote PostgreSQL database, no clients are required.
SSO and Smart Card limitations and requirements
-
The only smart card client reader supported is the Common Access Card (CAC), a United States Department of Defense (DoD) smart card issued as standard identification for logging in to DoD hosted software.
-
Smart card authentication is only supported on Linux and Solaris.
-
Installing or configuring an SSO server requires specific Light Directory Access Protocol (LDAP) parameters. For details, see Single sign-on prerequisites.
-
See the SSO and smart card prerequisites in Single sign-on prerequisites.
Install a server with a PostgreSQL database
Important: Your database must be running before you start the installation.
-
Run the server installer. Read and accept the license agreement.
-
Select New Install.
-
Select Install All Dimensions CM Server Components.
This option installs a server, schema, CM client, and SSO server with or without smart card.
-
Accept the default installation directory or choose a different one.
-
For Database Type, select PostgreSQL.
-
Select these installation components:
-
Server Core Files
Installs the server.
-
CM Schema
Installs the CM schema into the database.
-
(Optional) Single Sign On (Required for Smart Cards)
Installs or configures a connection to an SSO server. Only required when using other products in collaboration with Dimensions CM or for smart card authentication support.
-
(Optional) Smart Card Setup
Configures remote Windows smart card client software and hardware authentication.
-
Common Tools
Selected by default (required).
-
(Optional) Deployment Automation Server
Installs a Deployment Automation server.
-
PulseUno
Installs PulseUno (required) and its modules (optional):
-
Git server: The server that PulseUno uses for Git repositories.
-
Vault server: The server that PulseUno uses for the library of software packages.
-
For details about separating the database upgrade or migration operations from the server installation, contact Support.
-
-
(Optional) If you are not installing the PulseUno Git and Vault modules, configure the Git and Vault server connection.
Specify the host name and port number for the Git/Vault server. Optionally select the HTTPS option to enable HTTPS.
-
Select a licensing option:
-
Specify License Server
If the AutoPass License Server (APLS) is running on a remote machine, enter the URL of the remote machine.
If APLS is running on the same machine as the Dimensions CM server, accept the following localhost URL:
https://localhost:5814/autopass
For details about configuring Dimensions CM to use APLS, see Licensing.
-
Install a 30-day evaluation license
-
-
Enter the OS account name and password for the Dimensions CM system administrator. Default: dmsys
-
Select a database:
-
Local: Use an existing PostgreSQL database located on the local machine.
-
Remote: Use an existing PostgreSQL database located on a remote machine.
-
-
Enter the PostgreSQL connection details:
-
The server host name and port number.
-
The Dimensions database name.
-
The name and password of the PostgreSQL SuperUser.
-
-
Enter the new role and its password for the database instance. This role is the administrator of the database.
-
Select a demo process model.
-
Specify the operating system ID of the tool manager for the demo process model. Default:
dmsysSpecify credentials for the work and deployment areas:
-
Area Owner ID
Accept the default (dmsys) or enter a login ID. This user is set by default as the system administrator login ID.
-
Password
Enter the password for the area owner.
Accept the default directory for the demo process model areas or select a different one.
After the installation you must assign operating system accounts to the users in the sample process model. For details, see Create OS user accounts.
-
-
If you are installing a Deployment Automation server:
-
Accept the default installation directory or choose a different one.
-
(Optional if DA is already installed) Select Use existing settings.
-
(Optional) Select Skip database creation.
-
Specify the port number that Deployment Automation agents will use to make Java Message Service (JMS) connections to the server.
-
Select Client Mutual Authentication if you want Deployment Automation to use agent authentication when connecting to the server.
-
Specify a username and password for a new Deployment Automation database account to be created.
For details about installing and using DA, contact Support.
-
-
Enter the host name of the Dimensions CM server.
-
If you are installing an SSO server, select one of the following:
-
New: Install a new SSO server.
-
Existing: Configure a connection to an existing SSO server, for example, Solutions Business Manager (SBM).
-
-
If you are installing an SSO server and smart card, do one of the following:
-
Existing SSO server: Specify the SSO server’s host name and port. Optionally select a secure HTTPS connection.
-
New SSO server without smart card:
To configure LDAP details for user credentials, enter parameters for Hostname, Port, Base DN, Search Filter, Bind User DN, and Password.
Defaults:
Port:
389Search Filter:
(&(objectClass=user)(sAMAccountName={0}))For details about server SSO parameters, see Single sign-on prerequisites.
-
New SSO server with smart card:
-
To configure the LDAP connection for authenticating smart cards, enter parameters for Hostname, Port, Bind User DN, and Password.
Default port: 389
-
To configure LDAP details for user credentials, enter parameters for Hostname, Port, Base DN, Search Filter, Bind User DN, and Password.
Search Filter default:
(&(objectClass=user)(sAMAccountName={0})).For information about server SSO and smart card parameters, see Single sign-on prerequisites.
-
After the installation is complete, manually configure the smart card trusted certificate authorities. For details, see Configure trusted certificate authorities.
-
-
Specify the operating system user to own and run Tomcat and Java. This user is typically given restricted permissions and must exist before you start the installation.
Default:
dmsys -
Accept the default port number for the Tomcat server (8080) or enter a different one if it is in use. Some software is hard-coded to port 8080 and cannot be reassigned. For details, see Use TCP/IP ports.
-
Review the settings and click Install.
Install a server with an Oracle database
Important: Your RDBMS must be running before you start the installation.
-
Run the server installer. Read and accept the license agreement.
-
Select New Install.
-
Select Install All Dimensions CM Server Components.
This option installs a server, schema, CM client, and SSO server with or without smart card.
-
Accept the default installation directory or choose a different one.
-
For Database Type, select Oracle.
-
Select these installation components:
-
Server Core Files
Installs the server.
-
CM Schema
Installs the CM schema into the database.
-
(Optional) Single Sign On (Required for Smart Cards)
Installs or configures a connection to an SSO server. Only required when using other products in collaboration with Dimensions CM or for smart card authentication support.
-
(Optional) Smart Card Setup
Configures remote Windows smart card client software and hardware authentication.
-
Common Tools
Selected by default (required).
-
(Optional) Deployment Automation Server
Installs a Deployment Automation server.
Important: You must not install DA into a Serena-supplied runtime.
-
PulseUno
Installs PulseUno (required) and its modules (optional):
-
Git server: The server that PulseUno uses for Git repositories.
-
Vault server: The server that PulseUno uses for the library of software packages.
For details about separating the database upgrade or migration operations from the server installation, contact Support.
-
-
-
(Optional) If you are not installing the PulseUno Git and Vault modules, configure the Git and Vault server connection.
Specify the host name and port number for the Git/Vault server. Optionally select the HTTPS option to enable HTTPS.
-
Select a licensing option:
-
Specify License Server.
If the AutoPass License Server (APLS) is running on a remote machine, enter the URL of the remote machine.
If APLS is running on the same machine as the Dimensions CM server, accept the following localhost URL:
https://localhost:5814/autopass
For details about configuring Dimensions CM to use APLS, see Licensing.
-
Install a 30-day evaluation license.
-
-
Enter the OS account name and password for the Dimensions CM system administrator. Default: dmsys
-
Select a database:
-
Local: Use an Oracle located on the local machine.
-
Remote: Use an Oracle located on a remote machine.
-
-
Select an Oracle version.
-
Select the directory or path where Oracle is installed.
-
Enter the owner of the Oracle files. If you are connecting to:
-
A local database enter the user on the local machine.
-
A remote database enter the user on the remote machine. Default: oracle
-
-
Enter the following Oracle system information:
-
Host name of the machine where Oracle is installed.
-
System ID (SID), for example:
dim14
-
NET8 Service Name, for example:
dim14
-
TCP /IP Port number: a local or remote Oracle instance. Default:
1521
SID and NET8 Service name are normally the same. You must enter these correctly. Otherwise, the installation doesn’t function properly.
-
-
Enter the following Oracle values:
-
Oracle administration user. Default:
system
-
Password for the administration user. Default:
manager
-
Password for the PCMS_SYS schema that was created for the Oracle instance. Default:
pcms_sy
- Note:
-
Values are case-sensitive.
-
If you are installing on a Linux server that has a 32-bit RDBMS, a message may appear. These servers are native 64-bit and cannot be used with a 32-bit RDBMS. The installer automatically installs a 64-bit Oracle Instant Client.
-
-
Select a demo process model. For details, see Create OS user accounts.
-
Specify the operating system ID of the tool manager for the demo process model. Default:
dmsysSpecify credentials for the work and deployment areas:
-
Area Owner ID
Accept the default (
dmsys) or enter a login ID. This user is set by default as the system administrator login ID. -
Password
Enter the password for the area owner.
Accept the default directory for the demo process model areas or select a different one.
After the installation you must assign operating system accounts to the users in the sample process model. For details, see Create OS user accounts.
-
-
If you are installing a Deployment Automation server:
-
Accept the default installation directory or choose a different one.
-
(Optional if DA is already installed) Select Use existing settings.
-
(Optional) Select Skip database creation.
-
Specify the port number that Deployment Automation agents will use to make Java Message Service (JMS) connections to the server.
-
Select Client Mutual Authentication if you want Deployment Automation to use agent authentication when connecting to the server.
-
Specify a username and password for a new Deployment Automation database account to be created.
For details about installing and using DA, see the Support website.
-
-
Enter the host name of the Dimensions CM server.
-
If you are installing an SSO server, select one of the following:
-
New: Install a new SSO server.
-
Existing: Configure a connection to an existing SSO server, for example, Solutions Business Manager (SBM).
-
-
If you are installing an SSO server and smart card, do one of the following:
-
Existing SSO server: Specify the SSO server’s host name and port. Optionally select a secure HTTPS connection
-
New SSO server without smart card:
To configure LDAP details for user credentials, enter parameters for Hostname, Port, Base DN, Search Filter, Bind User DN, and Password.
Defaults:
-
Port:
389 -
Search Filter:
(&(objectClass=user)(sAMAccountName={0}))
For details about SSO parameters, see Single sign-on prerequisites.
-
-
New SSO server with smart card:
-
To configure the LDAP connection for authenticating smart cards, enter parameters for Hostname, Port, Bind User DN, and Password.
Default port:
389 -
To configure LDAP details for user credentials, enter parameters for Hostname, Port, Base DN, Search Filter, Bind User DN, and Password.
Search Filter default:
(&(objectClass=user)(sAMAccountName={0})).
For information about server SSO and smart card parameters, see Single sign-on prerequisites.
-
After the installation is complete, manually configure the smart card trusted certificate authorities. For details, see Configure trusted certificate authorities.
-
-
Specify the operating system user to own and run Tomcat and Java. This user is typically given restricted permissions and must exist before you start the installation.
Default:
dmsys -
Accept the default port number for the Tomcat server (
8080) or enter a different one if it is in use. Some software is hard-coded to part 8080 and cannot be reassigned. See Use TCP/IP ports. -
Review the settings and click Install. The installer:
-
Creates uninstaller files in the directory
_uninst_maintlocated one level up from the root directory. A record of the installed products is created in/var/opt/serena/inventory. To uninstall you must use the uninstaller files in the_uninst_maintdirectory to ensure that the inventory is correctly updated. For details, see Uninstall OpenText Dimensions CM.
-
Creates the Oracle tablespaces and sample process model. This may take a long time.
-
Installs the Common Tools (Tomcat server, web client, and Administration Console).
When the installation is complete, click Finish.
-