Share this page


SQL server setup and imports
If you are using an SQL server to store Analysis result data, you can import data directly from the Analysis machine.
SQL Server Express setup
This section describes Analysis and
Install SQL Server Express
Before you install SQL Server Express, make sure you have the following programs installed:
-
.Net Framework 3.5 SP1
-
Windows Installer 4.5
-
PowerShell 1.0
Once these items are installed, install SQL Server 2008 Express with Advanced Services.
When installing SQL Server make sure to include Database Engine Services and Management Tools - Basic. To verify your installation, open a command window and type the following :
sqlcmd -S (local)\<instance_name, for example, SQLEXPRESS>
A "1>" in the command line window indicates that your installation succeeded.
Set permissions:
-
From the Start menu, select Programs > Microsoft SQL Server 2008 > SQL Server Management Studio. You’ll be presented with a screen which should show the server name. Copy that name to your clipboard.
-
Click Connect. Expand the databases and highlight master.
-
Select Properties from the right-click menu. Select Files and copy the path name.
-
Go to the path in Windows Explorer and share the Data directory. Right-click on the folder and open the Properties.
-
Click Sharing. Input a name for the shared directory, and click Permissions. Give full access to everyone. Click OK.
Configure Analysis
-
Select Tools > Options to open the Options dialog box. Select the Database tab.
-
Select SQL Server/MSDE.
-
Enter a server name. For the Server name, provide the <machine name>\<DB instance name, usually SQLEXPRESS>.
-
Select Use Windows Integrated Security.
-
Click Test Parameters. Make sure the Connection parameters item is green, indicating success. If it did not succeed, see the Permissions section above.
- Enter the shared folder path and local folder path as described in SQL server setup and imports.
- Test the parameters again.
Troubleshooting
If you receive an error relating to synchronizing shared and physical server directories:
-
From your Desktop, right-click on My Computer. Select Manage and navigate to System Tools > Event Viewer > Application.
-
Look for any MSSQL messages in the Event viewer indicating blocked access. This issue is described on Microsoft’s support site.
-
Go back to the Management Studio, click New Query and enter in the following:
-
To allow advanced options to be changed, run:
EXEC sp_configure ‘show advanced options’, 1
GO
-
To update the currently configured value for advanced options, run:
RECONFIGURE
GO
-
To enable the feature, run:
EXEC sp_configure ‘xp_cmdshell’, 1
GO
-
-
Press ! Execute.
If you encounter issues with opening results (hanging halfway through), check the Event viewer for messages about a failed login. If you see this message, create a new query in Management Studio with the following commands:
-
Grant permissions:
EXEC sp_grantlogin ‘Domain\user’
GO
-
Change it to your login:
EXEC sp_grantdbaccess ‘Domain\user’, user
GO

Import data from the SQL server
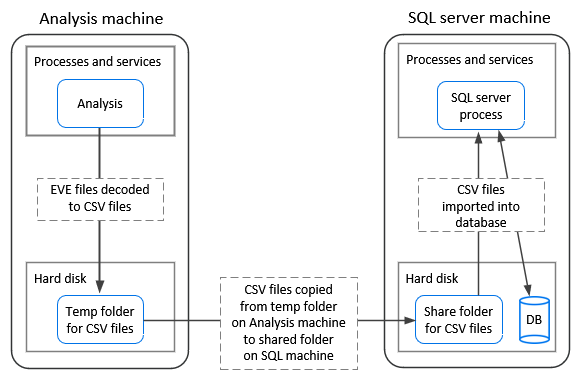
If you do not select the option to import data directly from the Analysis machine, Analysis creates CSV files in a local temp folder. The CSV files are copied to a shared folder on the SQL Server machine. The SQL server engine then imports the CSV files into the database. The following diagram illustrates the data flow:
Import data from the Analysis machine
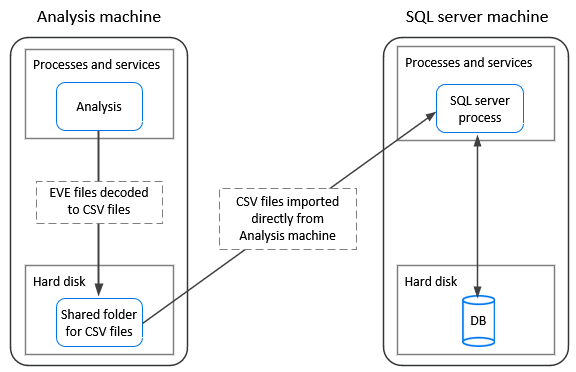
If you selected the option to import data directly from the Analysis machine, Analysis creates the CSV files in a shared folder on the Analysis machine and the SQL server imports these CSV files from the Analysis machine directly into the database. The following diagram illustrates the data flow:
 See also:
- Import data directly from the Analysis machine
- Database tab
- Known issues for Analysis - Microsoft SQL server