Share this page


Data Hub and Web Connector setup
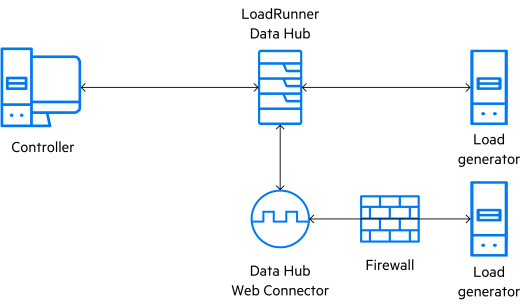
The Data Hub is a communication channel that supports communication between Controller and load generators. The Data Hub Web Connector is an additional component that enables the Data Hub to communicate over the web and over firewalls.
Overview
The Data Hub, based on Apache Kafka technology, enables more robust communication between components. For example, if the connection between Controller and a load generator is lost while running a scenario, the scenario does not immediately fail. Instead, the Data Hub allows an opportunity for Controller to restore the connection and continue running the scenario.
If your load generators are outside your local network, you also need to install the Web Connector to enable the Data Hub communicate with them.
After you install the Data Hub and Web Connector (if relevant), you configure Controller and the load generators to work with them.
The Data Hub and Web Connector use an SSL port for secure communication. The default port is 9443.

Installation
The Data Hub and Web Connector must be installed on Linux machines. They can work with OpenText Professional Performance Engineering components running on Windows and Linux machines.
For installation details, see Install.
Configure Controller for the Data Hub
Configure Controller to work with the Data Hub and Web Connector by defining the Data Hub settings.
To configure Controller to communicate using the Data Hub:
-
In Controller, select Tools > Data Hub settings.
-
In the Data Hub settings dialog box, enter the following:
Field Details Server address Data Hub server address, including the hostname, domain (if relevant), and port number. You can enter multiple addresses, separated by commas. Web Connector address (Optional) Data Hub Web Connector address, including the hostname, domain (if relevant), and port number. Proxy details (Optional) Enter this information if connecting using a proxy.
Configure the agent for the Data Hub
Before a load generator can work with the Data Hub and Web Connector, the OpenText Professional Performance Engineering Agent must be configured with the Data Hub settings. There are two ways to do this:
| Method | Details |
|---|---|
| Command line |
Use the Network and Security Manager command line tool. For details, see Network and Security Manager. Tip: You can use the Network and Security Manager command line tool to update multiple agents at once, using a remote batch update. |
| OpenText Professional Performance Engineering Agent dialog (Windows only) |
|
Set up a Data Hub network profile
Create a Data Hub network profile, or modify an existing profile to use with the Data Hub. Then, select that profile for each load generator in a scenario.
To create a Data Hub network profile:
-
In Controller, select Tools > Network Profile Manager.
-
In the Network Profile Manager dialog box:
- If creating a new profile: Click the Add new network profile
 button, and then select the new network profile from the Network Profile Name list.
 - If modifying an existing profile: Select a profile from the Network Profile Name list to modify for use with the Data Hub.
- If creating a new profile: Click the Add new network profile
-
In the Data Hub Settings area:
- Enable the Data Hub Profile option.
-
(Optional) Enable/deactivate the Transfer Files Over TCP option (enabled by default). When this option is enabled, the preferred file transfer method is through direct TCP connection rather than through the Data Hub, for greater efficiency.
If you are using the Web Connector, we recommend deactivating the Transfer Files Over TCP option. The script files are transferred more efficiently through the Web Connector.
Note: For files to be transferred over TCP, all files must be transferred to remote hosts before running a scenario. To ensure this, in Controller, enable the Transfer all files to remote hosts before running scenario option. For details, see Runtime File Storage tab.
NV Insights functionality cannot be used when Transfer all files to remote hosts before running scenario is enabled. For details, see NV Insights report.
-
If you are using a proxy: In the Proxy Settings area, enable Use proxy and enter the proxy details.
-
In the Connection Mode area, select an alternate communication method: direct connection (using TCP) or connection via MI Listener. The selected method is used in cases where communication through the Data Hub is inefficient or unsuccessful.
To select the Data Hub network profile for load generators:
-
In the Controller toolbar, click the Load Generators
 button.
 -
In the Load Generators dialog box:
- If adding a new load generator: Click Add. Enter the details of the load generator and click More.
- If modifying an existing load generator: Select the load generator from the list and click Details.
-
In the Connection tab, in the Choose Network Profile dropdown list, select the Data Hub network profile.
 See also: