Git integration

This topic explains how Git integration enables you to upload scripts from your Git repository.

Install and configure a Windows Git agent

The Git agent connects your Git repository to your OpenText Core Performance Engineering tenant.

Prerequisites

The following prerequisites apply when installing the OpenText Core Performance Engineering Git agent.

  • A Windows x64 operating system

  • A local Git installation

Install and configure the agent

The following actions describe how to install and configure the OpenText Core Performance Engineering Git agent.

Action How to
Download and install the agent
  1. Download the Git agent from the banner's Tools and integrations Tools and integrations buttonAgents area.

  2. Extract the downloaded package and run it to install the agent.

Configure the agent
  1. The Git Agent Configuration tool starts automatically after the agent installation is complete.

    To run the configuration tool manually at any time, go to Start > <product-path> - Git Agent, right-click Configure Git agent, and select Run as administrator to open the OpenText Core Performance Engineering Git Agent Configuration tool.

  2. On the General tab, specify the following:

    1. An agent name.

    2. Your OpenText Core Performance Engineering client ID and client secret. For details, see Create access keys.

      Note: For tenants created in version 24.3 or earlier, username and password authentication continues to work, although this method has been deprecated and will no longer be valid once enforcement begins in a future release.

    3. Your tenant ID.

    4. Your project ID.

    5. Select whether to Share this agent with other projects. Make sure the user entered above has access to the projects that need to use this Git configuration (available from Git Agent installer version 2021.08 and later).

      Note:

      • Git agent sharing can be done only when initially registering an agent. If a Git agent is shared, the repositories configured on the agent are visible to all assigned projects.

      • Git integration has been enhanced for faster updates. Windows and Linux agents now reflect new commits in the UI within 30 seconds (previously 2 minutes). The synchronization interval is configurable and can be reduced to as low as 5 seconds using the STORM_GIT_SYNC_INTERVAL parameter.

  3. On the Misc tab:

    1. To use a proxy other than the one shown, enter your proxy URL.

      If your proxy requires authentication, select the Advanced tab to enter your credentials.

    2. Enter the URL of the server and tenant. You can copy the URL from the address bar of the browser in which you opened your tenant.

    3. Select a log level.

    Log level dialog box

  4. On the Git tab:

    The Git agent enables you to configure multiple repositories and multiple branches. For each repository or branch you want to add, click the Open button Open button 
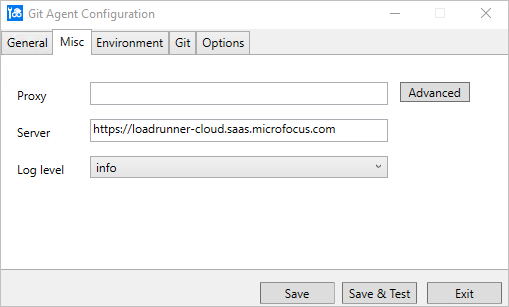
to open the dialog box, and then complete the following steps.

    1. Enter the repository URL.

      Tip: To configure credentials for a private repository, click Advanced. Enter your Git username and password. Refer to your repository's documentation for instructions on how to retrieve your credentials.

    2. Click Retrieve to retrieve all the branches.

    3. In the Branches list, select the branches to add.

    4. Click OK.

    Add repository dialog box

    Note: Configure only a small number of repositories or branches on a single Git agent. Having many repositories or branches on a single Git agent can significantly impact performance when uploading and synchronizing. If you need to use a large number of repositories or branches, use multiple Git agents to support them.

Launch the agent Go to Start > <product-path> - Git agent > Start Git agent.

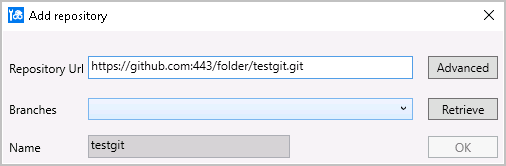
Install a Docker container for the Git agent

The following actions describe how to install a Docker container for the Git agent.

Action How to
Pull Docker image

Pull the Git agent Docker image from Docker Hub:

docker pull performancetesting/lrc_git_agent:latest

Launch a container

Launch the container in the background (detached) mode using the following command:

Copy code
docker run -d \   
    -e "STORM_TENANT=<tenant id>" \   
    -e "STORM_USERNAME=<username>" \   
    -e "STORM_PASSWORD=<password>" \   
    -e "STORM_PROJECT_ID=<project id>" \   
    -e "STORM_AGENT_NAME=<agent name>" \   
    -e "STORM_AGENT_CROSS_PROJECTS=<the flag to share agent across projects>" \   
    -e "STORM_GIT_REPO_URL=<git repository URL>" \   
    -e "STORM_GIT_REPO_BRANCH=<git repository branch>" \   
    --net=host performancetesting/lrc_git_agent

If you need to configure multiple branches or repositories, use the following command to provide details using a mounted volume:

Copy code
docker run -d \   
    -e "STORM_TENANT=<tenant id>" \   
    -e "STORM_USERNAME=<username>" \   
    -e "STORM_PASSWORD=<password>" \   
    -e "STORM_PROJECT_ID=<project id>" \   
    -e "STORM_AGENT_NAME=<agent name>" \   
    -e "STORM_AGENT_CROSS_PROJECTS=<the flag to share agent across projects>" \   
    -v "<git agent workspace path>:/opt/gitworkspace" \   
    --net=host performancetesting/lrc_git_agent

Note:

  • In the <git agent workspace path> folder, add a configuration file named config.json (see the example below). If other Git-related files such as .gitconfig or .ssh are required, add them to this folder.

  • Read, write, and run permissions are required on the folder.

  • The target path /opt/gitworkspace is fixed. Using another path is not supported.

  • If you need to customize the repositories configuration file path (inside the container), add it as a value for the STORM_GIT_REPO_CONFIG parameter.

  • To connect to a Git Docker container with SSH, mount the SSH folder into a container using the following command:

    -v "<git agent workspace path>/.ssh:/home/lr_user/.ssh"

Configuration file

Enter the details about your repositories and branches as JSON code.

For example:

Copy code
[
       {
             "url": "git@github.xyz.com:user/scripts.git",
             "branches": [
                    "branch1",
                    "branch2"
             ]
       },
       {
             "url": "https://user:token@github.com/user/scripts.git",
             "branches": [
                    "main"
             ]
       }
]
Environment variables

You can also pass environment variables using the --env-file command line parameter.

  • STORM_TENANT: Your Tenant ID [required]

  • STORM_USERNAME: Your username [required]

  • STORM_PASSWORD: Your password [required]

    Note: For tenants created after version 24.3, enter your client ID in the STORM_USERNAME field and your client secret in the STORM_PASSWORD field. For earlier tenants, continue using your username and password.

  • STORM_PROJECT_ID: Project ID (default value 1) [optional]

  • STORM_AGENT_NAME: Agent name [required]

  • STORM_AGENT_KEY: Agent key [optional]

  • STORM_AGENT_DESCRIPTION: Agent description [optional]

  • STORM_AGENT_CROSS_PROJECTS: The flag to share agent across projects [yes|no; default: no] [optional]

  • STORM_GIT_REPO_URL: Git repository URL [optional]

  • STORM_GIT_REPO_BRANCH: Git repository branch [optional]

  • STORM_GIT_REPO_CONFIG: Git repository configuration file path inside the container [optional]

  • STORM_GIT_SYNC_INTERVAL: Git agent synchronization interval in seconds [optional]. Supports values from 5 to 120, and defaults to 30 seconds if not specified.

If the agent needs to use a proxy, pass it using the https_proxy or http_proxy environment variable.

Manage scripts in your Git repository

To manage scripts in your Git repository, select Assets > Scripts.

Do the following to add or update scripts from your Git repository.

Action How to
Access the Git repository

Click the Upload button Upload button and select Upload from Git to open the Git repository dialog box.

Note: For shared Git agents, if multiple users upload or synchronize scripts using the same agent simultaneously, the uploading or synchronizing time increases.

Select an agent

From the menus, select the agent, repository, and branch that connect to the script repository you want to use.

For details on managing your Git agents, see Agents.

If you want all the scripts that are uploaded from the repository to be configured for auto sync, select the Auto Sync checkbox. You can also individually configure scripts for auto sync. For details, see Sync Git scripts.

Select a script

Select one or more scripts from the Git repository. Click Add.

Sync Git scripts

You can sync Git scripts both manually and automatically.

To sync Git scripts manually:

  1. Turn on the Show Git only switch.

  2. Select the scripts you want to sync.

  3. Click the Sync button Sync button to sync your scripts with the Git repository.

Note: When you manually sync a Git script, runtime settings configured for the script in OpenText Core Performance Engineering are retained.

To sync Git scripts automatically:

Turn on the Auto sync switch for the scripts you want to be synced automatically.

When a change to a script is made in the repository and the script is automatically updated in OpenText Core Performance Engineering, a message is added in the notifications area.

Note: When you automatically sync a Git script, the runtime settings configured for the script in OpenText Core Performance Engineering are retained.

Tip: To see a list and view the status of your uploads and syncs, click the Notification button Notification button in the banner. The Notification pane provides a time stamp and other relevant information for each event. If you have new notifications, the number above the button indicates the number of unread items. To delete an upload notification, hover over it and click x.

See also