Share this page


Load test profiles
This topic explains how to set the load profile for scripts, including the scheduling mode and load generator location for each script.
For information on how to schedule an entire load test, see Schedule a test run.
Create a load test profile
Create a profile for your test in the Load profile pane.
To create a load test profile:
-
Add scripts. Click the Add from Assets button
 to select scripts for your test from existing assets. For details, see Scripts.
 -
Choose a scheduling mode. For details, see Scheduling modes.
-
Select a location for the run: Cloud or On-premises.
-
Set the basic settings from the script list pane. For details, see Basic settings.
-
Set additional details about the Vusers and the run. For details, see Additional settings.
Scheduling modes
The available scheduling modes depend on the load test's run mode.
| Run mode | Scheduling mode |
|---|---|
| Duration |
The following script scheduling modes are available:
|
| Iteration | Simple mode only. |
| Goal Oriented | Scheduling modes are not available. |
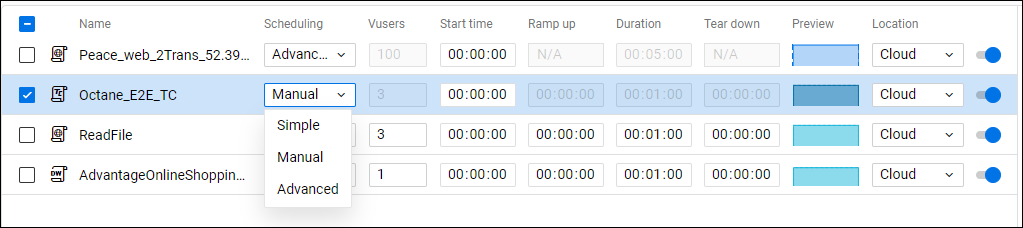
To set a scheduling mode, expand the Scheduling list in the script's row and select Simple, Manual, or Advanced as described below.
Basic settings
You can customize settings for each script either in the table columns or in the script's Details pane.
The visible columns depend on the script's run mode: Duration, Iterations, or Goal Oriented. The following table lists which columns are visible for each run mode.
 <Activate/Deactivate script>
After setting values in the Load profile page, you can configure additional settings in the script's Details pane.
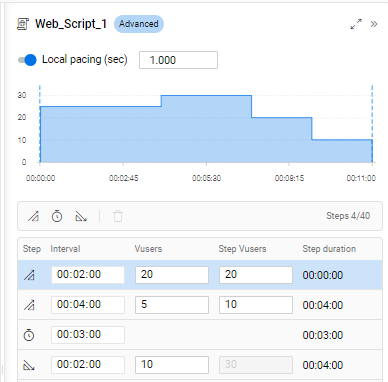
A graph in the Details pane displays a visual representation of the script schedule with the number of Vusers, duration, ramp up, and tear down. (A smaller version of the graph is also displayed in the row of the script.)
Simple mode settings
Simple mode is the default schedule mode and enables you to configure a time during which Vusers are started or stopped, at a consistent rate. For example, if you assign ten Vusers for a script and a ramp-up time of ten minutes, one Vuser is started each minute.

Configure the following additional settings directly in the row of the selected script.
| Action | Task |
|---|---|
| Define the ramp up |
Specify the ramp-up time to start Vusers at a consistent rate.
Note: For TruClient - Native Mobile scripts, only one Vuser runs, so there is no ramp up. |
| Define the tear down |
Specify the tear-down time to stop Vusers at a consistent rate.
Note: For TruClient - Native Mobile scripts, only one Vuser runs, so there is no tear down. |
Manual mode settings
Note: The Manual scheduling mode is only enabled for load tests configured to run in Duration mode.
Manual mode enables you to simulate a slightly more complex scenario by configuring ramp-up and tear-down values for a specific number of Vusers in time intervals. For example, you can configure three Vusers to be started every two minutes until all Vusers for the test have started.
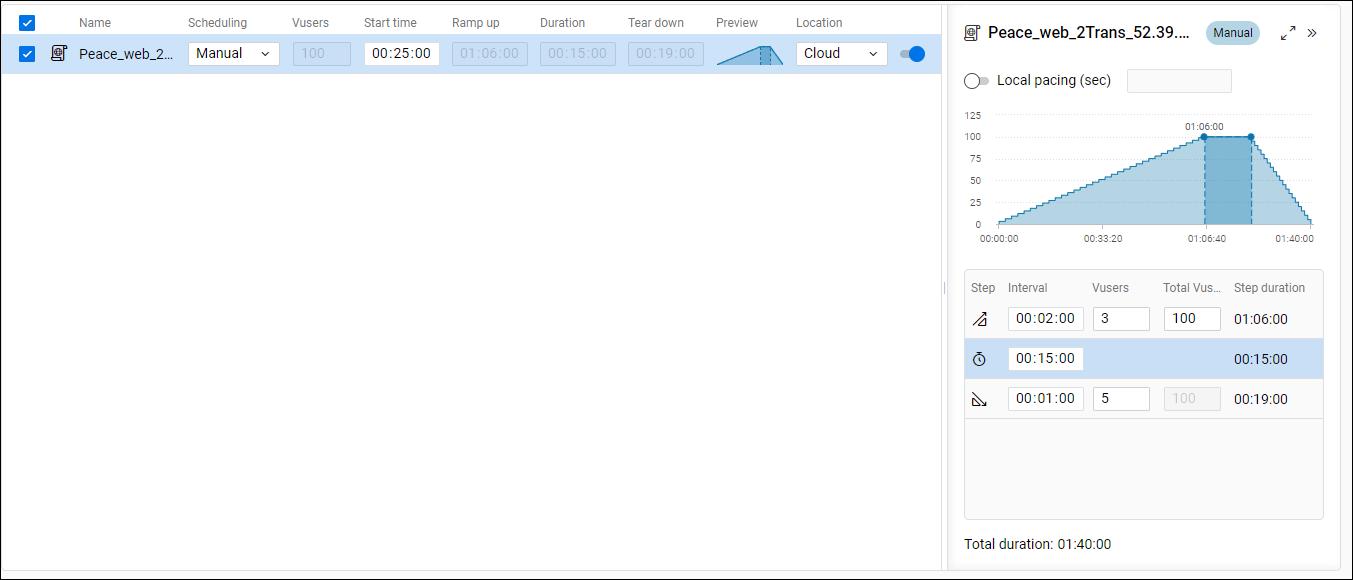
Select Manual scheduling mode, and configure the following additional settings in the schedule profile pane.
| Action | Task |
|---|---|
| Define the ramp up, the rate at which Vusers are added. |
Specify how many Vusers are added and at what time intervals.
|
| Define the tear down, the pace at which Vusers are stopped. |
Specify how many Vusers are stopped and in what time intervals.
|
Advanced mode settings
Note: The Advanced scheduling mode is only enabled for load tests configured to run in Duration mode.
Advanced mode enables you to configure a schedule that more accurately reflects a real-life scenario, with multiple instances of Vusers starting and stopping during the test.
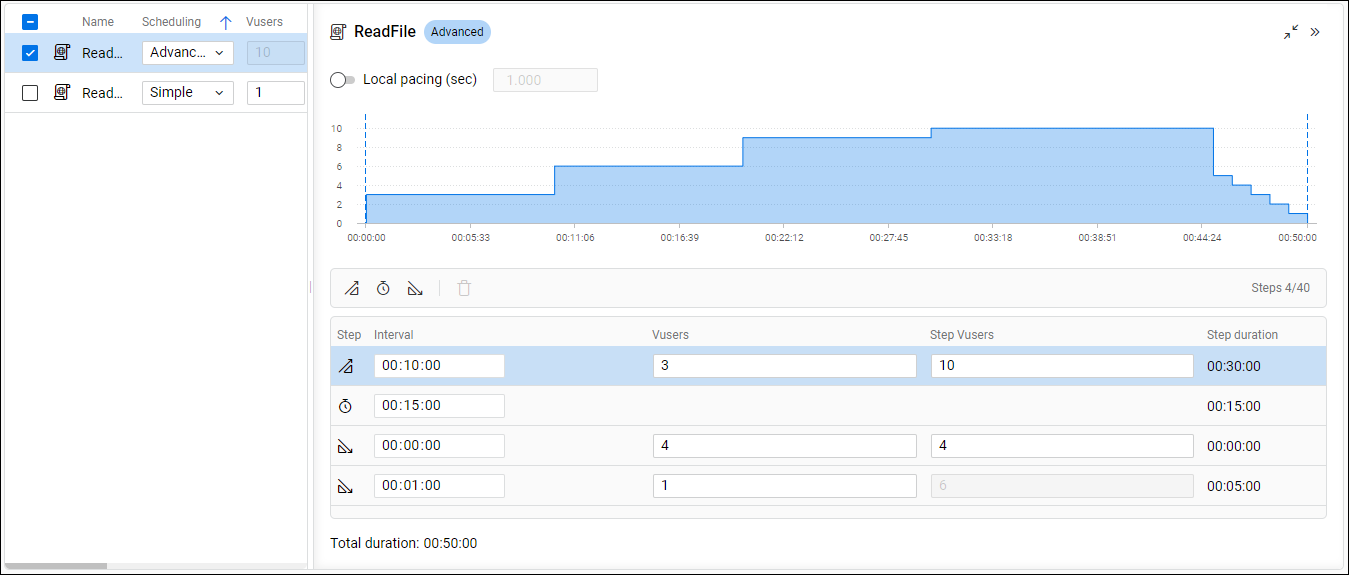
Select Advanced scheduling mode. In the schedule profile pane, configure multiple steps using the following settings.
| Action | Task |
|---|---|
| Define the ramp up, the rate at which Vusers are added. |
Click Add ramp up to add a Ramp Up step and specify how many Vusers are added and in what time intervals.
For example, you can configure two Vusers to be started every four minutes until a total of twelve Vusers have been started. |
|
Set a duration. |
Click Add duration to add a Duration step and specify the time the test runs before executing the next scheduling step. Duration does not include ramp up and tear down times. |
| Define the tear down, the pace at which Vusers are stopped. |
Click Add tear down to add a Tear Down step and specify how many Vusers are stopped and in what time intervals.
For example, you can configure three Vusers to be stopped every two minutes until a total of nine Vusers have been stopped. |
Note:
-
Advanced mode is unavailable for:
-
Scripts in a load test configured for the iterations run mode.
-
TruClient - Native Mobile scripts.
-
Scripts with the Test settings > Add Vusers option selected. For details, see Configure test settings.
-
-
The first step must be a Ramp up.
-
The last step must be a Tear down.
-
The schedule must include at least one Ramp up step, one Duration step, and one Tear down step.
-
You can include a maximum of forty steps in the schedule.
Additional settings
For all scheduling modes, you can configure the following additional settings.
| Action | Task |
|---|---|
| Set pacing |
Controls the time between iterations. The pace tells the Vuser how long to wait between iterations of your actions. You can control pacing either from Load test > Load profile or Runtime settings > Pacing. To set pacing in the Load profile tab:
For VuGen scripts, if your script contains fixed pacing, pacing defaults to the script value. You can manually change the value. To set pacing using runtime settings:
See Open the runtime settings. Note: If local pacing is turned off, the runtime settings values are used by default. |