Share this page


Analyzing performance test tun results
Now that you have completed running the performance test, you can use Analysisto analyze the performance data generated during the test run. Analysis gathers the performance data into detailed graphs and reports. Using these graphs and reports, you can pinpoint and identify the bottlenecks in the application, and determine what changes need to be made to the system to improve its performance.
How do I view Analysis information?
To view Analysis data for your actual performance test, you perform the following steps:
-
Install Analysis
You can download Standalone Analysis from the In the banner, click the module name or arrow and selectDownload Applications > Standalone Analysis.
-
Collate and analyze the results for the test run.
-
In the banner, click the module name or arrow and selectTest Runs. Select the performance test you just ran in the test management tree, and click the Runs tab.
-
If the test run is in the Before Collating Results state, right-click the run, and select Collate. The results for the test run are collated.
-
When result collation has finished, and the test run is in the Before Creating Analysis Data state, right-click the run, and select Analyze.
-
When OpenText Enterprise Performance Engineering has finished analyzing the results, download the Results_<#>.zip file for the test run.
-
-
Open the Analysis session file for your performance test.
-
In Analysis, select File > Open. The Open Existing Analysis Session dialog box opens.
-
Click File System, and go to the Results_<run_id>.zip file for the instance of your performance test that you want to analyze.
-
Double-click the Results_<run_id>.zip file. The Analysis session file is opened in Analysis.
For information about how to work within Analysis, see the OpenText Professional Performance Engineering Help Center.
-

Did I reach my goals?
Analysis opens displaying the Summary Report. The Summary Report provides general information about the performance test run. In the Statistics Summary of the report, you can see how many Vusers ran in the test and view other statistics such as the total/average throughput, and the total/average hits. The Transaction Summary of the report lists a summary of the behavior of each transaction.
How can I view the graphs?
The graph tree in the Analysis window shows the graphs that are open for viewing. From the graph tree, you can choose to open new graphs and remove graphs that you no longer want to view. The graphs are displayed in the graph viewing area of the Analysis window. You can view data from the selected graphs in the graph legend.
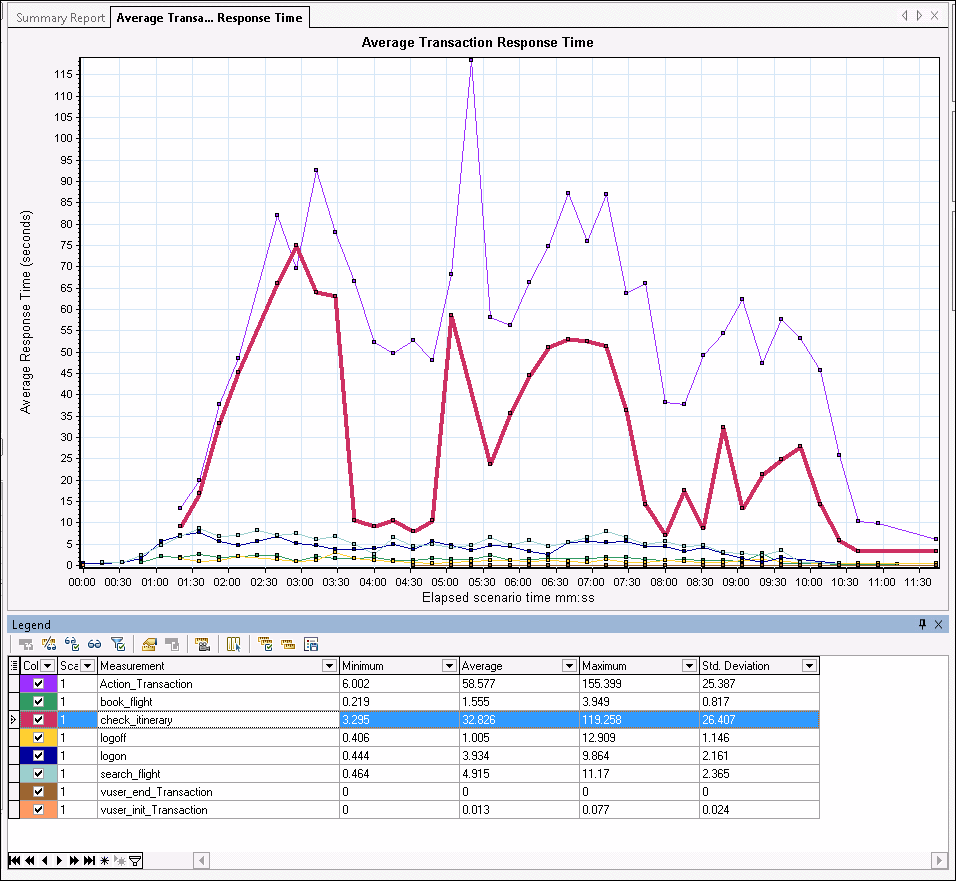
As an example, let's analyze the Average Transaction Response Time graph. Using this graph, you can view the behavior of the problematic transactions during each second of the performance test run. In this section, you view the behavior of the check_itinerary transaction.
To open and analyze the Average Transaction Response Time graph:
-
Select Graph > Add New Graph. The Open a New Graph dialog box opens.
- Under Transactions, select Average Transaction Response Time.
-
Click Open Graph. The Average Transaction Response Time graph opens in the graph viewing area.
Click Close to exit the Open a New Graph dialog box.
-
In the legend, click check_itinerary. The check_itinerary transaction is highlighted in the graph and in the legend below the graph.
Notice how the average response time of the check_itinerary transaction fluctuates greatly compared to the other transactions at the bottom of the graph, which follow a more or less stable average response time.
How can I compare data from different graphs?
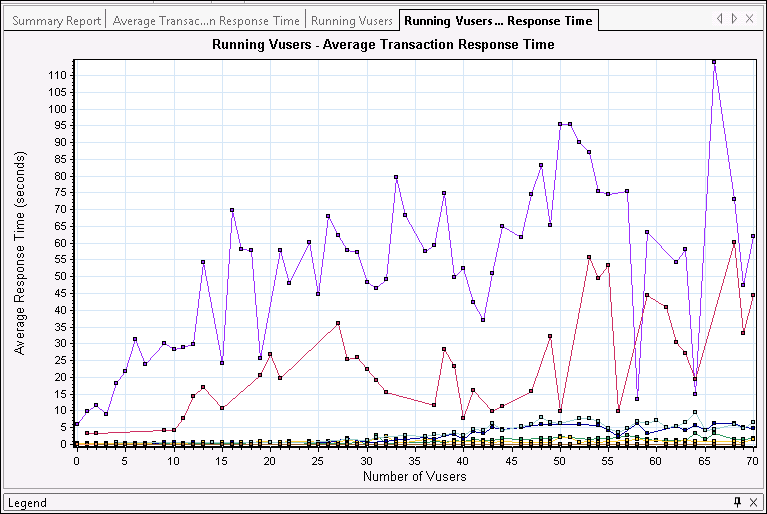
You can join two graphs together to see the effect of one graph's data on another graph's data. This is called correlating two graphs. For example, you can correlate the Running Vusers graph with the Average Transaction Response Time graph to see the effect of a large number of Vusers on the average response time of the transactions.
-
Choose Graph > Add New Graph. The Open a New Graph dialog box opens.
-
Under Vusers, select Running Vusers.
-
Click Open Graph. The Running Vusers graph opens in the graph viewing area.
Click Close to exit the Open a New Graph dialog box.
-
Select the Running Vusers graph and click the Merge Graphs button
 on the main toolbar.
 -
From the Select graph to merge with list, select Average Transaction Response Time.
-
In the Select type of merge area, select Correlate, and click OK.
The Running Vusers and Average Transaction Response Time graphs are now represented by one graph which opens in the graph viewing area.
Another Analysis tool, Auto Correlate (click  ), merges all graphs containing data that could have had an effect on a transaction. Correlations of the transaction with each element are displayed, allowing you to deduce which elements had the greatest effect on the transaction.
How can I sort graph data?
You can filter graph data to show fewer transactions for a specific segment of the performance test, and you can sort graph data to show the data in more relevant ways. For example, you can filter the Average Transaction Response Time graph to display only the check_itinerary transaction.
-
Click Average Transaction Response Time in the graph tree to open the graph.
-
Select the graph and click the Set Filter/Group by button
 .
. -
In the Transaction Name value box, select check_itinerary and click OK.
The filtered graph displays only the check_itinerary transaction and hides all the other transactions.
How can I publish my findings?
You can publish the findings from your analysis session in an HTML or Microsoft Word report. The HTML report can be opened and viewed in any browser. The Word report is more comprehensive than the HTML report, enabling you to include general information about the performance test and to format the report to include your company's name, logo, and the author's details.
For details about analyzing performance test results, see the Analysis section in the OpenText Professional Performance Engineering Help Center.
 Next steps: