Share this page


Kubernetes configuration settings
This section describes how to configure settings for a Kubernetes image on the OpenText Enterprise Performance Engineering server.
Configure Kubernetes settings
When using a Kubernetes orchestrator with Dockerized host images, you configure the following Kubernetes behavior in the kubernetes.config file. The configuration supports the following capabilities:
-
Image pull policy configuration
-
Access to containerized load generators
-
Load balancer IP allocation timeout and connection delays
-
Kubernetes service annotations
-
Service account auto‑mount control
-
Kubernetes health probes
-
TLS verification control
-
Pod and container security context settings
-
Persistent storage using PersistentVolumeClaims (PVCs)
-
Node taints and tolerations
Note:
-
Always restart IIS (iisreset) after updating kubernetes.config for changes to take effect. We recommend backing up the file because it is deleted during uninstall or upgrade.
-
If upgrading from a version earlier than 25.1, add the following lines to the
</configSections>section, then restart IIS:<section name="GlobalSecurityContext" type="PC.DynamicHostProvision.Common.SecurityContextConfig, PC.DynamicHostProvision.Common"/><section name="Tolerations" type="PC.DynamicHostProvision.Common.TolerationsConfig, PC.DynamicHostProvision.Common"/>
Configure the image pull policy
The image pull policy determines how Kubernetes pulls container images during pod creation or updates.
| Policy value | Description |
|---|---|
|
IfNotPresent (EKS) Pull If Not Present (AKS) |
Pulls the image only if it does not already exist on the node. This is the default value if no value is set, or if the pull policy key is missing from the configuration file. |
|
Always (EKS) Pull Always (AKS) |
Always pull the image from the registry. |
|
Never (EKS) Pull Never (AKS) |
Never pulls the image. |
To configure the image pull policy:
-
Open kubernetes.config in the <Server_installdir>\dat folder.
-
Add the
ImagePullPolicykey under <appsettings>.Example - EKS:
Copy code<?xml version="1.0" encoding="utf-8" ?>
<configuration>
<appSettings>
<add key="DeploymentAPIVersion" value="apps/v1"/>
<add key="PodAPIVersion" value="v1"/>
<add key="ServiceAPIVersion" value="v1"/>
<add key="CreateDeploymentTimeout" value="10"/> <!--in seconds-->
<add key="ImagePullPolicy" value="Always" />
</appSettings>
</configuration> -
If your cluster uses a private registry:
-
In Docker Hub, sign in to your private registry by running
docker login. -
Create a Kubernetes registry secret:
Copy codekubectl create secret generic <secret name> \
--from-file=.dockerconfigjson=<path/to/.docker/config.json> \
--type=kubernetes.io/dockerconfigjson -
Record the secret name and configure it in Administration > Orchestration. For details, see Add and configure the orchestrator.
-
-
Restart IIS after updating kubernetes.config for changes to take effect. Run
iisresetin a command line.
Define access to containerized load generators
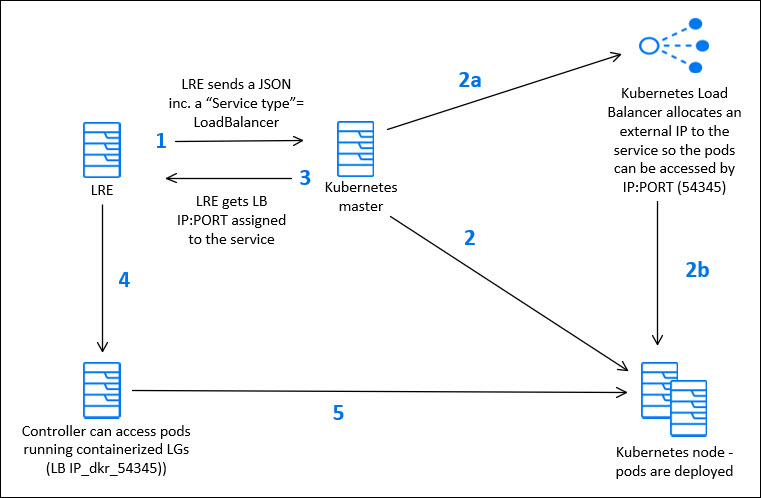
You can define how Kubernetes pods, or containerized load generators, are accessed based on your cluster configuration. If you use a load balancer such as AKS, use the cloud provider load balancer. For on-premises Kubernetes, you can connect to pods through a node port or a load balancer with an external IP. A node is the machine that runs the pods or containers.
Example: This diagram shows the implementation of the load balancer service with external IP flow.
To define how containerized load generators are accessed:
-
Open kubernetes.config in the <Server_installdir>\dat folder.
-
Under <appsettings>, add the
KubernetesAccessTypekey with one of the following values.Value Description NodePortNodeNames Exposes services on an internal cluster IP.
This is the default if no value is set, or if the access type key is missing.
NodePortExternalIPs Exposes services through a static port on each node’s external IP.
LoadBalancerIngress Uses the cloud provider’s load balancer. This enables provisioning load generators that are set up in different networks to the Controller.
Note:
-
Azure Kubernetes Service (AKS) and Amazon Elastic Kubernetes Service (EKS) load balancers with External IPs are currently supported. For supported versions, see the Supported Protocols guide available from Support Matrix.
-
When using this access type, you can set a timeout for waiting for all Load Balancer IPs to be allocated. For details, see Set load balancer IP timeout and pod connection delay.
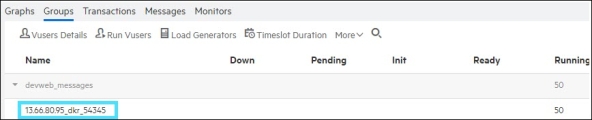
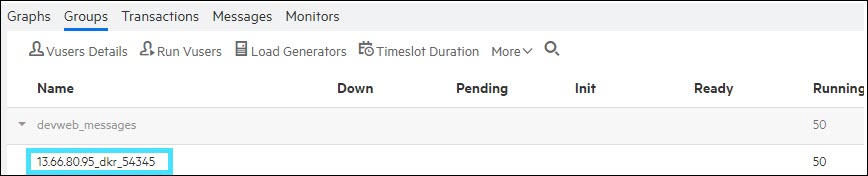
The external IP is displayed in the performance test as follows:
 Copy codeExample of configuring Kubernetes with the NodePortExternalIPs access type.
<?xml version="1.0" encoding="utf-8" ?>
<configuration>
<appSettings>
<add key="DeploymentAPIVersion" value="apps/v1"/>
<add key="PodAPIVersion" value="v1"/>
<add key="ServiceAPIVersion" value="v1"/>
<add key="CreateDeploymentTimeout" value="10"/> <!--in seconds-->
<add key="KubernetesAccessType" value="NodePortExternalIPs"/>
</appSettings>
</configuration> -
-
Restart IIS after updating kubernetes.config for changes to take effect. Run
iisresetin a command line.
Set load balancer IP timeout and pod connection delay
When using LoadBalancerIngress, you can configure the load balancer IP timeout and pod connection delay.
To set a timeout for Kubernetes to get load balancer external IPs:
-
Open kubernetes.config in the <Server_installdir>\dat folder.
-
Under <appsettings>, add one of the following keys.
Key Description WaitForIngressIPsTimeOut Timeout, in minutes, for allocating all load balancer IPs (default: 5).
This is useful where numerous Docker load generators are provisioned in the test.
ConnectToPodDelay Delay, in seconds, before the Controller connects to pods (default: 15).
We recommend increasing the value if you encounter connecting to host (Docker LGs) errors.
Copy codeExample of timeout for load balancer external IPs and delay connecting to pod:<?xml version="1.0" encoding="utf-8" ?>
<configuration>
<appSettings>
<add key="DeploymentAPIVersion" value="apps/v1"/>
<add key="PodAPIVersion" value="v1"/>
<add key="ServiceAPIVersion" value="v1"/>
<add key="CreateDeploymentTimeout" value="10"/> <!--in seconds-->
<add key="KubernetesAccessType" value="LoadBalancerIngress"/>
<add key="WaitForIngressIPsTimeOut" value="5"/> <!--in minutes-->
<add key="ConnectToPodDelay" value="15"/> <!--in seconds-->
</appSettings>
</configuration> -
Restart IIS after updating kubernetes.config for changes to take effect. Run
iisresetin a command line.
Add Kubernetes service annotations
You can use annotations to attach non-identifying metadata to Kubernetes services.
To define annotations in services:
-
Open kubernetes.config in the <Server_installdir>\dat folder.
-
Under <appsettings>, add a key named
Annotationsand enter a key and value using the following format.Copy codeFor multiple annotations:
<add key="Annotations" value="{'key1':'value1','key2':'value2'}"/>Copy codeExample of Kubernetes service annotations:<?xml version="1.0" encoding="utf-8" ?>
<configuration>
<appSettings>
<add key="DeploymentAPIVersion" value="apps/v1"/>
<add key="PodAPIVersion" value="v1"/>
<add key="ServiceAPIVersion" value="v1"/>
<add key="CreateDeploymentTimeout" value="10"/> <!--in seconds-->
<add key="Annotations" value="{'service.beta.kubernetes.io/azure-load-balancer-internal':'true'}" />
</appSettings>
</configuration> -
Restart IIS after updating kubernetes.config for changes to take effect. Run
iisresetin a command line.
Deactivate service account auto-mount
By default, Kubernetes mounts a service account token into every pod. If API access is not required, deactivate auto‑mount for improved security. Deactivating service auto-mount hardens cluster accessibility to the API server.
To deactivate the auto-mount service account token:
-
Open kubernetes.config in the <Server_installdir>\dat folder.
-
Under <appsettings>, add a key named
AutoMountServiceAccountTokenwith a value of false.Copy codeExample of deactivating the service auto-mount:<?xml version="1.0" encoding="utf-8" ?>
<configuration>
<appSettings>
<add key="DeploymentAPIVersion" value="apps/v1"/>
<add key="PodAPIVersion" value="v1"/>
<add key="ServiceAPIVersion" value="v1"/>
<add key="CreateDeploymentTimeout" value="10"/> <!--in seconds-->
<add key="WaitForIngressIPsTimeOut" value="5"/> <!--in minutes-->
<add key="CreateDeploymentTimeout" value="10"/> <!--in seconds-->
<add key="AutomountServiceAccountToken" value="false"/> <!--This is used for hardening cluster accessibility to the API server.-->
<add key="ConnectToPodDelay" value="15"/> <!--in seconds-->
</appSettings>
</configuration> -
Restart IIS after updating kubernetes.config for changes to take effect. Run
iisresetin a command line.
Enable Kubernetes health checks
Startup, liveness, and readiness probes are supported using TCP sockets for performing health checks on your Kubernetes application and container.
To enable Kubernetes health probes:
-
Open kubernetes.config in the <Server_installdir>\dat folder.
-
Under <appsettings>, enable the required probes listed below by changing the key value to true.
Key Description EnableStartupProbe The Startup probe determines if the application that runs in a container has started. If it has started, Kubernetes allows other probes to start functioning. Otherwise, the kubelet shuts down and restarts the container. This is used to protect slow starting containers.
Default values:
-
initialDelaySeconds="0"
-
periodSeconds="10"
-
timeoutSeconds="1"
-
failureThreshold="3"
EnableLivenessProbe The Liveness probe determines if a container is operating. If it does not operate, the kubelet shuts down and restarts the container.
Default values:
-
initialDelaySeconds="0"
-
periodSeconds="10"
-
timeoutSeconds="1"
-
failureThreshold="3"
EnableReadinessProbe The Readiness probe determines if the application that runs in a container is ready to accept requests. If it is ready, Kubernetes allows matching services to send traffic to the pod. If it is not ready, the endpoints controller removes this pod from all matching services. If a failed pod is not restarted, the performance test fails.
Default values:
-
initialDelaySeconds="0"
-
periodSeconds="10"
-
timeoutSeconds="1"
-
successThreshold="1"
-
failureThreshold="3"
-
-
To customize probe values, uncomment the selected probes (in the section above <appsettings>), and enter values of your choice.
Copy codeExample of Startup probe with customized failure threshold:<?xml version="1.0" encoding="utf-8" ?>
<configuration>
<!-- Do not modify the configSections -->
<configSections>
<section name="StartupProbe" type="PC.DynamicHostProvision.Common.ProbeConfig, PC.DynamicHostProvision.Common"/>
<section name="LivenessProbe" type="PC.DynamicHostProvision.Common.ProbeConfig, PC.DynamicHostProvision.Common"/>
<section name="ReadinessProbe" type="PC.DynamicHostProvision.Common.ProbeConfig, PC.DynamicHostProvision.Common"/>
<section name="GlobalSecurityContext" type="PC.DynamicHostProvision.Common.SecurityContextConfig, PC.DynamicHostProvision.Common"/>
<section name="Tolerations" type="PC.DynamicHostProvision.Common.TolerationsConfig, PC.DynamicHostProvision.Common"/>
</configSections>
<!-- Uncomment the sections below to apply custom values to probes -->
<StartupProbe initialDelaySeconds="0" periodSeconds="10" timeoutSeconds="1" failureThreshold="5" />
<!-- <LivenessProbe initialDelaySeconds="0" periodSeconds="10" timeoutSeconds="1" failureThreshold="3" /> -->
<!-- <ReadinessProbe initialDelaySeconds="0" periodSeconds="10" timeoutSeconds="1" successThreshold="1" failureThreshold="3" /> -->
<appSettings>
<add key="DeploymentAPIVersion" value="apps/v1"/>
<add key="PodAPIVersion" value="v1"/>
<add key="ServiceAPIVersion" value="v1"/>
<add key="CreateDeploymentTimeout" value="10"/> <!--in seconds-->
<add key="WaitForIngressIPsTimeOut" value="5"/> <!--in minutes-->
<add key="EnableStartupProbe" value="true"/>
<add key="EnableLivenessProbe" value="false"/>
<add key="EnableReadinessProbe" value="false"/>
<add key="AutomountServiceAccountToken" value="true"/>
</appSettings>
</configuration> -
Restart IIS after updating kubernetes.config for changes to take effect. Run
iisresetin a command line.
Notes and limitations
The following notes and limitations are applicable when using Kubernetes health probes.
| Area | Description |
|---|---|
| Startup probes |
Use the Startup probe settings with caution because they can cause permanent test run failure. In most cases, set the initialDelaySeconds value to 60 seconds for the Startup probe. You do not need the following key if the Startup probe is used.
|
| Liveness and Readiness probes |
|
| Liveness probe and EKS |
Avoid using only the Liveness probe, because this may cause permanent failure in EKS. Copy code
Example of Liveness probe enabled:
|
Deactivate TLS verification
By default, all requests sent to a Kubernetes cluster require a CA certificate and a TLS handshake. Otherwise, the request from OpenText Enterprise Performance Engineering to Kubernetes fails. You can deactivate TLS certificate verification in the Kubernetes configuration file.
Note: For security reasons, we do not recommend deactivating TLS verification.
To deactivate TLS verification for requests sent to a Kubernetes cluster:
-
Open kubernetes.config in the <Server_installdir>\dat folder.
-
Under <appsettings>, add a key named
EnableSslCertificateVerificationwith a value of false.Copy codeExample of deactivating TLS verification:<?xml version="1.0" encoding="utf-8" ?>
<configuration>
<appSettings>
<add key="DeploymentAPIVersion" value="apps/v1"/>
<add key="PodAPIVersion" value="v1"/>
<add key="ServiceAPIVersion" value="v1"/>
<add key="CreateDeploymentTimeout" value="10"/> <!--in seconds-->
<add key="EnableSslCertificateVerification" value="false"/>
</appSettings>
</configuration> -
Restart IIS after updating kubernetes.config for changes to take effect. Run
iisresetin a command line.
Configure pod and container security settings
You can control security permissions for a specific container or pod using Kubernetes SecurityContext.
You can specify the user ID, Group ID, and fsGroup, to provide the security permissions .
To define user permissions for a container or pod:
-
Open kubernetes.config in the <Server_installdir>\dat folder.
-
Uncomment the
GlobalSecurityContextsection, and enter a value for therunAsUserfield, or use the default user ID (1000). All processes in the container run with the specified user ID.Note:
-
Applies to Linux containers only.
-
If
runAsGroupis set, you must also setrunAsUser.
-
-
(Optional) Specify
runAsGroupandfsGroupas needed. In version 26.3 and later, when using PVCs withfsGroup, setfsGroupChangePolicyto avoid recursive permission updates on every mount. -
Restart IIS after updating kubernetes.config for changes to take effect. Run
iisresetin a command line.
Pod and container security settings (available in version 26.3)
The integration with Kubernetes supports additional pod and container SecurityContext fields, summarized below.
| Field name |
Level |
Description |
|---|---|---|
fsGroupChangePolicy
|
Pod |
Controls when Kubernetes changes ownership and permissions for volume content when Possible values: Use |
allowPrivilegeEscalation
|
Container |
Controls whether the container runs in privileged mode. Possible values: |
privileged
|
Container |
Runs the container in privileged mode. Possible values: |
seccompProfile
|
Container / Pod |
Specifies the seccomp profile applied to the container. Possible values: Note: For the Localhost option, a localhostProfile must be specified. Example:
In this example, the file must exist at:
|
capabilities.add
|
Container |
Linux capabilities explicitly added. Possible values: Kubernetes‑supported capabilities such as |
capabilities.drop
|
Container |
Linux capabilities explicitly removed. Possible values: |
Note:
-
These fields are interdependent and should be configured carefully.
-
For
seccompProfileof typeLocalhost, the referenced JSON file must exist on each Kubernetes node under:/var/lib/kubelet/seccomp/ -
readOnlyRootFilesystemis always set to false and is not configurable.
<GlobalSecurityContext>
    runAsUser="1001"
    runAsGroup="1001"
    runAsNonRoot="true"
    fsGroup=""
    allowPrivilegeEscalation="false"
    privileged="false">
    <seccompProfile type="RuntimeDefault" localhostProfile="" />
    <capabilities add="" drop="['ALL']" />
</GlobalSecurityContext>
Configure taint and toleration
Use tolerations to allow pods to be scheduled on tainted nodes.
To set taints and tolerations in Kubernetes (not related to OS node type):
-
Open kubernetes.config in the <Server_installdir>\dat folder.
-
Uncomment the
<Tolerations>section. -
Specify values for
key,operator, andvalue. If required, include a value forSecurityContext.Copy codeExample of tolerations:<Tolerations>
<Entries>
<add key="ssd" operator="" value="true" effect="NoSchedule" tolerationSeconds="" />
<add key="" operator="" value="" effect="" tolerationSeconds="" />
</Entries>
</Tolerations> -
Restart IIS after updating kubernetes.config for changes to take effect. Run
iisresetin a command line.
Note: Make sure that you set a matching taint under your node pool.
Configure persistent storage with PVCs
Available in versions: 26.3 and later
Use PersistentVolumeClaims (PVCs) to integrate Kubernetes persistent storage with load generator pods in supported on-premises Kubernetes, AKS, and EKS environments.
Persistent volume support is available for Linux and Windows load generators.
Note:
-
PVCs are configured at the Kubernetes level, not at the physical storage level.
-
Storage backends and provisioning methods differ by environment. This configuration does not create directories on the storage backend; use
subPathin your storage class if required. -
Cloud platforms usually provision PersistentVolumes dynamically; on-premises environments may use static or dynamic provisioning. You manage the data lifecycle, while Kubernetes handles PersistentVolume selection and provisioning.
-
When using
fsGroupinGlobalSecurityContext, setfsGroupChangePolicytoOnRootMismatchto avoid recursive permission updates. -
Multiple PVCs are supported, provided each claim is correctly defined and mounted with a unique mount path.
You control which PVC is mounted, where it is mounted (mountPath), and whether the pod can write to it (readOnly).
The integration flow is: Pod -> PersistentVolumeClaim -> PersistentVolume -> Storage backend.
To enable persistent volumes in Kubernetes integration:
-
Open kubernetes.config in the <Server_installdir>\dat folder.
-
Uncomment the
<PersistentVolumes>section.Copy code<PersistentVolumes>
<Entries>
<add name="<logical name>"
claimName="<PersistentVolumeClaim name>"
mountPath="<path inside the container>"
readOnly="true|false" />
</Entries>
</PersistentVolumes> -
Set values for the following attributes.
Attribute Description name Enter any logical name. A name that references the PVC helps identify the mount. claimName Enter your PVC name.
mountPath Enter the path inside the container, for example
/mnt/nas.readOnly Optional. Set to
trueorfalse. -
Restart IIS after updating kubernetes.config for changes to take effect. Run
iisresetin a command line.
For details on running Windows Docker images in your cluster, see Run Windows Docker images.
Limitations
If the following error occurs:
container has runAsNonRoot and image has non-numeric user (lr_user);
cannot verify user is non-root
Cause:
The container image uses a named user instead of a numeric UID. When runAsNonRoot=true is set, Kubernetes cannot verify that the user is not root.
Resolution:
-
Use an image with a numeric user ID, or
-
Set
runAsNonRoot="false"inGlobalSecurityContext.