Share this page


Initial cloud settings
This task describes the initial steps required for setting up communication with the cloud.
Initial cloud settings overview
To initially set up communication with a cloud provider, you must establish an account with the cloud provider and obtain the cloud provider credentials. You must then set up communication from LoadRunner Enterprise to your cloud provider, and define network settings for communicating with your cloud-based load generators.
Initial settings workflow
-
Create a cloud provider account
You must first sign up and create a cloud provider account for using the cloud provider.
For details about creating cloud provider accounts, see the documentation provided by your cloud provider.
Note: LoadRunner Enterprise currently integrates with Amazon Web Services (EC2) and Microsoft Azure cloud accounts.
-
Configure communication to the cloud provider
When communicating with your cloud provider, you can choose to communicate directly or via a proxy.
Direct Communication The following diagram illustrates direct communication to a cloud provider:
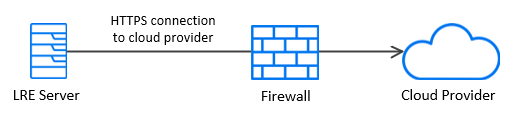
The communication is initiated from the LoadRunner Enterprise server over the organization's firewall to the cloud provider. Open the ports on the LoadRunner Enterprise server for outgoing requests.
Proxy Server The following diagram illustrates communication to a cloud provider through a proxy server:
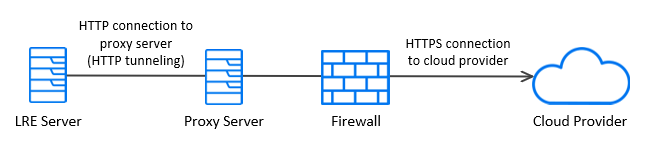
The communication is initiated from the LoadRunner Enterprise server to the defined proxy server using HTTP tunneling. The proxy server then runs over the organization's firewall and transfers outgoing requests to the cloud provider.
For details, see Configure cloud network settings below.
-
Configure communication to your cloud-based load generators
When communicating with your cloud-based load generators, you can choose to communicate directly or via a proxy.
Note:
-
TLS (SSL) communication is established between the Controller and the cloud-based load generators.
-
LoadRunner Enterprise supports provisioning of load generators only.
Direct Communication The following diagram illustrates direct communication to a cloud-based load generator:
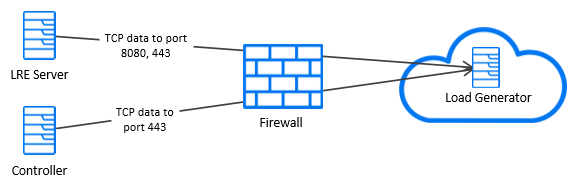
The communication is initiated from the LoadRunner Enterprise server and the Controller over a firewall to the cloud-based load generator. Data is transmitted through TCP (Transmission Control Protocol). The load generator should allow incoming requests on LoadRunner Agent and LoadRunner Remote Management Agent ports, see Configure cloud network settings. LoadRunner Enterprise and the Controller must allow outgoing requests.
Proxy Server The following diagram illustrates communication to a cloud-based load generator through a proxy server:

The communication is initiated from the LoadRunner Enterprise server and the Controller to the defined proxy server. An HTTP Tunnel is used as a means for communicating from the LoadRunner Enterprise server and the Controller to the proxy server. The proxy server then runs over the firewall and transfers the data to the cloud-based load generator.
For details, see Configure cloud network settings below.
-
-
Configure security settings
For details on additional security features related to your cloud provider, see Security group rules.

Configure cloud network settings
Define cloud network settings for communicating from LoadRunner Enterprise to your cloud provider (define the proxy settings if your organization uses a proxy server for communicating with an outside network), and for communicating with your cloud-based load generators.
-
Prerequisites
To enable TLS for your cloud-based load generator, you must create a Certification Authority (CA) and a Digital Certificate and store the files on the LoadRunner Enterprise server and the Controller. For more details on creating the certificates, see Create digital certificates.
-
In LoadRunner Enterprise Administration, select Configuration > Cloud. In the Accounts tab, click
 Cloud Network Settings to open the Cloud Network Settings dialog box.
 -
Enable communication from LoadRunner Enterprise to your cloud provider
-
In the Proxy section, enter the Proxy Server URL in the format
http[s]://server[:8080]. -
Enter the User Name (format:
Domain\user name) and Password of a user with connection rights to the proxy server.
Note: Port 8182 from load generators to the LoadRunner Enterprise server must be opened when running NV emulation for viewing NV related graphs during online. If the port is closed, graphs are still available in the offline results.
-
-
Enable communication for a cloud-based load generator (not available for multi-tenant environments)
Define the load generator service ports. You can use values other than the default ones.
LoadRunner Agent Service Port The port used for running Vusers on the load generator. Make sure this port is opened for incoming communication. The default port value is 54345.
Remote Management Agent Service Port The port used for Lab Management operations. Make sure this port is opened for incoming communication. The default port value is 54245.
-
Click Save to save your settings.
Define security settings for Amazon EC2 accounts
To define security settings on the cloud provider side for Amazon EC2 cloud accounts, perform the following:
-
From your cloud provider console, create a security group. The ports defined for communicating with the cloud-based load generator must be opened.
For details about security groups, see the documentation provided by your cloud provider.
-
Create a key pair.
-
If you plan on working with elastic IP addresses, allocate elastic IP addresses and make sure they are opened on your organization's firewall for outgoing communication.
 Next steps: