Share this page


Administration settings
In Administration  > Settings, admin users can configure the shared space by setting properties and enabling features on the Digital Lab server.
When using UFT Digital Lab as a managed service provided by an MSP or when shared spaces are enabled during installation, some settings may be controlled globally. For details, see Shared space management.
Configure settings
To configure administration settings:
Select a category from the left panel. After you modify the settings in a specific section, click Verify and Save and wait for the server to acknowledge your changes.
To erase the changes that you made, click Discard Changes in the top right of the screen.
Note: Some properties and settings are only available for Trial, Enterprise, and Ultimate license types. For details, see Digital Lab licenses.

General
This section lets you configure general settings, such as compatibility validation, lock duration (for consecutive failed logins on the account and for idle devices), and password expiration time.
The following table provides additional information regarding some general settings:
| Enable WebSocket Security | When this setting is enabled, all testing tools and integrated products connecting to Digital Lab must use an execution key for authenticating the connection. For details, see Access key management. |
| Enable compatibility validations | Validate that an app is compatible with the device on which the user is trying to install it, and only allow installation of compatible apps. |
| Password expiration |
The default password expiration is 180 days. Twenty days before the expiration date, Digital Lab issues a warning to the user to change the password. A "0" value indicates no expiration date. If a user's password expires or if a user forgets their password, an admin user can reset it from Lab management, or using a script. For details, see Manage user accounts with scripts . |
| Lock duration |
To prevent users from being locked out after entering a wrong password three times, set the Lock duration to "0". |
| Sanitize log reports | Mask sensitive data from your logs (such as passwords, user names, etc.) For details, see Collect and sanitize Digital Lab logs. |
| Collect usage data |
Relevant only for UFT Digital Lab. You can download CSV reports from the console containing reservation, device, app, and job information. This enables you to evaluate the usage of your lab resources. |
| Device screen view idle timeout | When no actions are performed on the device for the defined period of time, the remote device screen display window is closed. The device remains locked. |
| Device session idle timeout | When no actions are performed on the device for the defined period of time, the session ends and the device is unlocked. |
| Reset idle time after device message | Resets the device's idle time whenever a new device message arrives (e.g. logs, metrics, etc.) |
| Single-Sign-On init string |
Relevant only for UFTDigital Lab. This is mandatory for integration with the ALM extension for Digital Lab. Paste in the value of the COMMUNICATION_SECURITY_PASSPHRASE flag from the ALM Site Administration. If you leave this field empty, single sign-on does not work. For details, see Digital Lab wizard. |
| Permission to gather data |
Allow collection of data to be used internal by OpenText to improve the product, in accordance with the company’s privacy policy. |
| Email address for administrator | The email address of the user to be used when users click Contact your admin from Digital Lab. The user whose email is provided must be assigned an administrator role. |
| Execution/Connector max duration | Set the maximum number of days that Execution and Connector access keys are valid. After the limit is reached, the keys expire. If you leave these fields blank, the keys have no expiration date. You can also enable a setting to remove expired keys automatically from the list of access keys. For details on how to create access keys, see Access key management. |
| Prometheus integration |
Relevant only for UFT Digital Lab. Enable or disable the integration with Prometheus. After clicking verify and save, restart the server. |
| Usage data duration |
Relevant only for UFT Digital Lab. Define the time period, in days, for collecting usage data. |
Proxy setting (web access)
This section is relevant only for UFTDigital Lab.
When using a proxy server, use these settings to configure the proxy server settings.
Device reservation
This section lets you configure device reservation settings such as duration, and number of devices that can be reserved. For more details on these settings, see Device reservation settings.
Android packaging service
To enable record and replay functionality when testing certain apps, you need to repackage them with Digital Lab libraries.
UFT Digital Lab: You can specify the host machine, port, and protocol for the Android packager. The packaging service machine is set to localhost by default.
You can also specify if packaged apps should trust self-signed and Android system certificates. This is required when recording a script for load testing using the VuGen MITM protocol. For details on when packaging is required, see App packaging and signing services.
iOS signing service
This section enables you to configure signing services for iOS apps. For more details on these settings, see iOS signing service.
iOS options
Globally control settings for all iOS devices.
| Prevent Auto-Lock | When this option is enabled, Digital Lab prevents the Auto-Lock if configured in the Settings on an iOS device, by waking up the device every 30 seconds. |
| Auto-dismiss alerts during app launch | Alerts displayed during the launch of an app, for example a location permission request, may prevent Digital Lab from identifying that the app was successfully launched. When this option is enabled, Digital Lab automatically dismisses system alerts during app launch. |
| Auto-dismiss system alerts when idle | Sometimes, alerts such as iOS update notifications can interfere with the Digital Lab device plug-and- play process. When this option is enabled, Digital Lab automatically dismisses system alerts every 15 seconds. To avoid interfering with tests, Digital Lab does not dismiss alerts during record and replay. |
| Use accessibilityId | For packaged apps, use the accessibilityId property and value for identifying components instead of the accessibilityLabel. |
| Support for time and date changes |
Note: Enable this option only if your test involves changing the time and date. When enabled, this option prevents the remote view from freezing when the date or time is changed. |
| Phone call support (Tech preview) | Enable phone calls to be made or received on devices during record and replay. Supported in iOS version 12 and later. Note: After enabling the setting, reconnect the iOS devices for the setting to take effect. |
| Kanji keyboard support | When enabled, provides better support for the Kanji (Japanese) keyboard by looking up the key entered from the physical keyboard and passing it to the soft keyboard on the device screen. Note that this option should only be enabled for the Japanese keyboard. Note: The setting is supported on iOS 12 and later. |
Note: Digital Lab dismisses alerts by selecting the negative option. For example, if the location permission alert is displayed, Digital Lab selects Don’t Allow.
Amazon Device Farm integration
This section is relevant only for UFT Digital Lab.
This integration lets you use devices from the Amazon farm for testing purposes. In this section, you provide the AWS security credentials. If you created a project that you want to use through the EC2 interface, specify its name here.
For details, see AWS Device Farm integration or follow the links to the AWS documentation in this pane.
- Note:
- These settings override any other settings that you may have defined for your test in the EC2 instance.
- When you disable ADF integration, the change may take up to 10 minutes to take effect.
User permissions
You can define permissions for users in your workspace regarding actions on apps and devices. By default, users have permissions to perform all actions. For more details on these settings, see User permissions.
Network Virtualization integration
This section is relevant only for UFTDigital Lab.
This section lets you specify the NV Test Manager machine information, its authentication token, and the protocol to use (HTTP or HTTPS).
For details about these settings, see Set up Network Virtualization integration in Digital Lab .
NV is supported only for on-premises devices.
LDAP integration
This section is relevant only for UFT Digital Lab and UFT Digital Lab Managed SaaS.
If your organization uses LDAP to manage user accounts, you can allow users to access Digital Lab with their LDAP credentials. For more details on these settings, see LDAP settings.
When using shared spaces, some settings are controlled globally by the operator. For details, see Shared space management.
SAML SSO integration
This section is relevant only for UFT Digital Lab and UFT Digital Lab Managed SaaS.
Digital Lab supports single-sign on via SAML 2.0. SAML (Security Assertion Markup Language) is an XML-based standard for exchanging authentication and authorization data between an identity provider (IdP) and a service provider, such as Digital Lab. In this section of settings, you can enable single-sign-on (SSO). This way, users can use one set of credentials for logging into Digital Lab, as they do for logging into other SSO applications in their organization. For more details on these settings, see SAML SSO settings.
OpenText hosted lab integration
These settings enable you to integrate with the OpenText hosted lab. The lab offers both public and private hosted devices, as well as a cloud desktop browser lab.
| OpenText hosted lab credentials | UFT Digital Lab: Input your credentials. OpenText provides you with the key for accessing the lab when you purchase your UFT Digital Lab license. |
| To enable the hosted device lab | Set the option to the hosted device lab integration to Yes. |
| To enable the public device lab |
For more details on hosted private devices, see the Hosted devices datasheet. |
| To enable the cloud browser lab |
Set the option to enable cloud browsers to Yes. You require a valid cloud browser lab license.
You can also set a browser session inactivity timeout, and the maximum duration of a browser session. Note: Wait at least 10 minutes before executing a test script after the cloud browser lab setting is enabled. |
You can also set a timeout for browser session inactivity, as well as the maximum duration of a browser session.
Service Virtualization (SV) integration
This section is relevant only for UFT Digital Lab and UFT Digital Lab Managed SaaS.
This section lets you enable Service Virtualization (SV) instrumentation when uploading apps.
This integration enables you to virtualize your sensors, APIs, and devices. For details, see Set up Service Virtualization (SV).
AutoPass license server configuration
This section is relevant only for UFT Digital Lab.
The AutoPass license server configuration is required only when using a time-based (public device and cloud browsers hours or MSP device hours) license. After installing the AutoPass license server, specify the details of the AutoPass server machine. For details, see License installation and management.
Genymotion integration
This section is relevant only for UFT Digital Lab and UFT Digital Lab Managed SaaS.
These settings let you specify the account to use for integration with Genymotion cloud devices. For details, see Genymotion Cloud integration.
Defect Tracking System integration
Integrate Digital Lab with OpenText™ Octane to open defects directly from exploratory sessions. Enable the integration setting, and then populate the fields as described below:
- Specify the Octane URL where you want to manage your defects.
- Include the Octane space ID. The space ID is the number that immediately follows the equals sign in the Octane URL, for example 45001 in the example below:
https://almoctane-ams.saas.microfocus.com/ui/?&p=45001/2004#/defects - You can use your own customized Octane form (template) for filling in the description field of the defect. The template must include the placeholder UFTM_TEST_STEPS. The placeholder is populated with the steps from the step report.
When saving the settings, the connection to Octane is verified.
Device Health indication
This section lets you set the threshold values for alerts for several device health metrics. If a device's metric exceeds a threshold value, its card displays a warning icon  .
.
For example, the default battery temperature for an Android device is 45°. If Digital Lab detects a temperature that exceeds 45°, the card displays a warning icon. Hover over the icon to see details about the exceeded threshold.
For more information, see Manage devices.
Note that Battery health is only supported on Android devices. Thermal state on Android devices is only supported on Android 10 and later.
File storage
These settings enable you to manage file storage.
| Total space allocated |
UFT Digital Lab only Set the total file storage size (GB) for Digital Lab to store applications. Uploading apps is blocked if the storage space reaches this limit. You can view the file storage status in the admin dashboard. For details, see The Digital Lab dashboard. |
| Number of uploads per app | For better management of file storage space, you can also limit the number of uploads permitted per application. If you enable the setting, specify the maximum number of uploads per application to keep (Default: 30). The most recent uploads are kept, earlier uploads exceeding this number are deleted. For example, if you specify 15, only the 15 latest uploads of an app are kept. |
Appium options
In this section you can enable the following:
-
Anonymous access for Appium (not supported with LDAP). This allows logins from Appium scripts to Digital Lab when running tests, without an execution access key.
-
Appium insecure features. When you enable the setting, the Appium server runs with the --relaxed-security flag and all insecure features are turned on. For details on Appium insecure features, see the Appium documentation.
Tencent WeTest Device Farm integration
This section is relevant only for UFT Digital Lab and UFTDigital Lab managed SaaS.
The Tencent WeTest Device Farm integration enables you to connect devices in your private WeTest cloud to Digital Lab. When you enable the integration, you need to provide the name of the connector installed in WeTest, the WeTest API address, and your WeTest account secret ID and secret key.
Device screen image quality
These settings allow administrators to control the default quality of the device image displayed in the remote view, and to limit the maximum quality that a user can select. This may help to prevent network congestion on networks with not enough bandwidth. For more details on image quality, see Device info in Device access window.
| Default quality |
This value is used when a device is opened remotely for the first time. Valid values are intervals of 10 from 10%-100%. Users can scale the image quality up or down, however they cannot scale up more than the max quality value. |
| Max quality |
The maximum value for image quality that a user can select in the remote device access window. Reducing quality can improve performance when bandwidth is low. Valid values are intervals of 10 from 10%-100%. |
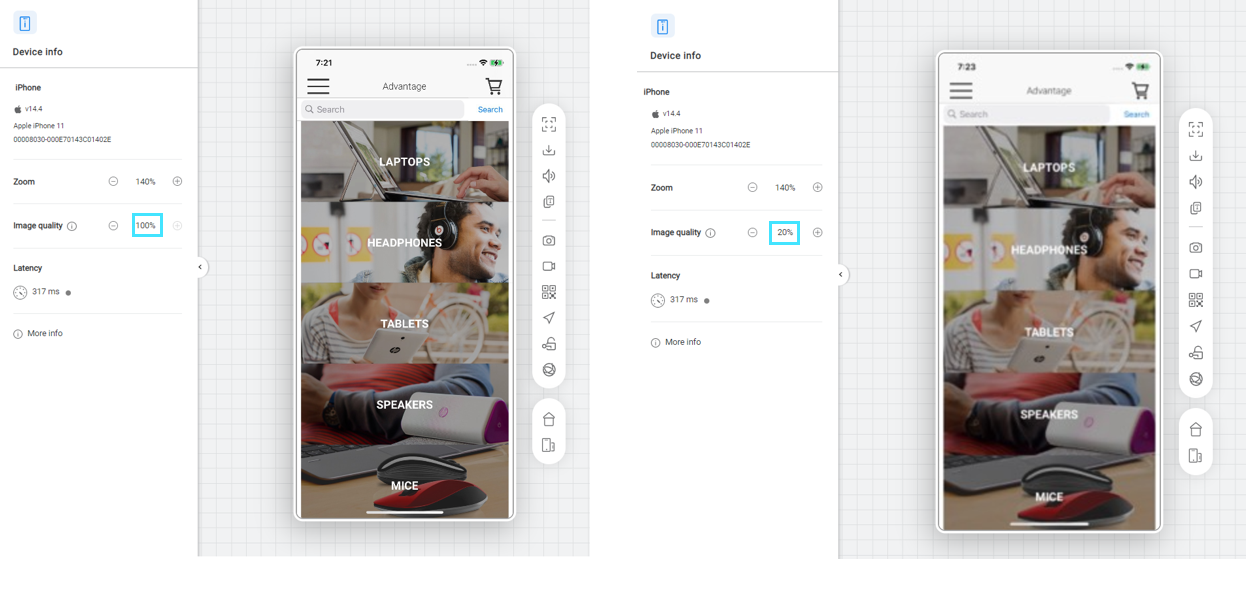
A user's scaling preference is preserved per browser and machine. However, if the administrator changes the default value for image quality in the administration settings, the updated default value will be used when a user opens a device remotely.
Device cleanup
The administrator can configure a setting to clean private on-premises and private OpenText hosted devices automatically at the end of each session. The setting defined in the Default Setting tab applies to Shared assets, and to each workspace separately. If needed, administrators can override the default setting for a specific workspace.
When an Android device is connected to Digital Lab for the first time, a snapshot is taken automatically. The snapshot serves as the state to which the device is restored after cleanup. Any installed app which is not in the snapshot is uninstalled from the device during cleanup. Administrators and workspace administrators can replace the snapshot by taking a new apps snapshot.
Note:
- Cleanup is currently only supported on English OS devices.
- For iOS devices, cleanup is only supported on iOS 13 and later.
- The snapshot is currently only available for Android devices. When an iOS device is cleaned, any non-system app is uninstalled
ValueEdge Digital Lab:
-
Workspace admin users can override Device cleanup settings for the workspaces that they administer.
-
Users can trigger a manual device cleanup at the end of the session by selecting the Device cleanup checkbox in the remote device display. For more details, see Device access window.
Cleanup actions
The following actions are performed during cleanup:
| Apps | Uninstalls all apps except system apps, the Digital Lab Agents, Device Policy Controller (DPC), and Appium settings. |
| Folders and files |
Deletes new non-system folders and files, photos, and videos. |
| Browsers | Safari (iOS)/ Chrome (Android): Closes open tabs, clears the cache, deletes saved passwords. |
During cleanup, maintenance mode is enabled on the device.
To override the default setting:
-
In Administration
> Settings > Device Cleanup select Shared assets or select a workspace. -
If a default setting is enabled, the default values are displayed as read-only. When the default is set to No, the value fields are empty.
To change a setting, clear the Default check box. Select Yes or No and update the values if needed.
-
Save your changes.
To take an apps snapshot (Android only):
-
Select an Android device.
-
In the More info > Action tab of the device, click Take apps snapshot
 .
.
The cleanup only removes apps based on the snapshot. It does not install apps.
Tip: To clean a specific device, you can use the REST API. For details, see REST API reference for Digital Lab.
 See also: