Share this page


QR code and barcode simulation
Digital Lab's simulation lets you simulate the scanning of QR codes and barcodes.
Prepare for QR code and barcode simulation
Using Digital Lab's QR code and barcode simulation, you specify the image to use instead of the actual scan of the device. You can then use these images to test your app.
When you perform simulation of a QR code, Digital Lab replaces the code scanned by the camera, with the selected file.
To prepare for simulation, create a packaged version of the app that utilizes QR or barcode scanning. For details on how to package an app, see App packaging and signing services. The packaged app must be uploaded to the lab. For details, see Manage apps.
Performing QR code and barcode simulation
The QR code and barcode simulation is available
Note: Simulation is supported only for packaged iOS and Android apps. iOS version should be 12 or higher. The apps need to be uploaded to Digital Lab.
-
Activate simulation mode, by clicking the QR code and barcode simulation button
 .
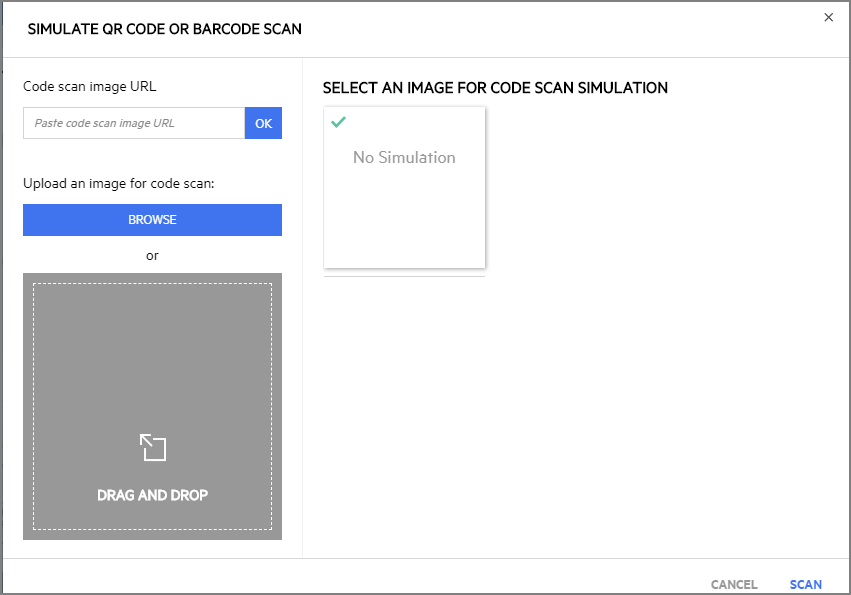
.The Simulate QR Code or barcode scan dialog box opens.

-
In the Simulate dialog box, provide a file, one at a time, in one of the following ways:
- Paste in the URL of the image or video file.
- Browse for a file on a local or network machine.
- Drag and drop a file
- Click the uploaded image to select it. A green checkmark indicates this is the image to be used for simulation.
You can add all your QR code or barcode image files at this stage, even if you do not intend to use them for the current test. See Guidelines for information on the valid file types and sizes. If you have uploaded multiple files, select the image to use the next time your device scans a code by clicking it.Tip: If you do not change your selection, the test continues to use the same image each time you scan a code.
- Close the dialog box by clicking the close button in the top right hand corner.
- On your device, navigate to the screen in the app from which you are scanning the code. Click the simulation button and click SCAN.
- When simulating multiple scans, for each code simulation click the simulation button , select the image to use, and click SCAN.

Guidelines for QR code and barcode simulation
When using QR code and barcode simulation for replacing images, follow these guidelines.
General guidelines
The following table details some general guidelines to be followed when using QR code and barcode simulation:
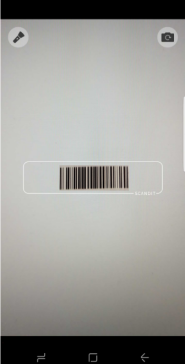
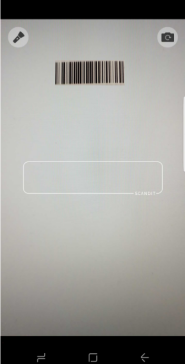
| Image | Make sure that the QR code you are simulating is clear, centered, and not bent. | ||||
| Placement of image |
Make sure that the bar code is clear and is in a place that can be detected by the barcode detection area. (The detection area is determined by the app.) If your simulation fails during replay, open the captured image and check the location of the bar code. Make sure that the barcode is near the center of the barcode detection area. If it is not, either crop the existing image or create a new image with a light background with just the barcode in the center.
|
||||
| Supported formats | The supported image formats are: JPG, GIF, PNG, BMP, and WBMP. For Android camera 2, only JPG and YUV_420_888 image formats are supported. |
||||
| Record and replay |
Recording of QR codes and bar codes is not supported for testing tools, including UFT One, Sprinter; replay is supported. To replay on iOS or Android, add the SimulateBarcodeByImage method. For example: Example:
Device("Device").App("SimpleSample").SimulateBarcodeByImage "CODE39.png" On iOS, you can also use the SimulateBarcodeByData method. For example: Example:
|
||||
| Exploratory testing | When working in the remote device view with exploratory testing, simulation cannot be deactivated after it has been activated. | ||||
| File size |
The maximum upload file size for images is 5 MB. The maximum upload size for videos is 20 MB with 1.5 GB of free memory for Android devices, and 40 MB for iOS devices. |
||||
| Uploaded files |
The uploaded files are only valid for the current session. After the test or remote view session is finished, the files are erased. |
-
Android X: Photo and barcode simulation can only be used one at a time. If your app uses both photo and barcode simulation, deactivate one before activating the other. For automation, ensure that you use a stop operation before switching between simulations.
- When working with Android 6.0 or later, you must have permission to access the device's external storage.
- Simulation is only supported for Scandit Barcode Scanner SDK, Google Mobile Vision, ML Kit, ZXing and other barcode recognition tools based on an image captured by camera 1, camera 2, and camera X. The native camera API is not supported.
- This simulation is only supported for apps using the YUV NV21 camera preview image format.
- Simulation may not be possible if you customized the built-in camera settings.
-
Set the saveToPic parameter to true (false by default) to save the image to a subfolder in the device's photo gallery. For example, modify the recorded step:
Device("Device").UploadMedia "sample.png","C:\sample.png"
to
Device("Device").UploadMedia "sample.png","C:\sample.png",True
iOS specific
For iOS, the following are supported:
- AVFoundation
- Vision.framework
- ZXing Objective C library
- ZXing C++ library
 See also: