Share this page


NV Virtual Appliance solution for Linux
The NV Virtual Appliance solution enables you to impair network traffic that passes through a server on which Network Virtualization is installed. This is especially useful where NV Test Manager cannot be installed on the clients or servers in the testing environment, as well as in high-throughput and complex environments.
Network operation modes
You set up Network Virtualization with NV Virtual Appliance using one of the following network operation modes:
| Operation mode | Description |
|---|---|
| Uses standard Linux kernel routing. | |
| Traffic is mirrored between multiple NICs concurrently. Uses standard Linux bridge configuration. | |
| Uses VLAN trunking. |
The NV Virtual Appliance solution consists of a dedicated physical server that is deployed with Linux and NV Test Manager, OpenText's Network Virtualization software. Network Virtualization is then used to impair network traffic that you route through the server.
Note: The NV Virtual Appliance solution requires a Virtual Appliance license. For details,
To set up the NV Virtual Appliance solution:
-
Set up a dedicated server machine deployed with one of the supported Linux distributions. (See System requirements for NV Test Manager.)
-
Install NV Test Manager on the NV Virtual Appliance server machine as described in Installing NV Test Manager on Linux.
When you configure NV Test Manager, make sure to select the standalone configuration.
-
Configure one of the following network operation modes to manage network traffic through the NV Virtual Appliance server machine. Select the mode that meets the overall requirements of your test environment.
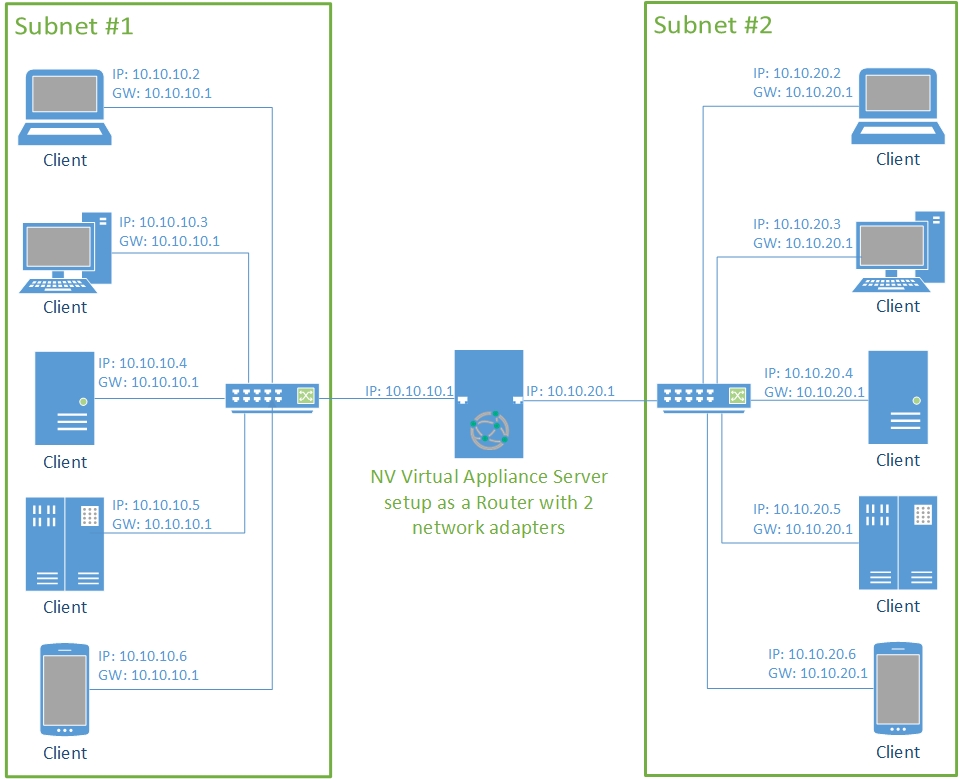
NV as a router mode
The objective of this configuration is to impair network traffic between systems on different networks communicating through a router. In this setup, the NV Virtual Appliance server machine is installed with multiple network adapters, and is configured as a router. In NV Test Manager, select one of the installed adapters to function as the “active adapter”. In router mode, NV impairs traffic that passes through the selected “active adapter”.
Note: If the NV Virtual Appliance server machine is connected to more than two subnets as a router, only traffic routed through the “active adapter” will be impaired.
To set up NV as a router:
Configure Linux routing on the NV Virtual Appliance server machine to enable traffic to flow between the adapters.
For instructions on routing configuration, see the documentation for your specific Linux system.
For an example of a router configuration process for CentOS, see Example: Configure CentOS as a router with two interfaces.

NV as a bridge mode
In this configuration, the NV Virtual Appliance server machine is configured as a network bridge. NV is then transparent to the network and no network setup other than physical cabling is required in order to impair traffic.
This solution supports multiple NICs (network interface cards). You set up Network Virtualization so that traffic passes between NICs.
In a scenario where the AUT servers and the database servers are not deployed in the same location in the production environment, NV Test Manager can be installed as a bridge between them in the testing environment in order to add the required network conditions.

To set up NV as a bridge:
See the documentation for your specific Linux system.
For an example of a bridge configuration process for CentOS, see Example: Set up CentOS as a persistent software bridge with two interfaces.
Note:
-
Active adapter settings do not apply to traffic forwarded by NV in bridge mode.
-
In a Linux installation with a bridge configuration, if the bridge NIC has no IP address, then no available active adapters will be listed in the NV Test Manager Settings tab. To specify an IP address for the bridge interface, modify the /etc/network/interfaces file using the example below.
# Bridge setup
iface br0 inet static
bridge_ports eth0 eth1
address 192.168.1.2
broadcast 192.168.1.255
netmask 255.255.255.0
gateway 192.168.1.1
NV as a VLAN router/switch mode
In this configuration, NV operates as a bridge between physical segments belonging to the same VLANs, and it operates as a router between networks of different VLANs (Layer 3 VLAN routing).

This configuration also enables routing between VLANs residing on the same physical segment (InterVLAN routing). NV impairs routed network traffic which uses the same physical port for both ingress and egress.

To set up NV as a VLAN router/switch:
See the documentation for your specific Linux distribution.
For an example of a VLAN configuration process for CentOS, see Example: Configure an Ethernet interface as a VLAN router/switch (trunk) on Red Hat.
Note: Active adapter settings do not apply to traffic forwarded by NV in VLAN mode.
Configuration examples for network operation modes
This section provides examples describing how to configure the network operation modes for CentOS and Red Hat. You can use the examples below or examples contained in Linux documentation.
Example: Configure CentOS as a router with two interfaces
-
On the NV Virtual Appliance server machineEnable packet forwarding.
- Log in as the root user.
-
From the command-line interface terminal, open the /etc/sysctl.conf file:
# vi /etc/sysctl.conf
-
Add the following line to enable packet forwarding for IPv4:
net.ipv4.conf.default.forwarding=1
- Save and close the file.
-
Restart networking:
# service network restart
-
Disable the CentOS firewall.
Note: Instead of disabling the firewall, you can open the ports required for the application under test.
-
Enter the following rule at the command prompt:
# service iptables save
# service iptables stop
-
To make it permanent:
# chkconfig iptables off
-
Example: Set up CentOS as a persistent software bridge with two interfaces
-
On the NV Virtual Appliance server machine, create a bridge configuration file (ifcfg-mybridge) under /etc/sysconfig/network-scripts:
DEVICE=mybridge
TYPE=Bridge
IPADDR=192.168.100.5
NETMASK=255.255.255.0
ONBOOT=yes
BOOTPROTO=none
NM_CONTROLLED=no
DELAY=0
-
To add interfaces to the permanent mybridge bridge, configure every interface you want to add (for example, eth1, eth2) with the following:
DEVICE=eth1
TYPE=Ethernet
HWADDR=00:50:56:89:34:41
BOOTPROTO=none
ONBOOT=yes
NM_CONTROLLED=no
BRIDGE=mybridge
DEVICE=eth2
TYPE=Ethernet
HWADDR=00:50:56:89:35:42
BOOTPROTO=none
ONBOOT=yes
NM_CONTROLLED=no
BRIDGE=mybridge
-
Reset the network configuration:
sudo /etc/init.d/network restart
To learn more about setting up a persistent bridge configuration, see:
Example: Configure an Ethernet interface as a VLAN router/switch (trunk) on Red Hat
Suppose that a host requires access to two VLANs, both carried by a trunk connected to physical interface eth0. The assigned IP addresses for the host are 192.168.2.1/24 on VLAN 2 and 192.168.3.1/24 on VLAN 3. (For a graphic representation, see the second graphic in NV as a VLAN router/switch mode.)
-
For each VLAN, add an interface script to /etc/sysconfig/network-scripts/. The format is similar to an Ethernet interface, with the following exceptions:
-
The script must contain the setting:
VLAN=yes -
The interface name must follow one of the naming conventions supported by vconfig.
The interface naming convention used and recommended here is of the form
ethx.y, whereethxis the physical interface name andyis the VLAN number. -
You do not need to specify the MAC address (HWADDR).
-
-
For the scenario described above two interface scripts are needed, one with the pathname /etc/sysconfig/network-scripts/ifcfg-eth0.2:
VLAN=yes
DEVICE=eth0.2
BOOTPROTO=static
ONBOOT=yes
IPADDR=192.168.2.1
NETMASK=255.255.255.0
and one with the pathname /etc/sysconfig/network-scripts/ifcfg-eth0.3:
VLAN=yes
DEVICE=eth0.3
BOOTPROTO=static
ONBOOT=yes
IPADDR=192.168.3.1
NETMASK=255.255.255.0
-
Invoke ifup to bring up the interfaces:
ifup eth0.2
ifup eth0.3
-
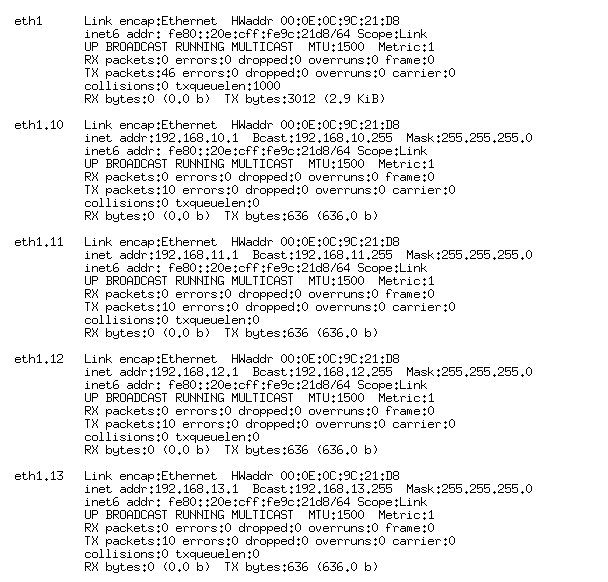
Inspect the new VLAN interfaces using the ifconfig command:
ifconfig eth0.2
Sample output:
eth0.2 Link encap:Ethernet HWaddr 00:00:00:00:00:00
inet addr:192.168.2.1 Bcast:12.168.2.255 Mask:255.255.255.0
UP BROADCAST MULTICAST MTU:1500 Metric:1
RX packets:0 errors:0 dropped:0 overruns:0 frame:0
TX packets:0 errors:0 dropped:0 overruns:0 carrier:0
collisions:0 txqueuelen:0
RX bytes:0 (0.0 b) TX bytes:0 (0.0 b)
- Enable IP forwarding.
- Edit the /etc/sysctl.conf file by changing net.ipv4.ip_forward from 0 to 1.
-
Restart the networking service.
sudo /etc/init.d/network restart
Below is the outcome of a VLAN configuration after running an ifconfig command: