Share this page


Configure the integration
This section explains how to configure Network Virtualization for integration with Digital Lab.
Plan your network configuration
For the Network Virtualization integration with Digital Lab, Network Virtualization should be installed on a single machine in the testing lab. If your Digital Lab environment is distributed, install Network Virtualization in one of the locations and then run the tests with Network Virtualization using devices from this location.
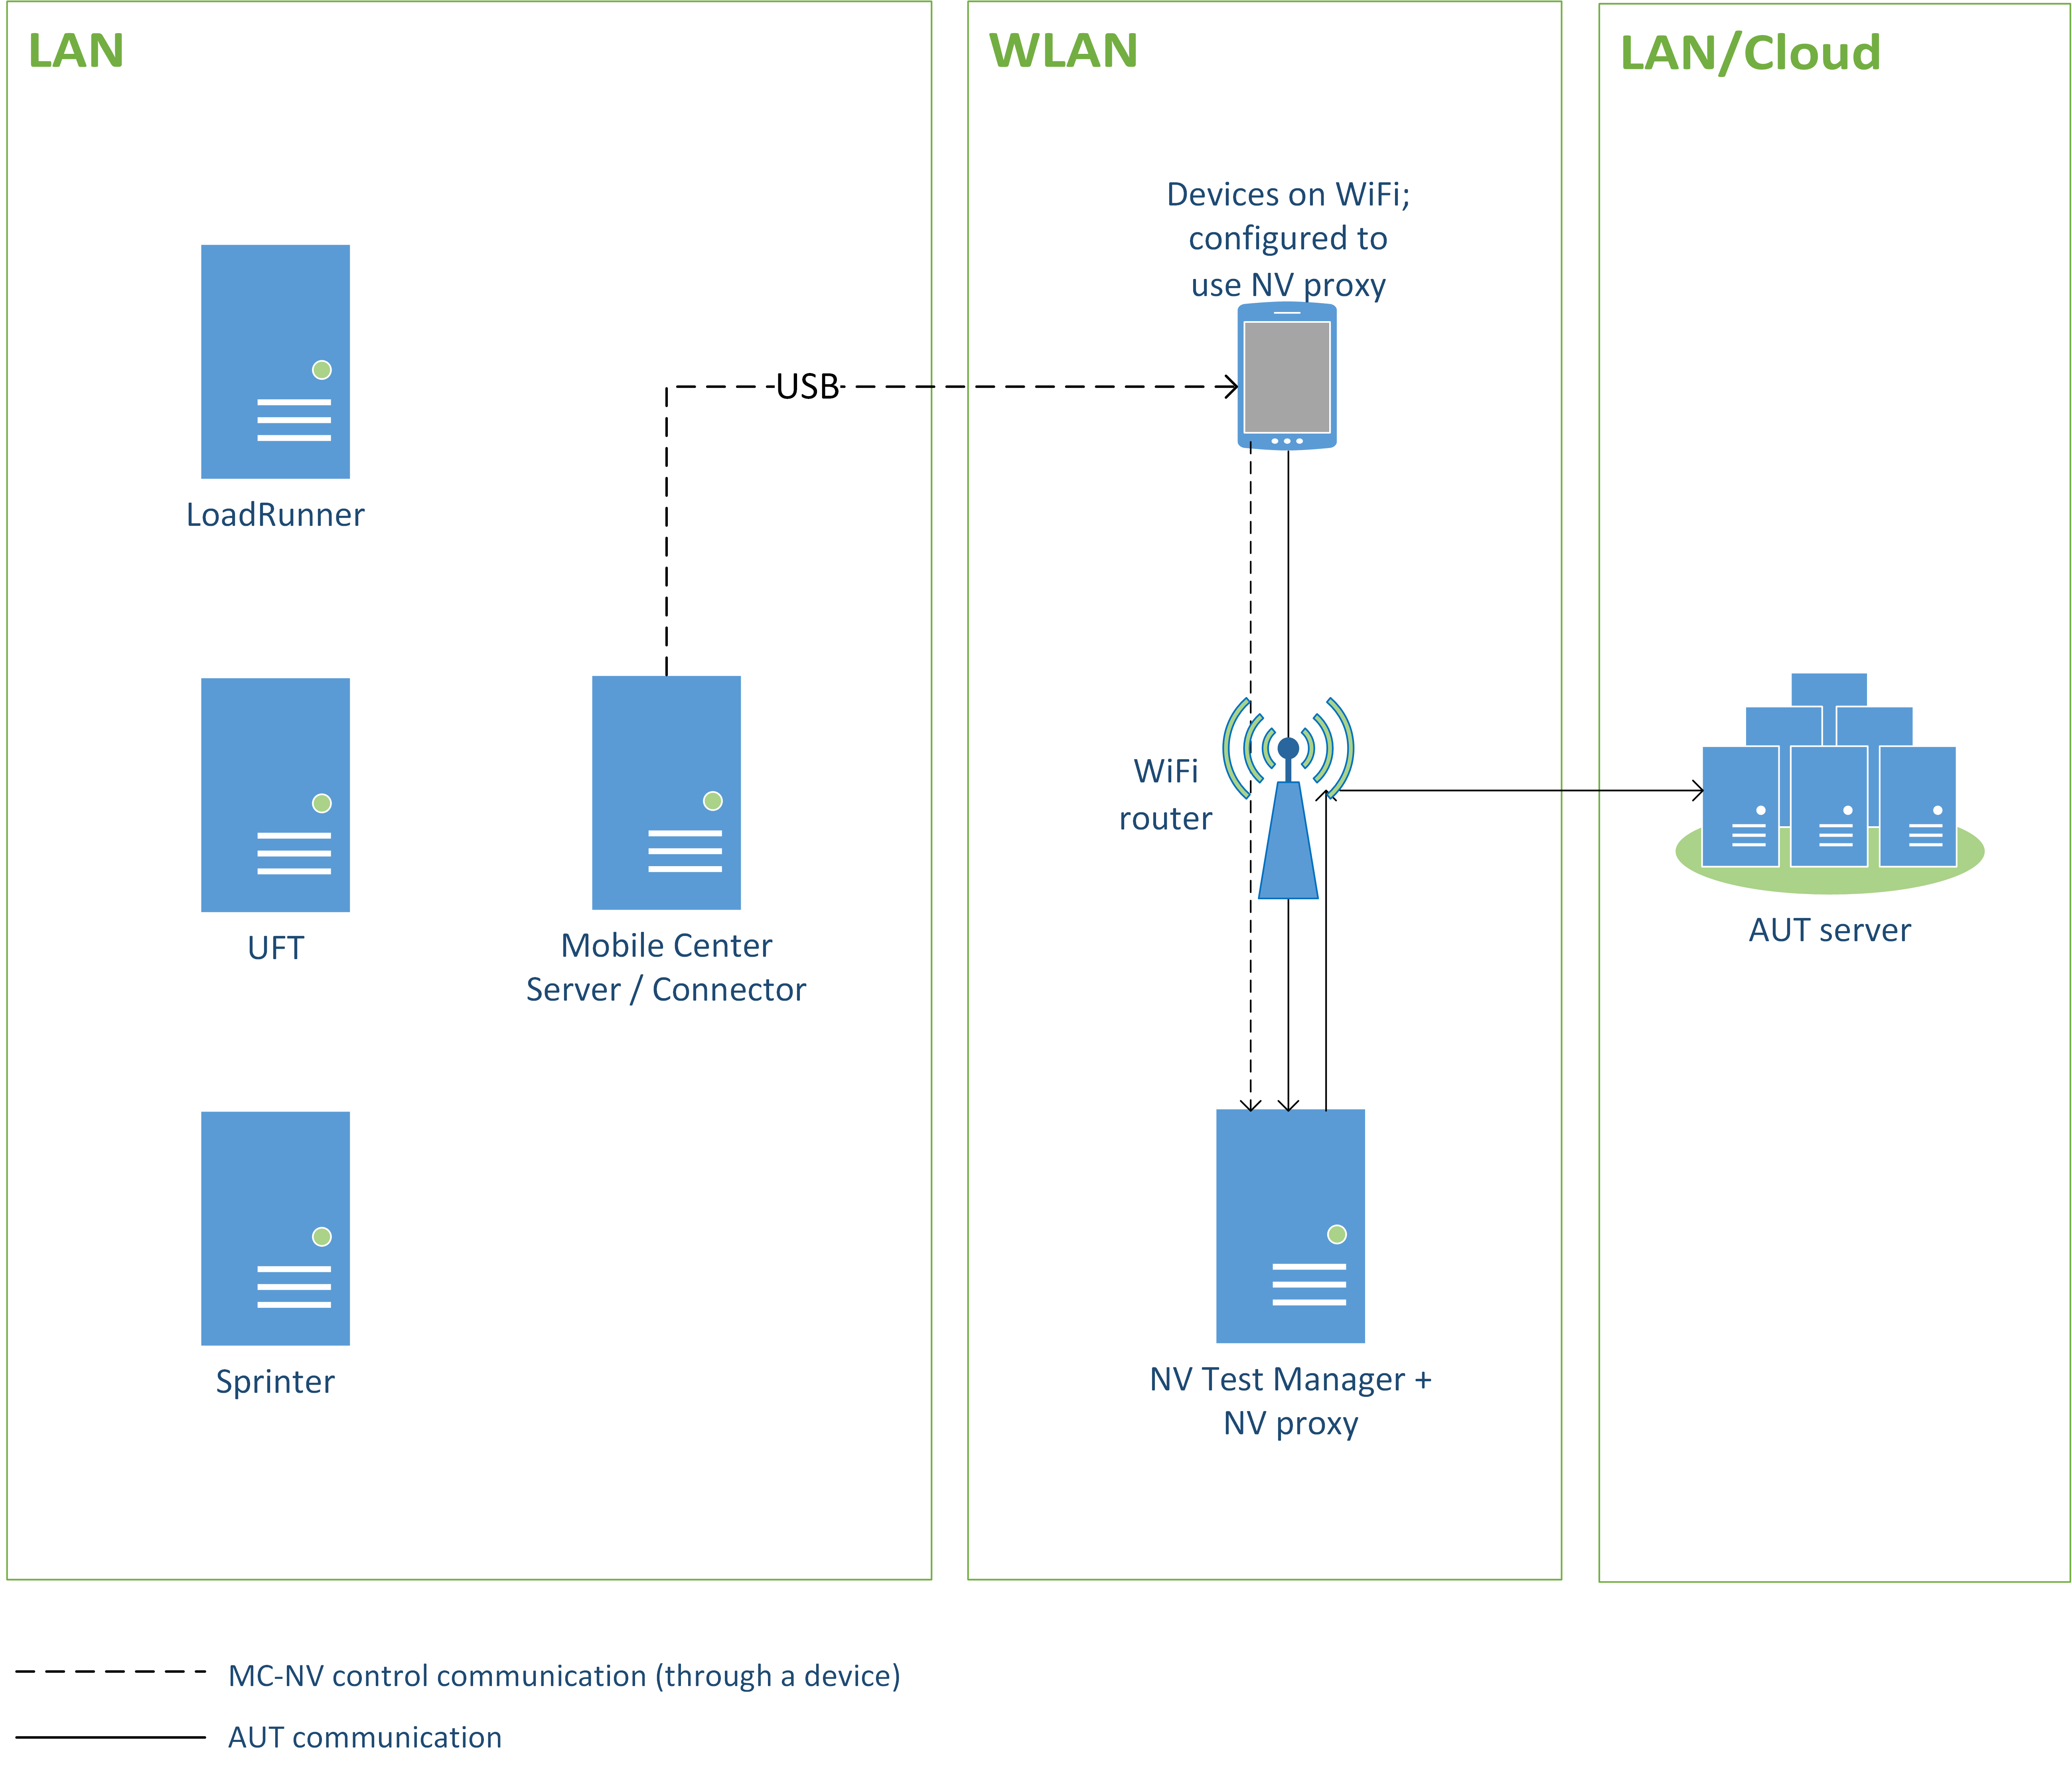
AUT (Application Under Test) communication
When running tests with Network Virtualization, the network traffic of the application under test should flow through the Network Virtualization host. When the traffic flows through Network Virtualization, the specified real world network conditions are emulated.
To enable the required flow of traffic, and for Network Virtualizationto analyze the performance of applications which use secure communication (HTTPS), you enable the NV proxy on the Test Manager machine, and configure mobile devices to use the NV proxy when testing.
Digital Lab—Network Virtualization communication
To allow proper integration between Network Virtualization and Digital Lab, you need to ensure that the server machines can communicate.
By default, Digital Lab tries to communicate with Network Virtualization directly over TCP 8182. If the Digital Lab server cannot communicate directly with NV Test Manager, you can enable communication through an Android device, as described in Set up Network Virtualization integration in Digital Lab.
Note:
-
Make sure that Client Isolation is disabled on the wireless router. The wireless network must allow devices to use another device on the network as a proxy. In this case, the test devices use the NV Test Manager workstation as a proxy.
-
Make sure that no Network Address Translation (NAT) device is placed between the clients and the NV Test Manager host machine.
-
If a proxy is configured on a mobile device, mobile web applications always use that proxy because they run in a browser. Native applications, however, might ignore the device's proxy settings. (If the AUT is designed to ignore the device's proxy settings, contact support for alternative routing methods.)

Upgrade NV Test Manager
If you are upgrading from an earlier version of Network Virtualization:
| Before you begin |
Review the upgrade instructions. For details, see the Network Virtualization Installation Guide. |
| Installation and configuration |
Make sure to:
|
Install NV Test Manager
If you do not already have the Network Virtualization installation package, download it from the Software Licenses and Downloads (SLD) portal or from the location from which you downloaded Digital Lab. The archive file, install-NV9.14.zip, contains the standalone installation. Make sure to check Network Virtualization and Digital Lab version compatibility. For details, see the Support Matrix in the Digital Lab Help Center.
Guidelines
- You must perform the standalone installation and not the server-based installation of NV Test Manager. Make sure to clear the Use NV Server option in the installation's NV mode screen.
-
During installation, make sure to enable the NV Proxy. Alternatively, you can enable the proxy in the Settings tab of NV Test Manager after installation.
- When your application server is on the cloud, and the mobile devices and NV Test Manager are behind a corporate proxy, NV Test Manager should be configured to use the corporate proxy. During installation, make sure to configure the corporate proxy using the proxy chaining option. Alternatively, you can configure proxy chaining in the Settings tab of NV Test Manager after installation.
For details, see the Network Virtualization Installation Guide.
Install the NV Test Manager seat license
A seat license must be installed on the NV Test Manager machine.
When upgrading from NV Test Manager versions earlier than 9.10, NV Test Manager must be re-licensed.
To install the NV Test Manager seat license:
-
Open the NV License Manager on the NV Test Manager machine.
-
Click Install seat license.
-
In the Install Seat license screen, copy the automatically generated Network Virtualization machine code (unique to your computer).
- In the Software Licenses and Downloads portal, navigate to Software Licenses and Downloads to generate and download a license file.
-
In the NV License Manager, browse to the Install Seat license screen. In the License file box, select the license file you saved in the previous step.
-
Click Update. The updated license details are displayed in the NV License Manager main page.
Configure the NV proxy on NV Test Manager
After NV Test Manager is installed, do the following to configure the NV proxy.
To set up NV proxy on NV Test Manager for integration with Digital Lab (one-time configuration):
-
In NV Test Manager, enable the Digital Lab proxy server.
If you did not enable the NV proxy during installation, enable it now in the NV Test Manager > Settings tab.
-
Define the upstream proxy.
When the application server is behind a proxy, for example, when the application server is on the cloud, and NV Test Manager is on the LAN behind the corporate proxy, you must configure the upstream proxy. If you did not configure the NV proxy during installation, configure it now in the NV Test Manager > Settings tab.
-
Add the ports your application uses to the list of ports for NV Insights.
In the NV Test Manager > Settings tab, add the ports your application uses to the list of ports used for analysis. If an upstream proxy was defined, also add its port.
For details, see NV Test Manager settings.
Configure the device to use the NV proxy and certificate
After the NV proxy is configured on NV Test Manager, do the following on each device for tests using Network Virtualization.
To configure a testing device:
-
Configure the test device to use the proxy server.
Some test devices may fail to reach the proxy when using the proxy's hostname. To avoid this problem, we recommend that you use a static IP address when configuring the test devices with the proxy.
Android devices -
Make sure that the device is connected to the same network as the NV Test Manager.
-
Go to Settings > WiFi.
-
Long press the wireless network name, tap Modify network, and then tap Advanced options.
-
Tap Manual and enter the NV proxy IP address and the NV proxy port as it appears in the Emulated Network window.
iOS devices -
Make sure that the device is connected to the same network as the NV proxy.
-
Go to Settings > WiFi.
-
Tap the “i” next to the wireless network name to display its properties.
-
Tap Manual and enter the NV proxy IP address and the NV proxy port as it appears in the Network Virtualization window.
-
-
Install the proxy's SSL certificate on the testing device.
When testing applications that use secured communication (HTTPS), install the proxy’s certificate on each test device.
-
Connect the device to the wireless network.
-
Browse to:
<http/https>://<NV Test Manager address>:<NV Test Manager port; 8182 by default>/hpenv.cer -
Download and install the certificate.
Note:
- On iOS 10.3 and later, browse to Settings > General > About > Certificate Trust Settings, and enable full trust for the certificate. For more details, see https://support.apple.com/en-il/HT204477.
-
When testing native Android apps, make sure the app was customized to trust certificates installed by the user on the device. For details, see https://developer.android.com/training/articles/security-config.
-
-
Verify that the test device communicates successfully through the proxy.
-
From NV Test Manager, start a Quick Test on a device which is configured to use the proxy. In the Include section of Client IPs and the Exclude section of Server IPs, use the IP of the device configured to use the proxy.
Note: When working with Digital Lab, you do not need to start tests from NV Test Manager. We recommend starting a test once from NV Test Manager to ensure that the devices can communicate through the proxy.
- On the device, browse to a website. Verify a website that uses HTTPS, if needed.
- In NV Test Manager, switch to the Statistics tab and make sure that the throughput is not 0.
-
Restore the device's proxy settings
After you complete your test on a mobile device, restore the device's original proxy settings if you do not plan to use the device for additional Network Virtualization tests.
| Android devices |
|
| iOS devices |
|
 Next steps: