Share this page


Manage site users
This topic describes how to manage site users.
Manage users at the site level
Site admins can delete, activate, and deactivate users from Settings  > Site. They can also assign other users the site admin role.
To assign the site admin role to existing users:
-
In Settings
> Site > Users grid view, select the user who should also be a site admin. -
Click
 to display the Roles column.
 -
Select Site Admin in the Roles column for that user.
Space and workspace admins can also activate and deactivate users. For details, see Activate or deactivate a user.

Assign the site admin role to existing users
This section describes how to assign the site admin role to existing users.
User management actions
On-premises admins can manage users by adding, editing, or deleting users. For details about managing users on workspace and space levels, see Users.
The following table provides an overview of user-related tasks and which of on-premises admins can perform them.
| User management capability | Site admin | Space admin |
Workspace admin |
|---|---|---|---|
| Import LDAP users to a space. For details, see Add LDAP users in ALM Octane . |

|

|
|
| Import IdP users for SSO authentication. For details, see Import IdP users. |
|
|
|
| Add existing users from the site into the space. For details, see Add a user. |
|
|
|
| Set user passwords. |
|
|
|
| Assign the site admin role to other users. For details, see Assign the site admin role to existing users (on-premises). |
|
|
|
| Delete a user. For details, see Manage site users. |
|
|
|
Add a user
To add new site users, use the REST API POST method. For details, see POST: Create a user.
Note: Site admins can not add users through the site settings.
Site admins can add existing site users to a space.
To add existing site users:
- In Settings> Spaces, select a space in the tree on the left.
- On the Users tab, click
 Include site users.
 - Select the users to include.
- Click Add.
Note: You can disable adding site users to a space in the ENABLE_INCLUDE_SITE_USERS parameter. For details, see Configuration parameters.
Change a user's password
Shared space admins, and admins for individual workspaces, can follow these instructions to change another user's password.
Note: As a space admin, you can change passwords for any user, but you cannot change your own password if that is your only assigned role.
To change another user's password:
-
In Settings
, click Spaces and select a space or workspace. -
In the Users tab, click a row to select a user.
-
Click Change Password.
-
Enter a new password and confirm it.
Passwords must be at least 8 characters long, and contain at least one capital letter, one lower case letter, and one number or symbol.
-
Click Change Password.
Methods for adding users
This section describes the various methods for adding users.
Use one of the following methods:
| Method | Details |
|---|---|
| Native user management system | |
| Include existing users from the site to a space (on-premises only) | Add a user |
| Include existing users from a space into a workspace | Add a user |
| Import users from an LDAP server | |
|
Import SSO users from an Identity Provider (IdP) Note: The users must exist in ALM Octane, but login authentication is done by the IdP. |
|
| Use the REST API |
|
Note: Version 12.60 CP10 and later: The ALLOW_WORKSPACE_USERS_CREATION configuration parameter is deprecated. This parameter used to be available for enabling or preventing the admin from adding and including users at the workspace level. Use Settings > Permissions instead.
Import IdP users
This section describes how to import Identity Provider (IdP) users for SSO authentication into a workspace (on-premises). You can import users that were already defined in an IdP to a workspace, without having to reenter the user details.
Prerequisite: Your ALM Octane server is configured for SSO authentication. For details, see Set up SSO authentication.
To import IdP users for SSO authentication into a workspace:
-
In Settings
> Spaces, choose a space in the tree on the left. -
In the Users tab, click
 .
. -
If you have not yet created an import (.csv) file for defining the IdP users, click View Import File Example to download a template. The default name for the template file is import_users.csv.
-
Modify the import (.csv) file that you created for defining IdP users as necessary.
 How to define users in the import file
The import file must have a header row.
Define, for each user, the following attributes in the order listed below.
The attributes are mandatory. Values for them must be specified. However, when the user logs in to ALM Octane, values specified in the IdP override these. For now, any values will suffice.
Attribute Description uid Corresponds to the ALM Octane UID field. Mandatory. Must be unique. Can be any unique value. name Corresponds to the ALM Octane LOGIN NAME field. name values must be the actual names to be used for authentication. Mandatory.
This field is used to identify the user in the IdP at first login. Subsequently, the uid is used.
first_name Corresponds to the ALM Octane FIRST NAME field. Mandatory, but can be any value. last_name Corresponds to the ALM Octane LAST NAME field. Mandatory, but can be any value. email Corresponds to the ALM Octane EMAIL field. Mandatory, but can be any value. Click Upload.
Example:

-
Navigate to the import file using the Browse button.
-
Select the workspace to which you want to import the users.
-
Select the role you want to assign to the users.
Tip: We recommend that you initially select the Viewer role, and instruct the admin to update the roles at a later time.
-
Click Import.
Post import steps
Perform these steps after a successful import:
-
If any users were not imported successfully, review the details, make corrections, and re-import.
You can re-import the entire import file. Users that were already imported successfully are not duplicated. However if you re-import with a different role, these users retain their original role. You can update their roles later using bulk update.
-
You can edit only users' languages and roles.
-
Non-SSO users are still listed in the user list. However, they cannot log into ALM Octane because the login will fail SSO authentication.
-
User activation works as it does for any other type of user. If the user is not active, the user is listed but cannot log in. For details, see Activate or deactivate a user.
Delete a user
The operation of deleting a user may take a few minutes.
Note: Before deleting in ALM Octane, SaaS operators should delete the user from the system before deleting the user in ALM Octane.
To delete a user:
-
In Settings
> Site > Users grid view, select a user. -
In the toolbar, click
 and answer Yes to confirm.
 -
If your site is configured to erase all traces of the deleted user, the following appears.
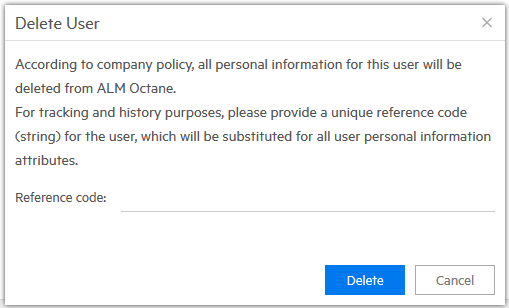
Click Delete.
Limitation: The ability to erase all traces of deleted users is not supported for SaaS.
The
 indicates that the user has been deleted. Even though the user appears to be assigned to items, you cannot:
 -
Filter by deleted users.
-
Assign a deleted user to any new or existing item.
-
Refer to a user in a comment.
-
See the user as part of a team.
We strongly recommend that you manage an external file that maps deleted ALM Octane users to reference codes.
Enter a reference code for the user from this external file.
Internally, references to the user are replaced by this reference code in ALM Octane.
If you do not enter a reference code, the user is not deleted.
For details on how to configure the site to erase deleted users' details, see FORGET_USER_ON_DELETE under Configuration parameters.
Setting the value for this parameter only affects how users are deleted from this point forward, not retroactively.
-
Tip: You can also delete multiple users using the REST API.
 See also: