Share this page


Requirements
The Requirements module provides you with a central repository for documenting and tracking all aspects of your project, from conception to delivery. Examples are business goals, customer requests, functional requirements, or any other requirements whose approval and progress you want to track.
About requirements
Requirements can be high-level descriptions or formal documentation for your release, depending on your development methodology.
For example, you may have a requirement to send an astronaut to Mars and bring them back to Earth, and your backlog is comprised of a huge number of detailed features, user stories, and tasks.
You can also use requirements to document business-oriented information rather than simply defining deliverables. For example, within requirements you might enter business objectives, executive briefs, risk factors, or market opportunities.
You can link requirements to tests and defects, providing you with coverage on each requirement. If your team works with both requirements and backlog, the two can be linked to one another, showing which backlog item implements which requirement.

Requirements vs. backlog items
From a use case perspective, the Backlog module is project-management oriented. Backlog items are defined in a hierarchy of epics, features, and stories, and different backlog items are created for different teams (for example back-end vs. client).
Requirements contain the overall story of what you want to deliver, rather than a hierarchy of tasks. For example, you might define a requirement as "Multi-language support," and this could be mapped to ten different items in the backlog.
This is also reflected in the personas using these modules; backlog items may be written by project owners or PMOs, while requirements may be written by business analysts or PMs.
From the perspective of test coverage, you can work with both backlog and requirements in parallel. Alternatively, you can choose one of these modules to reflect quality implementation, and link your tests to that module.
Create a requirement tree
First, you create a framework of high-level requirements. You then add additional child requirements to break these into manageable parts and give team members a better understanding of the specific objectives. Requirements can also be formed in traditional ways such as goals, use cases, security effects, or performance changes.
You can associate each requirement with releases, tests, defects, features and backlog items.
The Requirements tree (left pane) contains a hierarchy of folders and requirements.
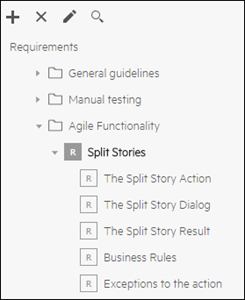
In the requirements tree you can drag and drop requirements as needed. ALM Octane highlights locations for dropping the requirement in green or red, depending on whether you are able to drop a requirement in that location. Top level requirements cannot be moved out of the containing parent folder. Child requirements can be moved under a different parent requirement.
Author mode and Manage mode
The Requirements module lets you work in two modes: Author mode and Manage mode. Both modes show the same content, but use a different visualization with different functionality.
| Mode | Details |
|---|---|
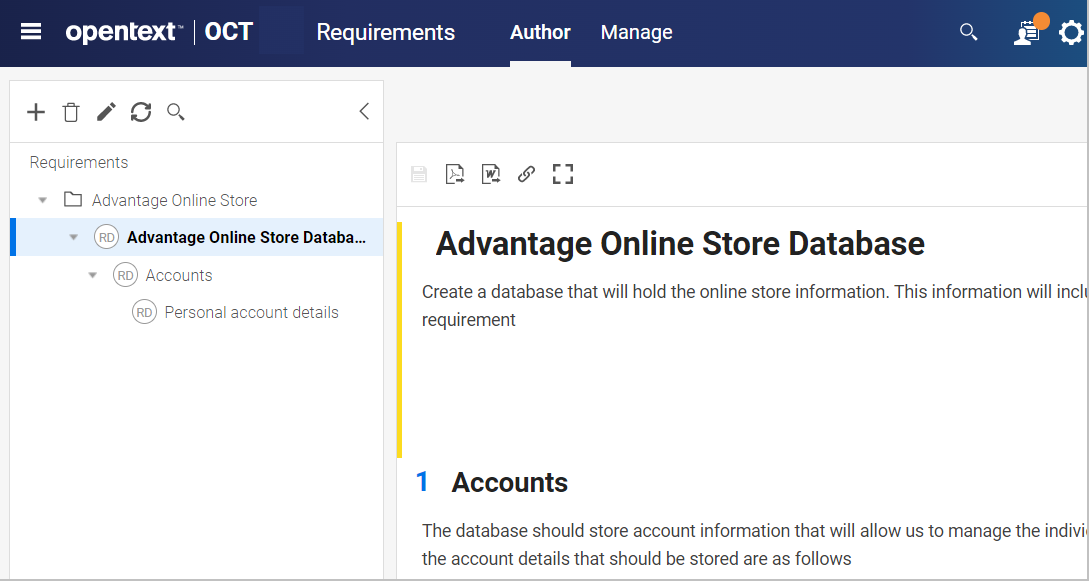
| Author |
Author mode enables you to define requirements in a document view. You define the full details for the parent requirement, and add child requirements and their details in the same document. In author mode you can use rich text capabilities, such as adding diagrams, tables, images, and links. In Author mode, each requirement is displayed in a single document that extends from the highest-level requirement until the lowest-level child. Numbering inside the document indicates the requirement hierarchy (for example: 1, 1.2, 1.2.1). The title of the document is the title of the highest-level requirement.
|
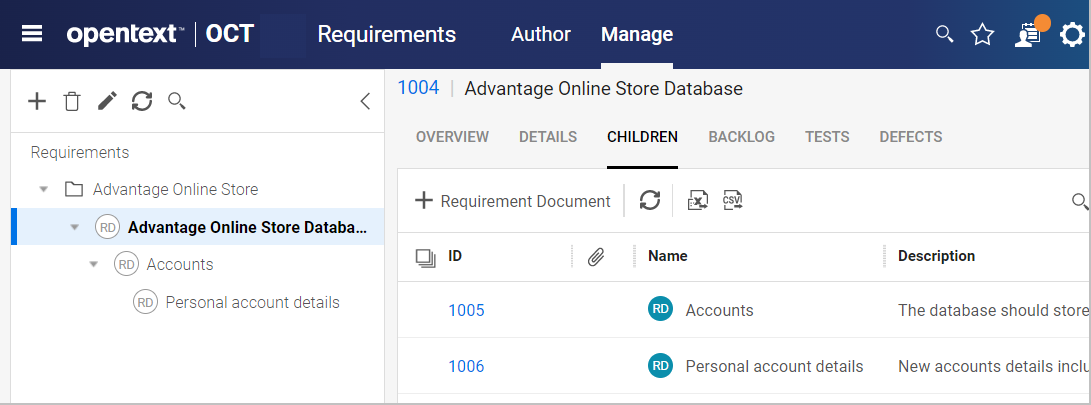
| Manage |
Manage mode lets you create and work with requirements within a grid. Each requirement is an item in the grid, and you can perform operations on one or more requirements using the Preview pane on the right. You create a container folder for a set of requirements, and then add additional child requirements to the folder. In this grid view you can filter items and perform bulk operations.
In the Children tab you can also work with a Board View. The Board View can help you manage the phases of your requirements. For details, see The board view. In Manage mode, you can link work items, such as defects and tests, to a requirement. The Backlog tab provides a view of all items linked to the requirement. For details, see Define requirements. |
Define requirements
You can define requirements using either the Author or Manage mode.
| Mode | Details |
|---|---|
| Author |
Use the Author mode to define detailed requirements in a rich-text document view. To define a requirement in a document view:
|
| Manage |
Use the Manage mode to define a requirement in a grid view. To define a requirement in a grid view:
|
Create and compare description versions
You can define versions of a requirement description, and compare the changes between versions.
To create and compare versions:
- When editing a requirement's description, click the dropdown arrow next to the Save button.
- Select Save Description Version.
- Assign a name to the new description version.
- In the requirement's History tab, filter the modified fields by "Description version".
- Click the View changes link alongside a "Description version" entry.
- In the Changes dialog box, select the versions that you want to compare.
Associate requirements with other items
You can associate requirements with the following items: tags, releases, features, stories, defects, and tests.
To associate a requirement:
- From a test, in the Covered requirement field, select the associated requirements.
- From a feature, story or defect, in the Requirement field, select the associated requirements.
- In the Requirements Children grid or in a requirement's form, select the Backlog implementation field.
Import requirements from Excel
You can create an Excel file with a hierarchy of requirements, and import it into ALM Octane. In the Excel file the hierarchy is represented by relative indentation in each row, which is then converted into a hierarchy of requirements in ALM Octane.
For example, this is useful if someone who is not using ALM Octane (such as a business analyst) creates requirements, which are then imported and implemented by the development team.
The Import Requirements permission is enabled by default for all roles except Viewer and Team member.
To import requirements from Excel:
-
To download an Excel template file, click the ALM Octane Settings button, and select Import > Requirement Documents. In the dialog box, click View import file example.
You can now edit this file, or create another file based on this template.
-
When importing, ALM Octane only imports the first sheet of the Excel file.
-
The first row of the first Excel sheet is the header, which represents the ALM Octane field labels. This row must contain the name column.
-
The text indentation level in the name column is used to determine the hierarchical order. For example:

-
The maximum hierarchy depth is 10 levels. The maximum number of imported entities is 1000.
-
-
When your Excel file is ready for import, click the ALM Octane Settings button, and select Import > Requirement Documents.
-
Browse to your file location. In the Root node field, select a parent requirement folder or requirement document in ALM Octane. All of the imported requirements will be nested under this parent.
-
Click Import. Each row in the Excel file is converted to a requirement document in ALM Octane.
Note that ALM Octane does not support updating requirement documents items via import. You can import each Excel file only once.

Export requirements to Word or PDF
You can export requirements to Word or PDF files to help you document them for legal purposes, or share them within your organization.
Supported versions: Acrobat version 11.0.23 and higher.
In Author mode, select and click Export to Word  or Export to PDF
  in the toolbar. ALM Octane creates a Word file or PDF using the hierarchy of the selected requirement.
Note: To generate PDFs and Word files properly in Linux environments, you need to have Arial Unicode MS installed on the server in site\storage\site\fonts or site\storage\sharedspaces\...\fonts. If additional fonts are missing, the admin should add them there. For details on installing fonts, see https://docs.aspose.com/words/java/install-truetype-fonts-on-linux/.
Export limitations
The following limitations apply to exporting requirements:
-
East Asian languages are not supported when exporting from a Linux server.
-
The styling in ALM Octane does not automatically generate identical styling in Word or PDF. If you want to generate output with particular fonts and sizes, select the relevant region in ALM Octane and apply a specific font and size to the text before exporting.
-
When you export tables, Word and PDF use their default table style rather than the style in ALM Octane.
-
Very wide tables and images in ALM Octane are not always exported correctly. If tables and images exceed A4 width, they are cut off when exported.
Analyze requirements
Use the Requirements module to analyze your requirements coverage.
In the Manage tab, open the Overview tab. This tab includes widgets that show useful information about the state of your project from a requirements point of view. By default, there are four widgets, including a Feature by Requirements graph. You can customize this view to display the widgets that suit you best.
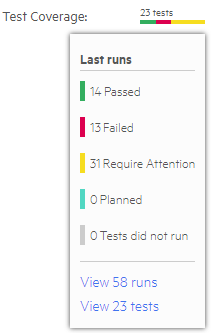
In the Details tab for both Requirement folders and Requirement documents, you can add the Test coverage widget to determine the relationship between your requirements and test runs. To add this widget, customize the columns to show Test coverage. You can also add this column in the grid view in the Children tab. Hover over the widget for more information.
You can create custom graphs to display requirement status and test run coverage according to requirements. You can only create graphs for a current status.
To create a requirements status graph:
Create a custom graph using Requirements as the Item type and group by Phase. For details, see Set up the dashboard.
The requirements are displayed in alphabetical order.
To create a coverage graph:
Create a custom graph using Test runs as the Item type and Covered requirement as the X axis. For details, see Set up the dashboard.
 See also: