Share this page


Create manual tests
Create manual tests in ALM Octane.
Create tests and add test steps
You can create tests from the Quality and Team Backlog, and Requirement modules, either from the Tests page or from a Test Suite.
You can compose a test script using either the Text Editor or the Visual Editor. Typically, tests are created using the Text Editor, however, you can also use the Visual Editor. The Visual Editor includes all of the functionality provided by the Text Editor, except for text formatting.
To create manual tests:
-
Create the test.
- In the Team Backlog or Quality module menus, select Tests. Click + Manual Test. If the tab shows the + Gherkin Test button, expand the dropdown and choose Manual Test.
- In the Requirements module menu, click Tests and select a Requirement document. Click + Manual Test. If the tab shows the + Gherkin Test button, expand the dropdown and choose Manual Test.
- Inside a Test Suite, select the Planning tab. Click + Manual Test. If the tab shows the + Gherkin Test button, expand the dropdown and choose Manual Test.
-
In the Add Manual Test dialog box, assign the following test attributes:
Field Details Name The name of the test. Test type The type of test, such as acceptance, end-to-end, regression, sanity, security, and performance. Estimated duration (minutes) The time it takes to run the test. Backlog coverage The backlog items the test will cover. This helps you track the release quality. Application modules The product's application modules. This helps you track product quality, regardless of release. Description A textual description of the test. -
Click Add & Edit.
-
Click Steps, and then click Text Editor
 .
. Note: To use the Visual Editor, to add or edit steps, click the Visual Editor
 button.
 -
Use the buttons in the toolbar to add steps.
If you are entering the entire test manually, make sure to use the correct syntax. For details, see Manual test syntax.
Button Details Add Step Add a setup step (an action in the application).
Enter the step text. For example: Create a new Epic.
Add Validation Step Check something in the application.
Enter the step text. For example: Verify that the current phase is New.
During the test run, you specify a pass or fail status for each validation step.
Add Call Step Add steps from an existing test to your script.
In the Add Tests dialog box, select the test or test that you want to call, and then click Add.
The step is added as a hyperlink to the original test. Click the View test steps
 button to display the steps of the test that you called.
Note: ALM Octane uses the latest version of the called test at run time, and not the latest version at the time of planning.
- To apply text formatting, see Format text in the test script.
-
To add attachments, select a step and click Attach to add files and navigate to the required file or paste an image directly into the test.
In the text editor, ALM Octane seems to add the attachment as a separate step in the test. If you check the visual editor, you will see the attachment is actually associated with the selected step.
You can view the file in the Attachments tab of the test, the Manual Runner when starting a test run, or the test run report.
Note: If you rename a test's attachment after it is already included in a step, you must manually update the link to the attachment in the step.
-
Save your test.
Tip: While you work, save and label versions of your manual test. As you work with the test over time, compare versions to view modifications. For details, see Use versions of test scripts.

Use parameters in tests
You can use parameters in tests in order to run a single test several times with different values.
To use parameters you must create a data table, define the parameters, and create at least one data set with values. The number of rows in your data set determines the number of iterations the test will run.
If you create multiple data sets, when you run the test, you will be able to select the data set with which to run the test.
Multiple data sets are useful when you want your test to reflect numerous scenarios. For example:
- If you want to test log in success and failure, you can create two data sets - one with valid credentials and another with credential that will fail to log in.
- You can create a different data set for each environment you want to test, like different browsers or different operating systems.
Here's an example showing a list of users and passwords. Each iteration will use a different set of values:
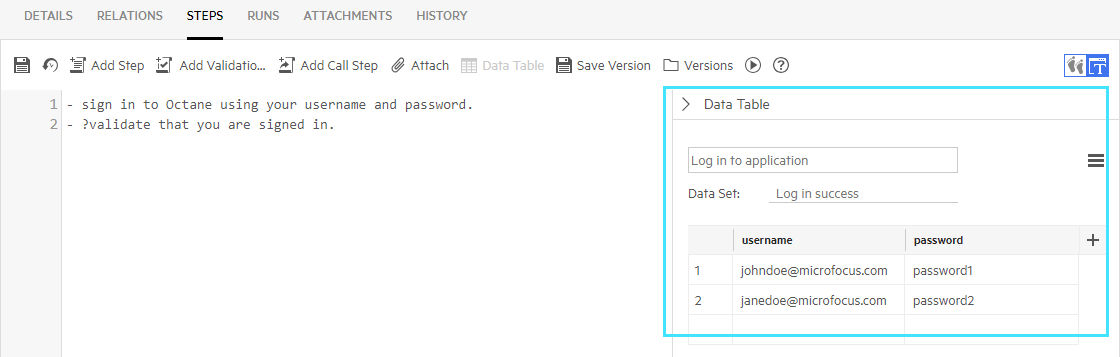
Data tables are shared, so you can use a single data table for multiple tests.
To work with parameters:
-
In the Steps tab of the test, click Data Table.
-
In the pane that opens on the right, click Create a new table.
-
Enter a name for the table and rename the parameters. , and add or remove columns as required.
To add or remove rows or columns, click the dropdown arrow next to the row or column name. The arrow is visible when you hover over a cell or column header.

Parameter names cannot contain empty spaces or angle brackets (< >).
-
In each row, enter a set of parameter values.
-
To add data sets, click the menu and then click Add Set. Enter parameter values for this set.
The first data set in the data table is always the default data set. When a data set is not explicitly selected in the run, the default data set is used.
The names of the sheets in the import file will be the names of the target data sets. You can rename data sets using the menu commands after import.
- Click Save when your table is ready.
-
You can use the menu options next to the Save button to manage your parameter tables. If you select Remove from test, you disconnect the table from the current test but it is still saved in ALM Octane. If you select Delete table, it is removed from all tests that are using this parameter table. ALM Octane shows you which tests use the table before you delete it.
-
In the relevant test step, enter parameter names using the following syntax: <parameter name>.
Tip: You can also quickly access the list of parameters by pressing
CTRL-SPACE. Use the keyboard arrows to navigate the list, andEnterto select a parameter. -
When you run the test, it runs in multiple iterations. Each iteration uses a different set of parameter values from the table.
For example, here are execution steps presented to the tester:

Export and import data tables or data sets
You can export data tables and data sets to Excel. You can update the Excel file, and then import it back to your manual test.
For each data set, consider the following requirements:
- Must have a unique name
- Must not exceed 31 characters
- Cannot include special characters (for example \ / * [ ] :?)
To export a data table:
- In the Steps tab of the test, click Data Table
- Select Export table. The data table opens in Excel. Each data set is displayed in a separate Excel sheet.
To export a data set:
- In the Steps tab of the test, click Data Table.
- Select a Data Set.
- Select Export set. The data set opens in Excel.
To import a data table:
- In the Steps tab of the test, click Data Table
- Select Import table. The Import Data Table dialog box opens.
- Select whether to override the content of the current data table or create new data table and link to current test.
-
If you select override the content of the current data table, click browse. Locate the data table. Make sure that table name matches the table name in the Excel file that you are importing from. Click Import. ALM Octane reads each sheet and determines whether to override or add data sets.
-
If you select create new data table and link to current test, click Import. ALM Octane creates a new data table with at least one data set and link it to the current test.
Note: If you have unsaved changes and you choose to create a new data table, your changes will be lost.
To import a data set:
- In the Steps tab of the test, click Data Table.
- Select a Data Set.
- Select Import Set. The Import Data Set dialog box opens.
- Select whether to override the content of the selected data set or create new data set under the current table.
- If you select override the content of the selected data set, click browse. Locate the data table. Click Import. ALM Octane loads the first sheet and copies the values into the selected data set.
-
If you select create new data set under the current table, click Import. ALM Octane creates a new data set and places it under the current data table.
Copy tests to another workspace
You can copy tests from one workspace to another, within the same shared space.
For details, see Copy items to another workspace.
 Next steps: