Share this page


Create and configure pipelines
ALM Octane pipelines represent the flow of your CI server jobs and steps. Use pipelines to get a clear, multi-level, analytic view of your pipeline runs and their status. This helps monitor quality and progress, quickly identifying and fixing issues as they occur.
Add a pipeline in ALM Octane
Once connected to a CI server, you can create a pipeline in ALM Octane. Specify the root job for the pipeline, and ALM Octane builds a pipeline that represents the job flow starting from that root job.
The result of a pipeline run is determined by the result of its root job. Therefore, for the pipeline run result to reflect the results of other jobs in the flow, make sure that on your CI server, the results of those jobs are aggregated up to the root job.
To learn more about pipelines in ALM Octane before creating them, see Pipelines.
Note: If you are working with Jenkins: You can similarly create and configure pipelines using the Application Automation Tools plugin on the Jenkins CI server. For details, see the section on creating and configuring pipelines on the Application Automation Tools wiki page.
To add a pipeline:
-
Prerequisites:
-
Make sure an Application Automation Tools plugin is installed on the CI server.
For details, see Install and configure the plugin on your CI server.
-
Make sure at least one CI server exists in the Settings area. For details, see Add CI/CD servers on ALM Octane.
-
-
In ALM Octane, go to the Pipelines module and open the Pipelines tab.
-
Click + to add a pipeline.
-
Select a CI server. The list displays the servers created on the CI Servers settings page of the current workspace. For Azure DevOps integrations, see Run Azure DevOps pipelines.
-
Select the root job from which you want ALM Octane to start the pipeline. The list displays the jobs defined on the CI server you selected. If the communication with the server fails, the list is not available.
-
Enter a name for the pipeline and, optionally, assign the pipeline to a program and/or a release. If you select a release, you can also select a milestone.
-
The program, release, and milestone are automatically assigned to all test runs collected from this pipeline. If you change the program, release, or milestone, a new set of automated runs is created to represent all the tests running in the pipeline. This lets you view test results in the context of program, release, and milestone, and track their quality over time using the Dashboard widgets.
-
For details on programs, see Working with programs in pipelines.
-
Before selecting the release and milestone, we recommend you read the section Best practice: Link a pipeline to release and milestone.
Tip: If you assign the pipeline to the Default Release, the pipeline is always associated with whichever release is currently set as the default release.
-
-
Specify the pipeline's type. Select one or more types from the list: Build, Test, Integration, Deploy, Security.
- Most types are optional. This definition helps you remember the lifecycle stages that this pipeline handles.
- You must select Security if you want this pipeline's runs to show security vulnerabilities discovered by Fortify or SonarQube.
-
Set up notifications (optional). Instruct ALM Octane to send emails to relevant users when builds or automated test runs fail.
- Notify committers upon run failure. Notify people whose commits were included in a pipeline run that failed.
- Notify test owners if their tests fail. Notify people who are owners of failed automated tests.
You can edit these options later in the pipeline's Details tab.
For more details, see Track commits associated with a pipeline run.
-
Set custom purge policy. A global runs purge policy is set at the space level. To set a special policy for the pipeline, select Override space purging policy. If applicable, select the desired policy type and set a value.
ALM Octane retrieves the information from the CI server and creates the pipeline. Click the pencil next to pipeline's name or release to edit it.
After the pipeline runs, you can see a comprehensive overview of the run results. For details, see Run pipelines.

Best practice: Link a pipeline to release and milestone
When creating a pipeline, you have the option of linking the pipeline to a release and milestone. When you link a pipeline to a release/milestone or modify the release/milestone value, all the future runs reported in the context of the pipeline are assigned to the selected release.
The following are recommendations for different scenarios:
| Scenario | Recommendation |
|---|---|
|
Continuous integration pipeline:
|
|
| Feature/story branching |
The CI on these branches would typically not be injected to ALM Octane and should certainly not have a release/milestone. |
| Automated regression cycle | When your release and milestone represent a release and cycle, it is recommended that you link the pipeline to both release and milestone to track results easily. |
Consequences of changing a release or milestone
When you change the Release or Milestone fields for a pipeline, you should be aware of the following significant consequences:
-
A new set of automated runs is created to represent all the tests running in the pipeline.
-
Failure analysis features are based on the history of a single automated run. As a result, when a new automated run is created the accuracy of the failure analysis insights is reduced until relevant history on the new run is built up.
Use parameter sets
Note: The following is supported in Jenkins, TeamCity, Bamboo, and GitLab.
If your CI server job is parameterized, you can define different sets of parameter values that can be used when running the pipeline job. Each pipeline can have multiple sets of parameter values.
For example, suppose that you sometimes run a job on one deployed environment, and other times on another. You can create one data set (Set 1) using the default URL and port, and another (Set 2) with a different URL and port. You can then run the pipeline a few times using different settings.
Note: This requires the Manage parameters permission.
To configure parameters in a pipeline:
-
When creating a pipeline, if its job is parameterized, a table appears showing the parameters configured in the CI server, with their default values.
Note: In GitLab, by default only project-level variables are shown. To also see group or instance variables, modify the gitlab.variables.pipeline.usage property as described in GitLab service.
-
In the column headings, add columns to define additional sets of parameter values.
-
You can rename each column heading as needed.
-
You can edit parameter values in each set of parameters as needed.
Values are limited to 4000 characters, and each set name must be unique.
-
To clone a column, delete it, or reset to its default values, select the relevant menu item in the upper right corner of the column.
-
Click Save.
When you run the pipeline, a dialog appears enabling you to choose which parameter values to use in the run. For details, see Trigger a pipeline run from ALM Octane (Optional).
-
If you change the job's parameters on the CI server, click Sync with CI on the pipeline's Details pane to get the latest parameters defined on the CI server.
Note: ALM Octane currently supports boolean and string parameters only. Invalid types are not displayed.
Customize your pipeline display
If you have a large number of pipelines defined, it may be helpful to show less information using filters.
In the Pipelines module, open the Pipelines tab and use the toolbar above the list of pipelines.
| What do you want to do? | How to do it |
|---|---|
| Filter the list of pipelines to display only the ones you want to work with |
Click the Filter pipelines button If you select a release or milestone in the upper section, the lower section shows you its pipelines. Select the pipelines you want to display. If a filter is active, an orange dot appear next to the filter icon. |
| Select to display less information about each pipeline in the list | Click  to show more or less information about pipelines in the list itself. to show more or less information about pipelines in the list itself. |
 and select the pipelines to display.
Your selection is retained for future sessions.
Tip: Select pipelines for your pipeline run, and configure the run by applying filters and widgets. You can then save the configuration as a Favorite for your pipeline run. Access this configuration by choosing the saved favorite from the Favorites drop down. This allows you to apply the configuration to new pipelines without having to reconfigure the filters and widgets.
Explore a pipeline's graphical representation
When you create a pipeline, ALM Octane creates a graphical representation of the pipeline steps, starting from the root job of the pipeline.
If you are working with Jenkins, Bamboo, or GoCD, you can see the flow of the steps, including which steps run in sequence and which steps run as parts of other steps.
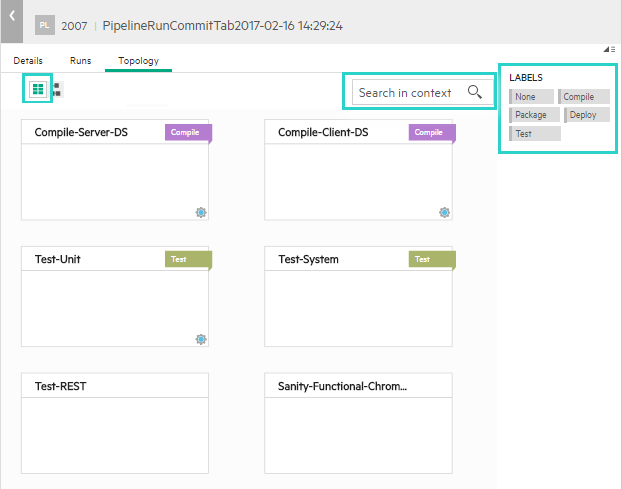
In the Pipelines tab, click on a pipeline. Click the horizontal ellipsis  and click View in the dropdown. The Pipeline PL pages opens. Select the Topology tab.
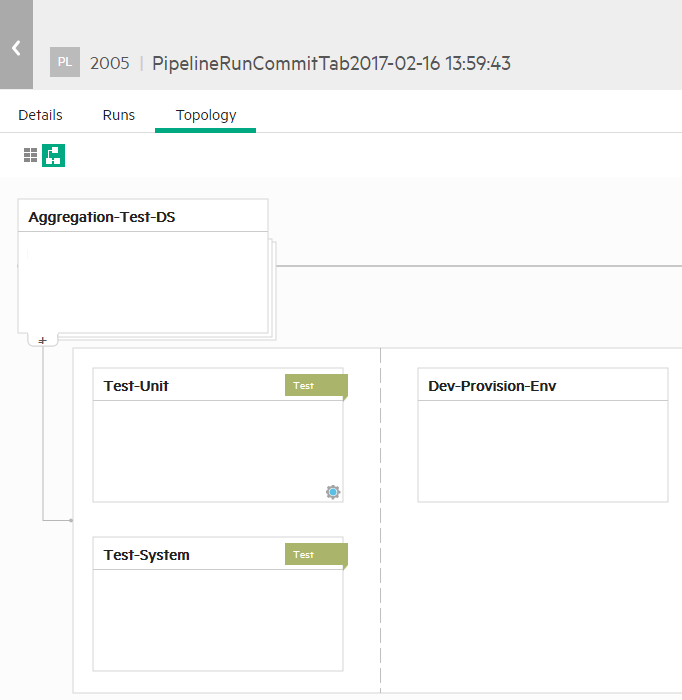
Jenkins example

Note: The pipeline is initially built based on the structure ALM Octane discovers on the CI server. When the pipeline runs on the CI server, ALM Octane adds any additional steps it discovers during the run. You can see these steps the next time you open the pipeline.
Here are visual clues for understanding and working with the display as you explore the pipeline in the Topology tab.
| Visual clue | Description |
|---|---|

|
The pipeline's ID and name. |

|
Click to view the pipeline in a Flat view or Tree view. Tree view. Displays the hierarchy and flow of the pipeline. Flat view. Displays the pipeline steps side by side without describing the hierarchy or flow. This view is useful for gaining an overview of complex pipelines. In this view, you can also filter pipeline steps. For details, see Filter pipeline steps . |
|
A step in the pipeline. Click the step's name to open the job on the CI server. |
  |
For a pipeline that displays hierarchy, click to expand and collapse the steps that run as part of their parent step. (inner jobs) |

|
Steps on the same side of a dotted line run in parallel to each other. (parallel jobs) Steps on the right side of a dotted line run after the steps on its left side end. (sequential jobs) |

|
Steps that run as part of the pipeline. In a pipeline that displays hierarchy, the steps after this arrow run only after the calling step and its children end. (sequential jobs) |

|
Click to label the step type as Compile, Package, Deploy, Security, or Test. |
  |
Click to configure step information, which is added to the pipeline step as a tag. You can use tags later, for example, for filtering test run results. You can specify:
For details, see Define test and test run information. |

|
Click to instruct ALM Octane to redraw the topology based on the current pipeline steps defined on your CI server. This is useful, for example, if you changed the pipeline flow on the CI server a few times and the pipeline structure in ALM Octane includes steps that no longer belong in the flow. When redrawing, ALM Octane attempts to maintain the pipeline step configuration. However, for steps that moved significantly, the configuration may be lost. |
Label pipeline steps by job type
Enhance the pipeline's usability in ALM Octane by labeling steps. This makes it easier to understand the purpose of the steps and provides additional contextual information for test run results.
To label pipeline steps:
-
In the Pipelines tab, click on a pipeline. Click the horizontal ellipsis
and choose View in the dropdown. The Pipeline PL pages opens. Select the Topology tab. -
Click the label at the top right of a step, and select a job type for the step. The label helps you understand the pipeline flow. In the flat pipeline view, you can also filter the pipeline to show only steps with specific labels.
Job types include: Compile, Package, Deploy, Test, and Security.
When the pipeline runs, the labels are added to the resulting builds. When analyzing pipeline run results in the Builds tab, the labels help you understand the context of the builds.
Ignore or hide results of specific steps
Your pipeline may include steps or tests whose results you do not want to track in ALM Octane. You can instruct ALM Octane to ignore such steps or hide their results from the quality analysis.
In a pipeline's Topology tab, click the Configuration button on the bottom right of the step. Then select one of the following options:
Configure pipelines to ignore the status, duration, and test results of certain steps and those that follow them.
For example, a pipeline might include post-build or downstream steps that you do not need to track. If these steps are ignored, the pipeline run status and duration is updated without waiting for them to finish running.
Sometimes, the failure of a specific step's build is not interesting when analyzing pipeline run failures. For example, a parent step's failure is not interesting if it indicates only that the child step failed.
Configure the pipeline step so its build failures are not included in the pipeline's Overview and Builds tabs. This helps focus on the failures that matter.
To hide build failures resulting from specific steps:
| In a pipeline's Topology tab | In a pipeline run's Builds tab |
|---|---|
|
Right-click a build that you want to hide and select Hide builds from this pipeline step. |
Builds resulting from this step are hidden in all pipeline runs.
To unhide a step's build failures:
In the pipeline's Topology tab:
- Click the Configuration button on the bottom right of the step.
- Clear the Hide failed builds when analyzing build failures option.
If a step runs tests that you do not want to track in ALM Octane, select Ignore test run results. When this step runs tests, the results are not sent to ALM Octane, and it does not create the corresponding tests.
For example, we recommend that you use this option to ignore unit tests. This prevents unnecessary load on your ALM Octane, which could result in performance issues.
Specify whether to delete test run results that were previously collected from this step. If all of a test's run results are subsequently deleted, the automated test is deleted as well.
Caution: Deleting test results affects your pipeline's build run history. In addition, failure analysis is not available for steps whose test results are ignored.
In the pipeline's Topology tab, the pipeline step reflects the selected option. For example:
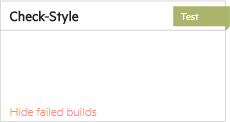
Define test and test run information
For pipeline steps that run tests, add environment tags and testing information for the step.
-
Test Fields and Testing Environments. This adds tags to your pipeline step. When this pipeline step runs tests, its tags are added to the tests, test runs, and builds. You can then filter builds and test run results in ALM Octane according to these tags, and enhance your product and release quality analysis.
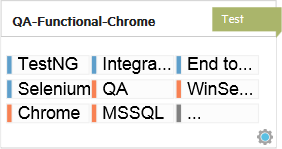
Example: This Jenkins step, QA-Functional-Chrome, is labeled as a Test and has the following tags configured:
-
Test fields: Framework = TestNG, Test type = End to End, Test level = Integration Testing, Testing tool: Selenium.
-
Testing Environment: WinServer2012 (OS), MSSQL (DB), QA (AUT Env), Chrome (Browser).
-
-
Build Report and Test Run Report. If your build creates reports, ALM Octane can add a link to the report in the relevant automated test runs. This report can be stored on your CI server or elsewhere, and may help analyze test run failures.
Configure a URL or URL template for report links in your pipeline step. ALM Octane adds the links to the test runs that are created as part of this pipeline step and to the build that is the result of this step.
To configure a pipeline step:
-
In the Pipelines tab, click on a pipeline. Click the horizontal ellipsis
and choose View in the dropdown. The Pipeline PL pages opens. Select the Topology tab. -
Display the pipeline steps in Flat view and click the
Configuration button in the bottom right of a step. -
In the Test Fields tab, add information about the type of tests the step runs, and the tools and framework it uses to run them.
Select from the predefined values:
Field Possible values Framework Select from the list. Example: JUnit, TestNG, UFT One. Test type One of: Acceptance, End to End, Regression, Sanity, Security, Performance.
Testing tool
Select from the list. Example: Manual Runner, Selenium, UFT One, UFT Developer, LoadRunner Cloud, LoadRunner.
Test level Select from the list. Example: Integration Test, System Test, Unit Test. You can add values to the Framework and Testing tool lists. To do this, add tags to the pipeline step using the API, or the Jenkins plugin UI.
ALM Octane automatically sets the following fields for test runs discovered on Jenkins pipelines:
Field Set for test results from Testing tool
UFT One
LoadRunner
LoadRunner Cloud
LoadRunner Enterprise
Framework UFT One Test type LoadRunner Enterprise If you manually added tags to the pipeline step that runs these test, your tags override the automatic ones.
-
In the Testing Environment tab, you choose environment tags for the pipeline step, such as an operating system, browser, and database.
Environment tags are grouped by category. ALM Octane provides a default list of environment tags. Admins and leaders can also define new environments tags, based on the project developing model. For details, see Environment tags.
Do one of the following:
Goal Action Use an existing environment tag Expand the Environment tags field and select the relevant environment tags.
Start typing in the box to search for a specific value.
Add a custom environment tag -
Expand the Environment tags field, and type the name for the new environment tag. Select the new name and then click on it. The Add Environment Tag box opens.
-
Either select an existing category or add a new category by doing the following:
-
Type in a name for the new category.
-
Double-click on the new value.
-
Example:
-
Add a Lab Machine category with tags for each machine you use for nightly runs.
-
Add environment tags for specific browser versions or development branches.
Create conditions for setting environment tags during the build run, based on build parameter values
In the table, add a row for each environment tag you want to assign dynamically.
In each row, specify:
Parameter name + value ==> Environment tag
Select the build parameter name from the list of build parameters available for this step.
Note:
If you use the Matrix plugin on Jenkins, the pipeline displays child steps, generated during the build run. Each one represents a set of build parameter values.Conditional environment tags are applied to parent steps. These are applied to the generated child steps. You cannot modify a child's configuration.
-
-
Build Reports. In the Report Customization tab's Build Report URL field, enter a URL or a URL template that ALM Octane should use to create a link to reports generated for your builds.
If you include {job_name} and {build_number} placeholders in the template, ALM Octane replaces them in the URL with the relevant job name and build number when creating the link.
For example:
http://myServer:myPort/jenkins/job/{JobName}/{BuildNum}/reports/logs/jenkins-test-reports.htmlALM Octane adds the links to the test runs that are created as part of this pipeline step and to the build that is the result of this step.
-
Test Run Reports. In the Report Customization tab > Test Run Report URL field, enter a URL or a URL template that ALM Octane can use to create a link to reports generated for your test runs.
Note: If you have defined an External Report URL in your CI server, that URL setting overrides the ALM Octane URL definition.
If you include placeholders in the template such as {test_class} and {test_name}, ALM Octane replaces them in the URL with the relevant entity when creating the link.
For example:
http://myServer:myPort/{root_job_name}/{job_name}/{build_number}/{test_component}/{test_package}/{test_class}/{test_name}/{root_job_build_number}/reports/logs/jenkins-test-reports.htmlALM Octane adds the links to the test runs that are created as part of this pipeline step.
Tip: You can select the checkbox Override test run report URL inheritance so that the current job does not inherit the URL format from its parent in the topology.
Filter pipeline steps
Filter a pipeline by label or job name, to display only pipeline steps with a certain label and/or steps with a specific string in their name.
If you set up a filter on a specific pipeline, that filter is used again the next time you view the pipeline.
In the Pipelines tab, click on a pipeline. Click the horizontal ellipsis and choose View in the dropdown. The Pipeline PL pages opens. Select the Topology tab.
In the pipeline flat view:
- Filter by label. Select from the labels on the right to specify the type of pipeline steps you want to see.
- Filter by job name. Type in the context search box to see only steps whose name contains the specified string.
If you filter by label and by job name, the pipeline displays only steps that match both filters.
Delete a pipeline
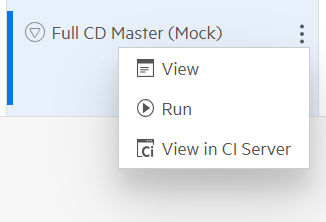
In the Pipelines > Pipelines page, click the vertical ellipsis on a pipeline (in the upper summary bar), and then select View.
When the pipeline's details appear, click Delete and confirm the action.
If you delete a pipeline:
-
All of the pipeline's labels and configuration information are lost.
-
The pipeline runs and the automated test runs from this pipeline are deleted. The automated test entities remain.
Special pipeline types
The following section describes how to work with Pipeline as Code and Multibranch pipelines.
Pipeline as Code
Pipeline stages are shown in the ALM Octane pipeline topology. Tests and commits are linked to the root jobs, as they are in Jenkins. Note that you cannot add tags to stages because tests are linked to the root job.
Multi-branch pipelines
If you are working with supported multi-branch pipelines, ALM Octane automatically creates a corresponding child pipeline whenever a new branch is built for the first time (after the parent pipeline was created). You can use the pipeline's menu commands to filter which branches are shown in ALM Octane.
For example, suppose you have a pipeline in ALM Octane for your master branch, and you create a branch off the master in GIT and run tests on the custom branch. In this case, ALM Octane automatically adds a branch pipeline to the master pipeline, and shows your tests on the branch pipeline. If you merge your branch and delete it, ALM Octane automatically deletes the related pipeline.
Multi-branch is supported as follows:
-
Jenkins plugin from version 5.7, based on Multi-branch pipeline job (Pipeline Multibranch plugin).
-
Bamboo plugin from version 1.9.6, based on plans with branches.
-
GitLab plugin from version 1.1.45, based on repository with branches.
-
Azure DevOps extension.
Note: If you create a pipeline without branches, and then add branches in GitLab, ALM Octane does not reflect this change. In this case, delete the original pipeline and create a new one for the multi-branch plan.
 Next steps: