Share this page


Restore a workspace
This topic describes how to restore a corrupted workspace from backup.
Overview
Data in a workspace may become corrupted for a variety of reasons, such as a power outage, a corrupted operating system, or human error.
The workspace restore utility lets you restore a specific workspace, without having to restore the entire space.
Restoring an individual workspace depends on you having a current snapshot or backup of the space, on the DB level with storage, Elastic, and audit backups. This section describes how to restore your workspace from a recent backup.

Export a workspace from backup
The first step in restoring a corrupted workspace, is to export the corresponding workspace from your company's backup server.
In the backup space, you use the Workspace Export utility to extract the workspace that needs to be restored. The export action generates an .osa file. You import the .osa file into your production space, to restore the corrupted workspace.
To export a specific workspace:
-
Open Settings
 > Spaces. and select the backed up space,
 -
Within the backed up space, select the workspace you want to extract.
-
Click the Export Workspace button
 in the Workspace pane toolbar. The Export Workspace dialog box opens.
 -
Click Export. Wait for the status message to indicate Exported Successfully and for the dialog box to show the Download link and MD5 ID number.
-
Click Download to save the .osa file to your default Download folder. The file name contains the tenant string and version of OpenText Software Delivery Management:
<workspace_name>_<spaceID>_<workspaceID>>_<version-number>.osa.
Restore the corrupted workspace
To restore the corrupted workspace, use the .osa file generated during the workspace export, as described above
The following guidelines apply:
-
The workspace you want to restore, must be the same one as the workspace you exported above.
-
The workspace you want to restore, must be of the same version of as the workspace you exported above. The filename of the .osa file contains the tenant string and version of OpenText Software Delivery Management:
<tenant_string>_<version-number>.osa. - During a restore operation, OpenText Software Delivery Management locks the space, preventing all other users from accessing the space.
- If certain shared entities were removed from the space since the last backup, the restore action will fail, since it will not find the corresponding entities. You will need to manually remove those entities from the backed up space, as described below.
-
If you move an item from one workspace, WS1, to another, WS2, and then attempt to restore WS1 that still contains the moved item, it will fail. This failure occurs since an item with that ID already exists in WS2 into which the item was moved. To continue restoring, do one of the following before reattempting to restore WS1:
-
Delete the item from WS1's database.
-
Move the item back into WS1.
-
Delete the item from the WS2.
-
To restore a workspace:
-
Open Settings
 > Spaces.
 -
Select the workspace you want to restore.
-
Click the Restore Workspace button
 in the Workspace pane toolbar. The Restore Workspace dialog box opens.
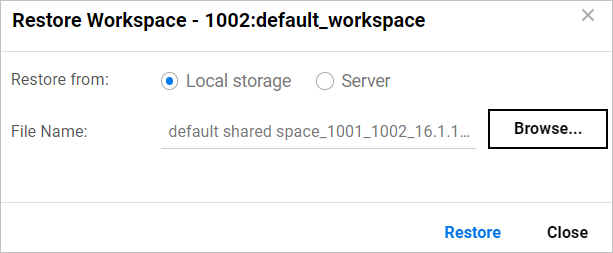
-
Select a Restore from option:
-
Server if the backup .osa file is on the server.
-
Local storage if the .osa file is on the local machine. Browse for the local file.
-
-
Click Restore. The restore engine performs a validation.
-
For shared spaces, if a shared entity was deleted after the backup date and does not exist in the current corrupted version, the validation engine will issue an error. For example, if you deleted a release on the space level after the time of the last backup, you will be unable to continue with the restore. To continue, perform the following:
-
Cancel the current restore operation.
-
Return to your space backup. Manually remove the shared entities that you recently removed from the production space, since the last backup date.
-
After you manually remove the problematic shared entities, re-export the workspace
-
Click the Restore Workspace button
in the Workspace pane toolbar, and repeat the steps above until your restore operation is successful.
-
 See also: