
Share this page


Create workflows
This section provides basic instructions on how to use the Workflow Workbench to create a workflow.
Create a workflow
Use the Workflow Workbench to create a workflow.
To create a workflow from the Workflow Workbench:
-
Log on to PPM.
-
From the menu bar, select Open > Administration > Open Workbench.
-
From the PPM Workbench shortcut bar, select Configuration > Workflows.
-
In the Workflow Workbench window, click New Workflow.
-
From the Workflow Scope list, do one of the following:
-
For Deployment Management packages, select Packages.
-
For Deployment Management releases and distributions, select Release Distributions.
-
-
In the Description field, you can type a short description of the workflow and its purpose.
-
In the Enabled field, select Yes to enable this workflow or No to disable this workflow.
-
Click Save.
Next, add steps to the workflow. For instructions, see Choose workflow steps.

Choose workflow steps
Workflow steps are events that are linked together to form a complete workflow.
PPM comes with the predefined workflow steps available in the Workflow Step Sources window. These workflow steps are grouped into the following types:
| Workflow step type | Description |
|---|---|
| Decisions |
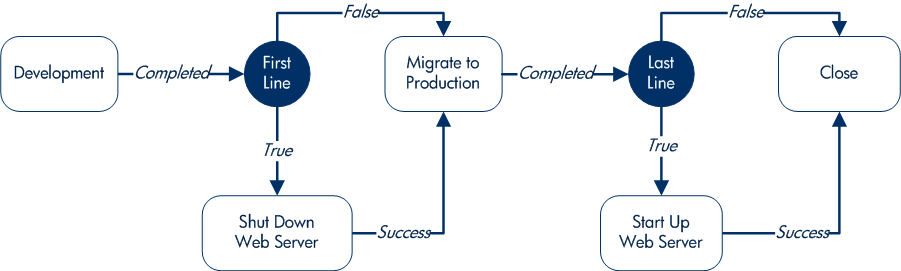
Decision workflow steps represent manual activities performed outside of PPM. Decision workflow steps include such activities as:
|
| Conditions |
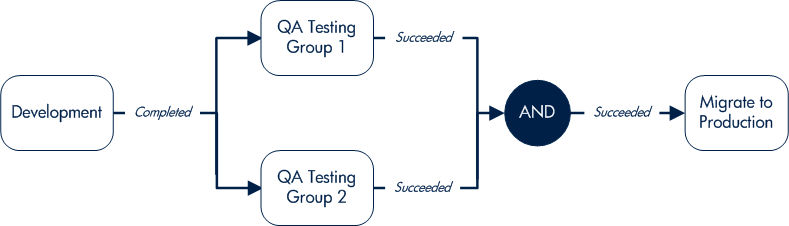
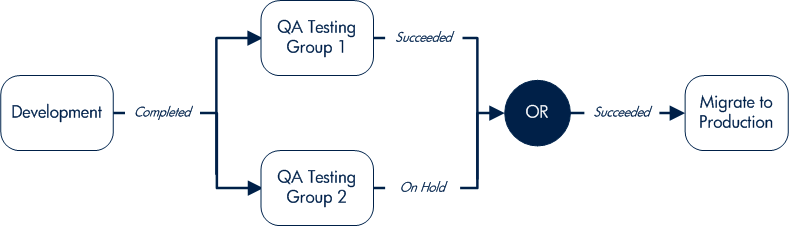
Condition workflow steps are logic steps used for complex workflow processing, such as allowing the workflow to proceed only after each workflow step is completed. The condition workflow steps include the following:
|
| Executions |
Execution workflow steps represent actions that are automated through PPM. Execution workflow steps include such activities as:
|
| Subworkflows |
A subworkflow is a process unit that contains a series of steps that perform a functional subcomponent of a workflow. Subworkflows allow you to model complex business processes in logical, manageable, and reusable subprocesses. Within its parent workflow, each subworkflow is represented as a single workflow step. After the workflow process reaches the subworkflow step, it follows the path defined in that subworkflow. Subworkflows can either end the workflow or return to the parent workflow. Subworkflows have the following restrictions:
|

To evaluate a workflow step and determine which of the workflow types it corresponds to, expand the workflow group, and add the workflow step that best suits your needs to the Layout tab. For instructions, see Choose workflow steps.
Validations determine the values a workflow step can have (see Configure validations for workflow steps ). Check these to see if they meet your requirements for transition to the next workflow step.
Add steps to a workflow
You assemble workflow steps into workflows on the Layout tab of the Workflow window.
To add a step to a workflow:
-
Open the Workflow Workbench of the target workflow, and click the Layout tab.
To the right of the Workflow Workbench, the Workflow Step Sources window contains a library of predefined steps, classified by type. You can use these workflow steps to build your workflows. The window also includes Filter by lists, which you can use to selectively display a subset of available steps.
-
From the first Filter by list, select one of the following:
-
For packages, select Packages.
-
For releases and distributions, select Release Distributions.
-
For requests, select Requests.
-
-
In the second Filter by list, you can select an additional filter condition to further refine the available workflow steps listed.
-
Click New.
-
Click Save.
-
To view the available steps, expand the folders in the Workflow Step Sources window.
Note: For more information on how to select the steps for your workflows, see Choose workflow steps.
-
Determine which step to add as the first step, and then drag and drop it onto the Layout tab.
After you add a step to the Layout tab, the Workflow Step window opens. Use this window to configure the following:
-
General workflow step properties. See Configure properties of a workflow step .
-
Workflow step security. See Configure security for workflow steps.
-
Notifications for the workflow step. See Configure notifications for workflow steps .
-
Timeouts for the workflow step. See Configure timeouts for workflow steps.
-
Step fill color for graphic workflow display. See Add color to workflow steps.
-
Segregation of duties. See Configure segregation of duties for workflow steps.
-
-
After you configure all the steps in the workflow, click OK.
Add a close step
Every workflow must include a close step. A close step is a type of execution workflow step. You can find it in the Executions folder in the Workflow Step Sources window.
You can use one of the following close steps in a workflow:
-
Close (Immediate success). This close step immediately completes a request or package with a status of Success.
-
Close (Manual success). This close step requires manual intervention to complete a request or package and set the request or package status to Success.
-
Close (Immediate failure). This close step immediately completes a request or package with a status of Failure.
You add a close workflow step to a workflow as you add any other type of workflow step.
Configure reopen workflow steps
Users who have the required access grants can reopen closed requests. A reopened request begins at a step specified as the reopen workflow step for the workflow.
To specify a reopen step for a workflow:
-
In the Workflow Workbench, click the Workflow tab.
-
In the Reopen Step list, select the reopen workflow step.
-
Click OK.
Adjust workflow step sequences
After you assemble all the workflow steps on the Layout tab, you can adjust their sequence.
To adjust the sequence of steps in an open workflow:
-
In the Workflow window, click the Step Sequence tab.
The Step Sequence tab lists all the workflow steps.
-
Select a workflow step, and then click the arrows at the bottom of the tab to move the selected workflow step up or down in the display sequence.
-
Click Save.
On the Workflow tab, the First Step field displays the first workflow step.
Verify and enable workflows
To make a workflow available for use, you must verify it, and then enable it. Workflow verification ensures correct workflow logic. Enabling a workflow makes the workflow available to users.
To verify a workflow:
-
From the PPM Workbench shortcut bar, select Configuration > Workflows.
-
Open the workflow that you want to verify.
-
On the Workflow tab, click Verify.
If the verification process uncovers no problems in the logic of the workflow, a message is displayed to indicate that no errors were detected. If the verification process uncovers problems with the workflow, its steps, or its transitions, the Verify window opens and lists the errors.
To enable a workflow:
-
Open the Workflow Workbench.
-
Open the workflow that you want to enable.
The Workflow window opens to the Workflow tab.
-
For the Enabled option, click Yes.
-
Click Save.
 See also:


