
Share this page


Manage users in User Administration Console
This topic provides details on how to manage users in the User Administration Console.
- Note:
- To open the User Management Console, you must have the User Administration license and the Open Workbench access grant.
- To view user list in User Management Console, you must have the View Users access grant.
Create a user
You can create a new user and edit the user information.
To create a new user:
- Log on to PPM.
- From the menu bar, select Open > Administration > Open User Management Console.
- Click Add user at the top of the User Management Console.
-
In the Add a User window, complete the following sections for the user:
Section Details User Information See step 5 and step 6 for field descriptions. Authentication See step 7 and step 8 for field descriptions. License See Assign licenses to users. Security Group To link the user to the security groups that provide functional roles and access grants required:
- Click Edit.
- Select the target security groups from the Available column.
-
Click OK. The security groups that are linked to the user are listed in the Directly Linked Security Groups tab.
A user associated with an organization unit, as defined in the Resource Management functionality, may inherit security group associations. The Security Groups Linked by Organization Association tab lists these security groups.
The Access Grant tab lists the access grants provided by the security groups both directly linked and linked by organization association.
Ownership Select the users or groups that can edit, copy, or deactivate this user.
- To allow all users that have the Edit Users Access Grant to edit the user, select the All users with the Edit Users Access Grant option.
-
To allow users from specific groups to edit the user, do the following:
- Select Only groups listed below that have the Edit Users Access Grant.
- Click Edit.
- Select the security groups.
-
Click OK.
The users in the selected security groups that have the Edit Users Access Grant are able to edit this user.
-
Click Add.

Copy a user
You can also create a user by copying an existing user.
To copy a user:
- From the PPM menu, select Open > Administration > Open User Management Console.
- In the User Management Console, select the user you want to copy.
-
Click the Copy user button. (The icon of the Copy user button may vary between different versions.)
-
In the Copy User window, enter the username and password for the new user.
The new user is created with the information described in Data copied from the original user.
- To change the user information, click the Edit button in the User Information page and make necessary changes.
Data copied from the original user
The following table lists what data is copied from the original user and what data is not copied from the original user.
| Data copied from the original user |
|
| Data not copied from the original user |
|
Example: If you create the user B by copying the user A who is a member of the security group ABC associated with the organization unit XYZ, then B is a member of the security group ABC, but not a member of the organization unit XYZ.
Edit a user
This section describes how to edit the information of a user.
To view and edit a user:
-
From the PPM menu, select Open > Administration > Open User Management Console.
-
Select the user you want to view or edit. The View User page opens in the right pane displaying the user information. You can also search for the user by using filters. For details, see Filter users.
Note: If a user is designated as protected, that user can only be modified by other protected users. For details, see Protected users.
-
Do either of the following to edit the user information:
-
Click the Edit user button in the top-right corner of the View User page, make necessary changes, and then click Save. See Create and edit a user for the field descriptions.
- Double-click the user information field you want to edit, provide a new value, and then click elsewhere to save the changes.
-
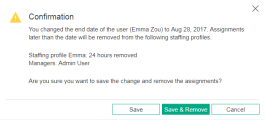
Remove invalid assignments when editing end date
When you change the end date of a user or deactivate a user, the user's assignments that are later than the new end date become invalid.
PPM helps administrators systematically remove these invalid assignments from related staffing profiles, so that the system will not consider the invalid assignments in the cost calculation.
To remove invalid resource assignments systematically when editing a user's end date:
- Save the new end date.
-
In the pop-up warning window that informs you which staffing profiles will have invalid assignments removed, click Save & Remove.
If you click Save, your changes to the user are saved but the invalid assignments are not removed.

Filter users
You can filter users based on some provided criteria.
To filter users:
-
From the PPM menu, select Open > Administration > Open User Management Console.
- Click
 to open the Filter pane.
 -
Provide values in the filter fields and click Search.
The page returns the users that meet the filter criteria.
-
To remove the filter criteria, click
, and then click Clear All and Search.
Deactivate users
You can deactivate a single user or multiple users at a time. After you deactivate a user, the user cannot log on to PPM, and is not listed in the Search Resource result page.
Note: If a user is designated as protected, that user can only be deactivated by other protected users. For details, see Protected users.
Deactivate a single user
To deactivate a single user:
- Log on to PPM.
- From the PPM menu, select Open > Administration > Open User Management Console.
- In the User Management Console page, select the user to open the View User page.
- Click the Edit user button.
- To deactivate the user immediately, select No for the Enabled field. Alternatively, change the value in the End Date field to the current date or a date earlier than the current date.
- To deactivate the user at a future date, change the value in the End Date field to the target date in the future.
-
Click Save.
To deactivate multiple users at a time:
- From the PPM menu, select Open > Administration > Open User Management Console.
- In the User Management Console page, select the users that you want to deactivate and then click the Disable Selected Users button in the top-left corner of the page.
-
In the Disable Selected Users window, select a new date in the End Date field for each listed user.
Note: If the user you selected is already disabled, it is not listed in the Disable Selected Users window.
- To deactivate the selected users immediately, change the end date to the current date or a date earlier than the current date.
- To deactivate the selected users at a future date, change the end date to the target date in the future.
-
Click OK.
Protected users
You can designate specific users as protected. Protected users can only be modified by other protected users. This enhances access control and minimizes the risk of unauthorized access, especially in a SaaS platform.
To designate users as protected:
Add the username or user ID of the user you wish to protect to the PROTECTED_USERS parameter in the server.conf file. Use commas or spaces to separate multiple users.
Alternatively, you can add the username of user ID of the protected users from the following page: https://<web_server><server_port>/itg/web/knta/admin/UpdateProtectedUsers.jsp. This page is accessible only by protected users and admin user (whose user ID is 1)
 See also:

