
Share this page


Purge Stale Data Using the PPM Purge Tool
This section provides detailed instructions on how to use the PPM Purge Tool to purge stale database data.
To purge stale data,
-
Copy and extract the
<PPM_Home>/bin/purge/ppm-purge.zippackage to a different server than the DB server.For security reasons, it is highly recommended that this tool should be installed on a dedicated server that only the tool users with both the SYS DBA and administrator access grants can have access to, rather than on an end-user's machine.
-
(Required if you use BusinessObject on PPM) Stop the capture process of Oracle Streams.
For information about how to stop a capture process, see the Oracle documentation.
- Stop the PPM Server. If in clustered configuration, stop all nodes in the cluster.
-
Set the JAVA_HOME value.
-
To set the JAVA_HOME value in Windows,
Note: The steps described in the following procedure are for Windows 7. The exact steps may differ, depending on your Windows operating system.
-
Open the Control Panel.
-
Open the System window.
-
Click Advanced system settings in the navigation pane.
The System Properties dialog box opens.
-
Click Environment Variables on the Advanced tab.
-
Under System Variables, click New.
The New System Variable dialog box opens.
-
In the Variable name box, type
JAVA_HOME. -
In the Variable Value box, type the full Java install directory path, and click OK.
-
-
To set the value of JAVA_HOME in DOS, run the following:
set JAVA_HOME=<JDK_Home> -
To set the value of
JAVA_HOMEin UNIX using the Bourne shell (SH, BASH, or KSH), run the following:JAVA_HOME=<JDK_Home>; export JAVA_HOME
For more information about setting JAVA_HOME value, see the Verifying that the JAVA_HOME Environment Variable Is Set section in the Installation and Administration Guide.
-
-
Navigate to the
<purge_home>directory that you extracted in step 1, and start the purge tool server.Run the following script to star the purge tool server:
- On Windows system, run the
kPurgeStart.batfile - On Unix system, run the
kPurgeStart.shfile
- On Windows system, run the
-
Open a web browser, type
http://localhost:8080or a specified IP address with access control in the Address bar, and press Enter.Note:
- We recommend you use domain name to access the Purge Tool web server, instead of using IP address.
- The default port is
8080. To use a different port, you can configure the port value in the<ppm_purge_home>/jetty/start.d/http.inifile. - By default, the Purge Tool allows access from the localhost only. However, you can control whether you allow remote access to the Purge Tool or not. For more information, see Restrict Remote Access to the PPM Purge Tool to Specified IP Addresses.
The PPM Purge Tool login page opens in your browser.
-
Configure PPM Server and Oracle database related parameters.
Go to the
<ppm_purge_home>/jetty/confdirectory and configure the parameters in theppminfo.conffile as described in the table below.Note: Only the DB account configured in the
ppminfo.conffile has access to the PPM Purge Tool.Parameter name Description Sample Value DB_USERNAME Username of the PPM database schema for connecting the Oracle database.
It is usually the same as the value of the DB_USERNAME parameter in the
server.conffile.DB_USERNAME= kntaRMI_URL_LIST RMI URL of the PPM Server. When there are multiple PPM Server nodes, the RMI URLs are separated by commas.
See the RMI_URL parameter value in the
server.conffile.RMI_URL= rmi://localhost
:1099/KintanaServerJDBC_URL JDBC URL for the Oracle database.
See the JDBC_URL parameter value in the
server.conffile.JDBC_URL= jdbc:oracle:thin:@localhost:1521:ORCL - Provide the DB account information you just configured in the DB User Name and DB Password fields.
-
Click Login.
The PPM Purge Tool opens to its Database Statistics Overview tab.
The Database Statistics Overview tab dynamically displays the current statistics of all entities found in the Oracle database.
There are two date types available for all the entities: Creation date (default) and Update date. You can choose to display the database statistics overview by Creation date or Update date.
The entities found in the Oracle database are categorized into two statuses for simplification purpose: Open and Closed. The following table describes specific statuses categorized as Closed or Open for each entity type:
Entity Type Closed Open Request (status) - Cancelled
- Closed
- Closed (Approved)
- Closed (Not Approved)
- Closed - Failed
- Closed - Rejected
- Closed – Successful
All the other Request statuses Project (status) - Cancelled
- Closed
- Closed (Approved)
- Closed (Not Approved)
- Closed - Failed
- Closed - Rejected
- Closed – Successful
All the other Project statuses Staffing Profile (status) - Completed
- Cancelled
All the other Staffing Profile statuses Program (status) - Completed
- Cancelled
All the other Program statuses Scenario Comparison (active_flag) N/A All the other Scenario Comparison statuses Timesheet (status) - CANCELLED
- CLOSED
All the other Timesheet statuses Package (status) - Cancelled
- Closed [Failure]
- Closed [Mixed]
- Closed [Success]
All the other Package statuses Release (status) Closed All the other Release statuses Portfolio N/A N/A -
Go to the Run PPM Purge Tool tab.
You can define and add your purge criteria by specifying desired values for the fields on this page. You can add as many criteria as you like.
Note: In case there are any specific data that you want to retain, go to the Allow List tab to specify your retention criteria. Otherwise leave the Allow List tab empty.
-
On the Purge Criteria tab, define system level or entity level purging criteria as described in the following table.
Field Description Date type Specify date type for all entities in the Oracle database by selecting Creation Date or Update date from the Date type drop-down list. Criteria Allows you to define a system level or an entity level purging criteria:
To define a system level purging criterion, select All.
To define an entity level purging criteria, select an entity from the list of supported entities:
- Request
- Project
- Timesheet
- StaffingProfile
- Program
- ScenarioComparison
- Package
- Portfolio
- Release
To specify purging criteria for multiple entities, you need to add them one at a time.
Entity Type Allows you to select All or a specific entity type (if available) for the entities you specify in the Criteria field: Request, Project, Program, or Package.
Note that the available entity type options vary with the entity you select.
Note: This field is not applicable for the following entities: Timesheet, StaffingProfile, ScenarioComparison, Protfolio, and Release.
To specify multiple entity types for an entity, you need to add them one at a time.
Status Allows you to multi-select statuses for the entity type you want to purge.
The available statuses vary with entities you specify in the Criteria field. You can click Check all or Uncheck all to select or deselect all options.
Note: The Status field is not applicable to the Portfolio entity.
The Status field is not applicable when you select All in the Entity Type field.
Date Before Click the calendar icon to select a date. This defines that you want to purge data with their creation date or update date earlier than the specified date (not including data created or updated on the selected date).
You can also manually enter a valid date value.
-
After you have specified a criterion, click Add.
To add multiple entities and/or entity types, you need to add them one at a time.
Note: If you add a criteria that was already added, the new one will override the existing one.
-
If there are any specific data that you want retain from the purging criteria you already specified, go to the Allow List tab and specify the retention criteria.
Otherwise, leave the Allow List tab empty.
-
Review the purging criteria and click Next.
The purge tool starts to identify and add tags to purgeable data.
-
When the purge tool finished identifying and tagging purgeable data, click Next.
The summary page displays an overview of purgeable entities and non-purgeable entities.
Click View Details to view entities that have dependencies.
-
(Optional) Run some SQL scripts in the database to view detailed lists of purgeable entities.
Detailed lists of purgeable entities are not displayed here due to potential large amount of the purgeable entities. However, you can run some SQL scripts in the database to view the detailed lists.
Note: Skip this step if you do not need to view the detailed lists of purgeable entities.
- Log on to the database.
-
Run SQL scripts as described in the table below to view the detailed list of purgeable entities for a concerning entity type.
Entity Type Run the following script Request SELECT * FROM KCRT_REQUESTS T1 WHERE EXISTS(SELECT 1 FROM P_REQUEST T2 WHERE T1.REQUEST_ID=T2.REQUEST_ID)Project SELECT * FROM PM_PROJECTS T1 WHERE EXISTS(SELECT 1 FROM P_PROJECT T2 WHERE T1.PROJECT_ID=T2.PROJECT_ID)Timesheet SELECT * FROM TM_TIME_SHEETS T1 WHERE EXISTS(SELECT 1 FROM P_TIME_SHEET T2 WHERE T1.TIME_SHEET_ID=T2.TIME_SHEET_ID)Staffing Profile SELECT * FROM RSC_STAFFING_PROFILES T1 WHERE EXISTS(SELECT 1 FROM P_STAFFING_PROFILE T2 WHERE T1.STAFFING_PROFILE_ID=T2.STAFFING_PROFILE_ID)Financial Summary SELECT * FROM FM_FINANCIAL_SUMMARY T1 WHERE EXISTS(SELECT 1 FROM P_FINANCIAL_SUMMARY T2 WHERE T1.FINANCIAL_SUMMARY_ID=T2.FINANCIAL_SUMMARY_ID)Portfolio SELECT * FROM PFM_PORTFOLIOS T1 WHERE EXISTS(SELECT 1 FROM P_PORTFOLIO T2 WHERE T1.PORTFOLIO_ID=T2.PORTFOLIO_ID)Program SELECT * FROM PGM_PROGRAMS T1 WHERE EXISTS(SELECT 1 FROM P_PROGRAM T2 WHERE T1.PROGRAM_ID=T2.PROGRAM_ID)Release SELECT * FROM KREL_RELEASES T1 WHERE EXISTS(SELECT 1 FROM P_RELEASE T2 WHERE T1.RELEASE_ID=T2.RELEASE_ID)Package SELECT * FROM KDLV_PACKAGES T1 WHERE EXISTS(SELECT 1 FROM P_PACKAGE T2 WHERE T1.PACKAGE_ID=T2.PACKAGE_ID)
-
Go back to the pre-processing summary page of the PPM Purge Tool, click Next.
The purge tool moves to Step 3. Start Purge page.
-
Follow the screen instructions to create the PPM_PURGE_DIR directory and grant read/write privileges to it.
The PPM_PURGE_DIR directory will hold the external tables that the purge tool created on each run to store the purged data. For example, you can run the following to replace the
/home/oracle/oracle11g/product/11.2.0/dbhome_1/backupdirectory with your own directory on the Oracle database server:CREATE DIRECTORY PPM_PURGE_DIR AS '//home/oracle/oracle11g/product/11.2.0/dbhome_1/backup';
GRANT READ, WRITE ON DIRECTORY PPM_PURGE_DIR TO;
- Check that PPM server or all nodes in the PPM cluster are stopped, and provide comments for the current purge operation in the Messages text box.
-
Click Start Purging.
Wait for the current purging operation to finish.
Caution: We strongly recommend you not to click Logout or move to other tab pages while the purging is in progress.
-
Click Next when purging finishes.
The Purge results <Purge_ID> page displays.
-
To view or download historical purge criteria and summary reports, go to the Purge History tab.
By clicking Download XML, you can download an XML file that contains all purge criteria that you or another DB administrator specified for that purge operation. You can find the XML file as follows:
C:/Users/<User>/Downloads/purgeCriteria_<purge_ID>.xml. Below is the content of the XML file for purge ID 30020: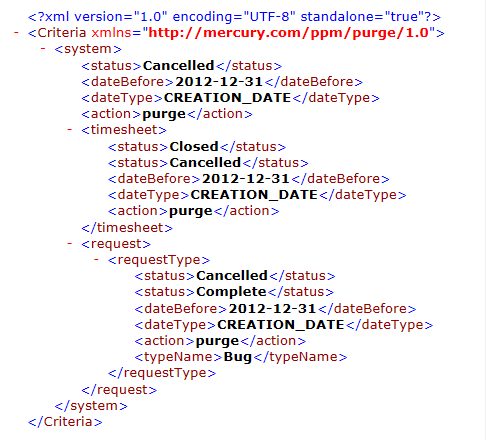
By clicking Summary Report, you can view a snapshot of the database statistics for a purge operation, like the following.
-
(Required if you use BusinessObject on PPM) After the purging is done, perform a full ETL.
For information about how to perform a full ETL, see the Operational Reporting Administrator’s Guide.

