Share this page


Activate Power Mode
When you work with Power Mode, you have access to Sprinter's advanced functionality. This includes data injection (automatically entering data into fields in your application), macros (recording and replaying a set of user actions), and scanners (checking that various aspects of your application behave correctly).
When you are in Power Mode, Sprinter also captures each action you perform on your application and stores the list of these user actions (the actions you perform in your application) in the form of descriptive sentences.
Example:
"Enter "My User" in the "userName" edit field."
"Enter the encrypted password in the "password" edit field."
"Click the "Sign-In" image."
"Select the "New York" item from the "fromPort" combo box."
"Select the "February" item from the "fromMonth" combo box."
"Select the "Paris" item from the "toPort" combo box."
"Select the "March" item from the "toMonth" combo box."
You can view these user actions in your run results or in the Storyboard viewer at the end of your run, which displays each action you performed in your test. You can also include a list of the relevant user actions in any defect you submit to let Sprinter automatically insert a defect scenario.
If you run your test with Power Mode and do not configure data injection or macros, Sprinter will still learn all your user actions, which you can include in defects and view in the Storyboard in the test results.
Once you configure Power Mode to test an application, Sprinter remembers your settings every time you test that application.
You decide that the data injection and macro capabilities will be helpful during your run. You have several forms that need to be filled out just to get to the main screen you need to test, and it will be useful to have Sprinter fill them in for you. You can also use macros to run through some of the initial screens in your application for you and get to the area that requires rigorous testing.
You activate Power Mode by clicking the Power Mode button on the toolbar  .
.
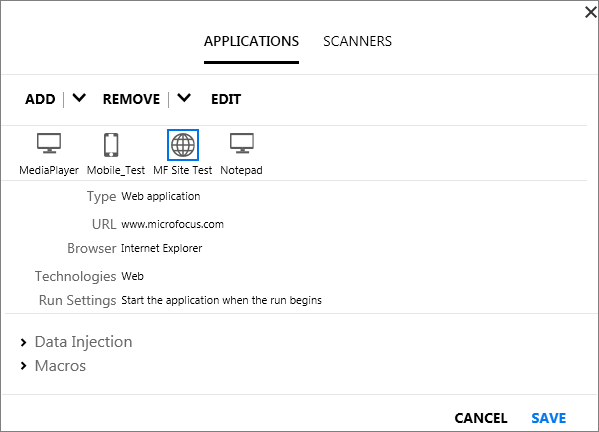
To use Power Mode, you need to define the application for your test. This is the application that you will be testing. By defining an application for your test, Sprinter is able to learn the objects and screens in your application in order to work with the Power Mode features described above.
When you define an application for your test, Sprinter associates all your Power Mode configurations with that application. That means that whenever you run a test in Power Mode and select an application for your test, all the
You click the Setting button  adjacent tot the Power Mode button to display the Application dialog box and define the application for your test.
The travel agency application you will be testing is currently running on your computer, so you click Quick Add, select you application from the list and Sprinter automatically defines the application for you.
Using Data Injection
During the test you are going to run, you will need to enter data into a few forms in your application. To make the data entry process faster and less error-prone, you configure data injection so it can automatically fill the forms in your application with the data from your spreadsheet.
To use data injection, you need to create one or more files (data sets) that contain the data you want to use in your application. The column headings in the data set must match the field names of the fields in your application where you want the data injected. For example, to create a column for a field labeled First name in your application, the column header should be First name.
The data set can be stored in the form of an .xsl, .xslx, or .csv (Comma Separated Values) file. You then associate this file with your application in the Data Injection section of the Power Mode pane.
Now that you've associated this data set with this application, the data set will be automatically available for any test that is configured to use this application.
Using Macros
During the testing process, you may have parts of your test that require performing a series of actions that you want Sprinter to perform for you. There may also be parts of your test that involve performing the same set of actions in multiple areas of your application. Macros perform a series of actions and run them as a single command, which can save testing time and reduce errors.
To create a new macro for your current application, you record the macro while you are performing your test. It will then be available for your current test and for any test that is configured to use this application.
You can view and manage the list of available macros for your application in the Macros section of the Power Mode pane.
Using Scanners
Sprinter's scanners enable you to check whether strings in your application are spelled correctly, whether the application conforms to Web Standards (Web applications only), if there are broken links, or whether the user interface of your application is translated correctly.
You can turn the scanners on or off as needed. Use the Scanners section in the Power Mode pane to turn on the relevant scanners. During the test run, you use the Scanners sidebar to begin a scan.
Now you are ready to Begin Your Run.