Share this page


Create a Test for mobile apps
Sprinter's integration with OpenText Digital Lab lets you create manual tests on mobile devices running mobile apps.
Prerequisites
To allow the integration between Digital Lab and Sprinter, make sure you have access to a Digital Lab server. For details, see the Digital Lab Help Center.

Connect to Digital Lab
Upon startup, Sprinter prompts you to connect with ALM, a UFT license, or Digital Lab.
If you connect via Digital Lab, enter the server details and credentials.
If you connect with ALM, ValueEdge and ALM Octane, or a UFT license, then after you login, you enter the Digital Lab credentials through the Settings dialog box:
-
Click Settings
 .
.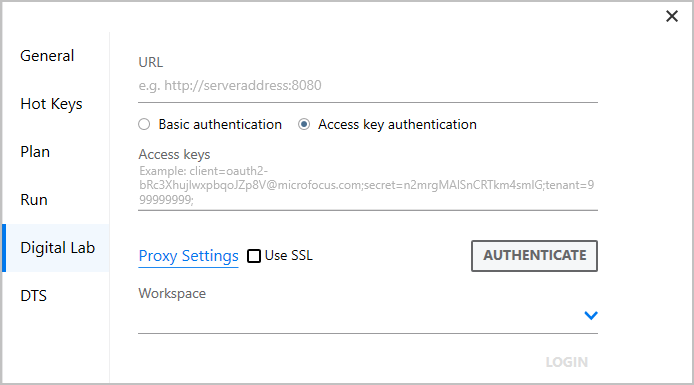
- In the Digital Lab page, enter the address of your Digital Lab server and the credentials.
- Choose authentication method:
- Basic authentication. Connect via a username and password.
- Access key authentication. Connect via an execution access key.
- If the Digital Lab server was installed with secure access (https), select Use SSL. If you did not enable this option, and Authenticate failed, try selecting this option.
Create a manual mobile test
You create your mobile test from Plan mode.
- In Plan mode, create or open a test. Select Steps Capture > Application Settings. The Select Application dialog box opens.
- In the Applications tab, select a mobile app from the existing apps (indicated by the Mobile icon
 , or click Add to add a new one. The Add Application dialog box opens.
 -
When adding a new app, click the Mobile App icon
. (If you logged in via Digital Lab, only the Mobile App icon is shown.)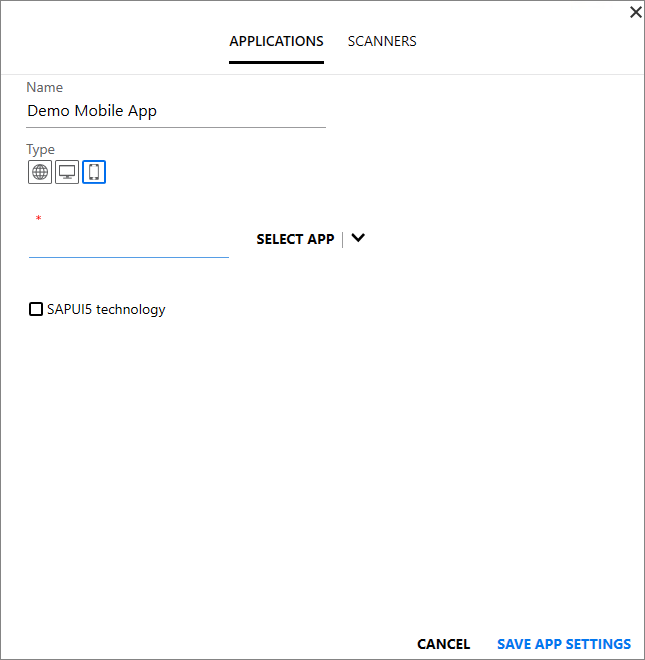
- Enter a name for the application.
-
To test a native app, system app, or the home screen, click Select App. The Digital Lab wizard opens. Follow the three wizard screens to select a device, app, and test options. For details, see Digital Lab wizard.
- To test a web application, click Select Browser from the Select App drop-down. The Digital Lab wizard opens. Follow the three wizard screens to select a device, browser, and device metrics.
- Click Save and Close at the top right corner of the wizard window.
-
(Optional) Select SAPUI5 technology if you are working with SAPUI5 technology in mobile applications. Sprinter launches the application with the SAP UFT agent in order to record all of the controls.
- Click Save App Settings in the Add Application dialog box and Close in the Select Application dialog box.
-
Select Steps Capture > Capture Steps. The Digital Lab remote view opens.
Tip: The actions are captured in the step. Create a new step for each group of actions using the New Step button
 in the Captured Steps sidebar.
 - After the remote view loads and installs the apps, begin performing actions on your device. Interact with your device and enter simulations. For information, see the Control Panel in the Digital Lab Help Center.
-
Use the Capture sidebar to save snapshots for your step.
Note: The snapshot shows the image before the execution of the action.
- End your capture session and proceed as you would with any other test. For details, see Author a test or component.
 See also: