Share this page


Record and run macros
This topic describes how to work with Sprinter macros.
Macros overview
During the testing process, you may have parts of your test that require performing a series of user actions that you want Sprinter to perform for you. You may also have parts of your test that involve performing the same set of actions in multiple areas of your application. Having Sprinter perform the set of actions can save testing time and reduce errors.
A macro is a series of actions that you can save and run as a single command.
Sprinter can perform these actions for you when you create and run macros.
For example, you may want to use macros to:
-
Automate a login procedure.
-
Perform a series of introductory steps to set up your application for testing.
Sprinter only saves a macro if it contains at least one user action. Your user actions are only recorded after they are completed. For edit boxes and combo boxes, the action is not complete, and will not be recorded until you move the focus off the box.

Record macros
This topic describes how to use macros to have Sprinter perform a series of user actions in your test and run them as a single command.
 Macros can be used only in tests run in Power Mode.
To record or run a macro:
-
In Run mode, make sure that Power Mode is active, as indicated by a green indicator. Click Run or choose Run selected test. The Run screen opens. Expand the Macros sidebar. For details, see the relevant steps in Prepare a test to run in Power Mode.
-
Record a macro
If your application already has a macro associated with it that you want to run, you can skip this step.
-
In the Macros sidebar click the Record button
 .
. -
Perform the actions you want to include in your macro.
-
In the Macros sidebar, click the Stop button
 . The Macro Details Dialog Box opens.
 -
Set the definitions for your macro and save it. For details, see Macro Details dialog box.
-
-
Run a macro
-
For best results, close the instance of the application upon which the macro was recorded. Allow Power Mode to reopen the application.
-
In the Macros sidebar select the macro you want to run from the macros drop-down list.
-
In the Macros sidebar click the Run button
 .
. -
The Macros sidebar displays an icon in its tab indicating the progress and success or failure of the macro. Click the icon for more details.
-
Macros sidebar
Relevant for Power Mode only
This sidebar enables you to record and run macros during your test run.
| UI Example | 
Click thumbnail to view full size image. |
| To access |
During a test run, click the Macros sidebar tab.
|
| See also |
 icon.
icon. User interface elements are described below (unlabeled elements are shown in angle brackets):
|
UI Elements |
Description |
|---|---|
|
|
Record/Stop. Starts and stops recording user actions you perform in your application. Each defined app has its own macros. Remember to select the desired application using the Application Settings button When you stop recording, the Macro Details dialog box opens, enabling you to name and save your macro. |
|
|
Run. Runs the selected macro from the macros drop-down list. |
| <Macros drop-down list> |
The list of macros you can run in this test. Sprinter associates macros with the application for which they were created. |
| <Macros status> |
The Macros sidebar displays an icon in its tab indicating the progress of the macro and the success or failure of a macro that was run. Click the icon for more details. |
Macros pane
The Macros pane displays the macros that are associated with the currently selected application.
To view the Macros pane, click the Application Settings button  and expand the Macros section.
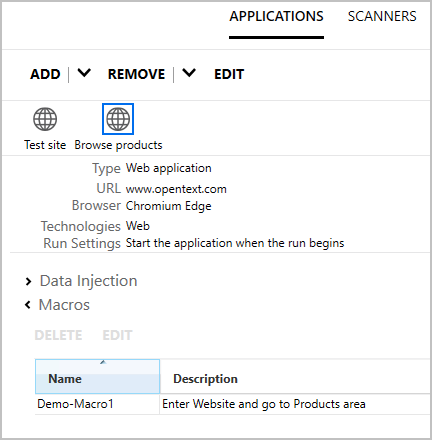
- Click Delete to remove the selected macro.
- Click Edit to open the Macro Details dialog box.
Macro Details dialog box
Relevant for Power Mode only
This dialog box enables you to name your macro and view and edit its details.
To open the Macros Details dialog box, do one of the following:
-
After recording a new macro click the Macros sidebar > Stop button
. -
In the main window, enter Run mode and click the Application Settings button
. Expand the Macros section, select a macro and click Edit.
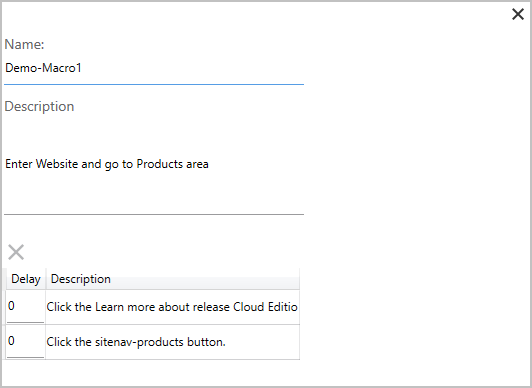
This dialog box lets you:
- Edit the name and description of the macro.
- Edit the description of each step in the macro.
- Delete a step in the macro, by selecting the step and clicking X.
- Insert a step delay in seconds, by entering a number in the step's Delay column.
Troubleshoot macros
This section describes troubleshooting tips and limitations for macros.
-
Gestures in macros can only be recorded and replayed for objects.
-
Macros recorded on Mobile Web for Android cannot be replayed on Mobile Web for iOS. Macros recorded on Mobile Web for iOS cannot be replayed on Mobile Web for Android.