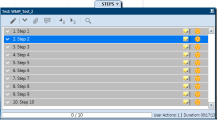
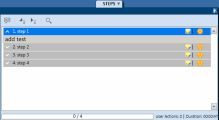
Steps sidebar
This sidebar enables you to navigate, mark, and edit the steps in your test.
For OpenText Application Quality Management users: If you are running a Business Process Test, the Steps sidebar displays the test hierarchy and components in an additional pane on the left. The Steps display area displays the steps for the selected component.
The Steps sidebar contains the following elements:
User interface elements are described below:
|
UI Elements |
Description |
|---|---|
| <Title bar> |
The title bar of the Steps sidebar displays the test name. For OpenText Application Quality Management users, this is the name |

|
Pass Selected Steps. (Default) Marks the selected steps as Passed. (Ctrl-click to select multiple steps.) Click on the down arrow for the following options:
|

|
Fail Selected Steps. (Default) Marks the selected steps as Failed. (Ctrl-click to select multiple steps.) Click on the down arrow for the following options:
|

|
Actual Result. Enables you to modify the actual result and/or add a regular or annotated screen capture to the actual result. For details, see the Actual Result dialog box If your steps have user defined fields from OpenText Application Quality Management, they can be edited in the Actual Result dialog box. |

|
Edit Step. Opens the Edit Steps dialog box. Click the down-arrow for the following options:
|

|
Attachments. |

|
Previous Component (Business Process Tests only). Returns the right pane and the Steps display area to the previous component. |

|
Next Component (Business Process Tests only). Advances the right pane and the Steps display area to the next component. |

|
Parameters mode (Business Process Tests only). Displays and enables you to edit the actual values of the parameters for the component selected in the left pane. |

|
Show Subtitles. Displays the steps, as an on-screen subtitle. For details on working with subtitles, see Subtitles toolbar. |

|
Expand All. Expands all the steps in the Steps display area. |

|
Collapse All. Collapses all the steps in the Steps display area. |

|
Find. Enables you to search the steps for specific text.
|
This area displays the steps in the current run.
For OpenText Application Quality Management users:
-
When you start a run, the Steps display area displays the first step expanded. If you switch to another run that you have not yet completed, the last step you marked is expanded.
-
When you set the status of a step, the Steps display area automatically advances to the next step in the test.
User interface elements are described below (unlabeled elements are shown in angle brackets):
|
UI Elements |
Description |
|---|---|

|
Expand/Collapse. Expands or collapses the selected step. When the step is expanded, the name, description, and expected results are displayed. |

|
Status. Displays a drop-down list that enables you to set the status of the step. Default status values:
Note: For OpenText Application Quality Management users, in addition to the default status items above, the list includes any user-defined statuses defined for your project. For details on user-defined statuses, see the Application Lifecycle Management Administrator Guide. Tip: You can Ctrl-click to select multiple steps and then use the one of the selections in the drop-down list to set the status of all the selected steps. |
| <Step content> |
When a step is expanded, the following fields are displayed:
Double-clicking the icon opens the attachment in your default program for that file type. For images, moving the pointer over the icon displays a preview of the attachment. |
User interface elements are described below (unlabeled elements are shown in angle brackets):
|
UI Elements |
Description |
|---|---|
| <Steps status bar> |
Displays a progress bar and text indicating the number of steps that do not have a status of No Run, out of the total number of steps. |
| User Actions |
Displays the number of user actions performed in the current test run. |
| Duration |
Displays the amount of time spent on the current run. The Duration counter resets to 0 when you move between runs in the Run Control sidebar. |


 icon. To reposition the sidebar, click and drag on the sidebar header.
  Passed. The step passed.
 Failed. The step failed.
 Blocked. The step is blocked.
 Not Completed. The step was paused in the middle of the run.
 N/A. Current status is not applicable.


