Share this page


Docker containers
Deploy and configure a Docker container for Linux to load test your secure applications.
Note: The Docker client (engine) must be installed on each host machine where you want to install the LoadRunner Cloud Docker container.
System requirements
This following table lists the recommended processor and memory for deploying a Docker container on Linux. The actual memory, CPU, and free disk space requirements vary per protocol, system under test, and script characteristics.
| Processor |
8 core CPU (recommended) |
| Memory |
16 GB (recommended) |

Notes and limitations
The following notes and limitations apply to Docker containers:
| Limitation/Note | Solution |
|---|---|
| Date and time |
Ensure that the date and time on the load generator machine are correct. Tip: Synchronize your computer clock with an Internet time server. |
| Connection between LGs and LoadRunner Cloud |
The load generator machine needs to be able to access the LoadRunner Cloud servers in SaaS and the cloud machines. (Only outbound HTTPS connection on port 443 needs to be enabled.) If there is no connection between LoadRunner Cloud servers and the Load Generator (on-premises load generator Status=Not Connected), an error message is reported when you try to run your test. If you receive a system error -1030, check the network connectivity between your on-premises load generator and the cloud (AWS). Also ensure that outbound communication over port 443 is enabled. If your company's security or firewall requires static allocated IP addresses,submit a service request to request them. |
| One test per load generator |
The load generator can run only one test at a time. If the required load generator is already in use by another test, an error message is reported when you try to run your test. |
| Vusers |
Vusers in your on-premises load test cannot exceed the maximum number of Vusers in your license. |
Supported protocols
Beginning with version 2020.10, the revised Docker image contains OneLG, the on-premises load generator installation for all of the LoadRunner family products.
The Docker image supports the following script protocols:
- Gatling
- Java over HTTP
- Java Record Replay
- Java Vuser
- JMeter
- Kafka
- Mobile HTTP
- MQTT
- Oracle NCA
- Oracle - Web
- SAP - Web
- TruAPI
- DevWeb
- Web HTTP/HTML
- Windows Sockets
For details about the supported protocol versions, see Support Matrix.
Deploy and configure the Docker container from Docker Hub
From LoadRunner Cloud version 2020.10, the microfocus_onelg_linux_ubuntu repository contains the OneLG image.
To deploy and configure the Docker container using the microfocus_onelg_linux_ubuntu image:
| Action | How to |
|---|---|
| Pull Docker image |
Pull the OneLG Docker image from Docker Hub:
|
| Launch a container |
Type the following command: To create the container in background/detached mode: docker run -d \
-e "STORM_TENANT=<your tenant id>" \
-e "STORM_USERNAME=<your user name>" \
-e "STORM_PASSWORD=<your password>" \
--net=host performancetesting/microfocus_onelg_linux_ubuntu
To run the container in the foreground: docker run -t -i \
-e "STORM_TENANT=<your tenant id>" \
-e "STORM_USERNAME=<your user name>" \
-e "STORM_PASSWORD=<your password>" \
--net=host performancetesting/microfocus_onelg_linux_ubuntu
To enable JMeter or Gatling on the load generator, add the variable "ENABLE_JMETER=1" or "ENABLE_GATLING=1" to the command. For example: " docker run -d -e ENABLE_JMETER=1 -e ENABLE_GATLING=1 ...." |
| Launch a container with HTTP(s) proxy |
Type the following command:
      docker run -d \
      -e "STORM_TENANT=<your tenant id>" \
      -e "STORM_USERNAME=<your user name>" \
      -e "STORM_PASSWORD=<your password>" \
      -e "http_proxy=<your proxy url e.g. http://proxy.com>" \
      -e "https_proxy=<your proxy url e.g. http://proxy.com>" \
      --net=host performancetesting/microfocus_onelg_linux_ubuntu
|
| Environment variables |
You can also pass environment variables using the --env-file command line parameter.
|
Manually deploy and configure a Docker container
You can manually deploy the Docker container.
| Action | How to |
|---|---|
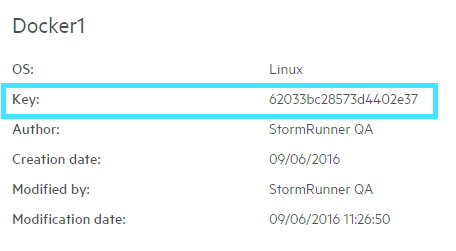
| Define your LoadRunner Cloud load generator in LoadRunner Cloud and note the key: |
|
| Create the container |
For the new microfocus_onelg_linux_ubuntu image, run: docker run -t -i \
-e "STORM_DISABLE_AUTO_REGISTER=1" \
--net=host performancetesting/microfocus_onelg_linux_ubuntu
The current working folder is: |
| Edit the sample_conf.json |
Add your load generator key and your credentials to the {
"key": "<YOUR KEY>",
"interval": 20000,
"logLevel": "info",
"server": {
"protocol": "https:",
"addr": "loadrunner-cloud.saas.microfocus.com",
"user": "<YOUR USERNAME>",
"password": "<YOUR PASSWORD>",
"tenant": "<YOUR TENANTID>"
},
"injector": {
"rootPath": "../injector_mdrv"
}
}
Note: You can get the LRC server address by coping the URL from the address bar of the browser in which you opened LoadRunner Cloud. For example, if the URL in the address bar of the browser is |
| Launch the container |
Type the following command:
|
Run a test using a Docker container
| Action | How to |
|---|---|
| Create a test |
From LoadRunner Cloud > Load tests, select a load test or create a new test. |
| Select On-premises as the location of the load generators |
From the Load profile tab, select a script and then select On-premises from the Location drop-down list.
|
| Add a load generator |
From the Load distribution tab, click On-premises and then click |

 Add from Assets to select the on-premises
 Create and view logs
You can create and view test run logs.
Create a log
To use the Docker container to create logs, launch the container with the -r or --reserveTestLog flag. For example:
Example: docker run -d -e STORM_AGENT_EXTRA_CONFIG='--reserveTestLog'
Logs are saved in the inj_o_*** folders under /storm.
View logs
You can view logs from within a running Docker container, or copy the logs to your local file system.
-
View logs from within a running Docker container
- Run the command:
docker exec -t -i <container ID> /bin/bash - Enter the /storm folder and check the required log.
- Run the command:
-
Copy logs to your local file system
Run the command:
docker cp <container ID>:/storm /tmp/In this instance, the logs are copied to the tmp folder in your local file system.